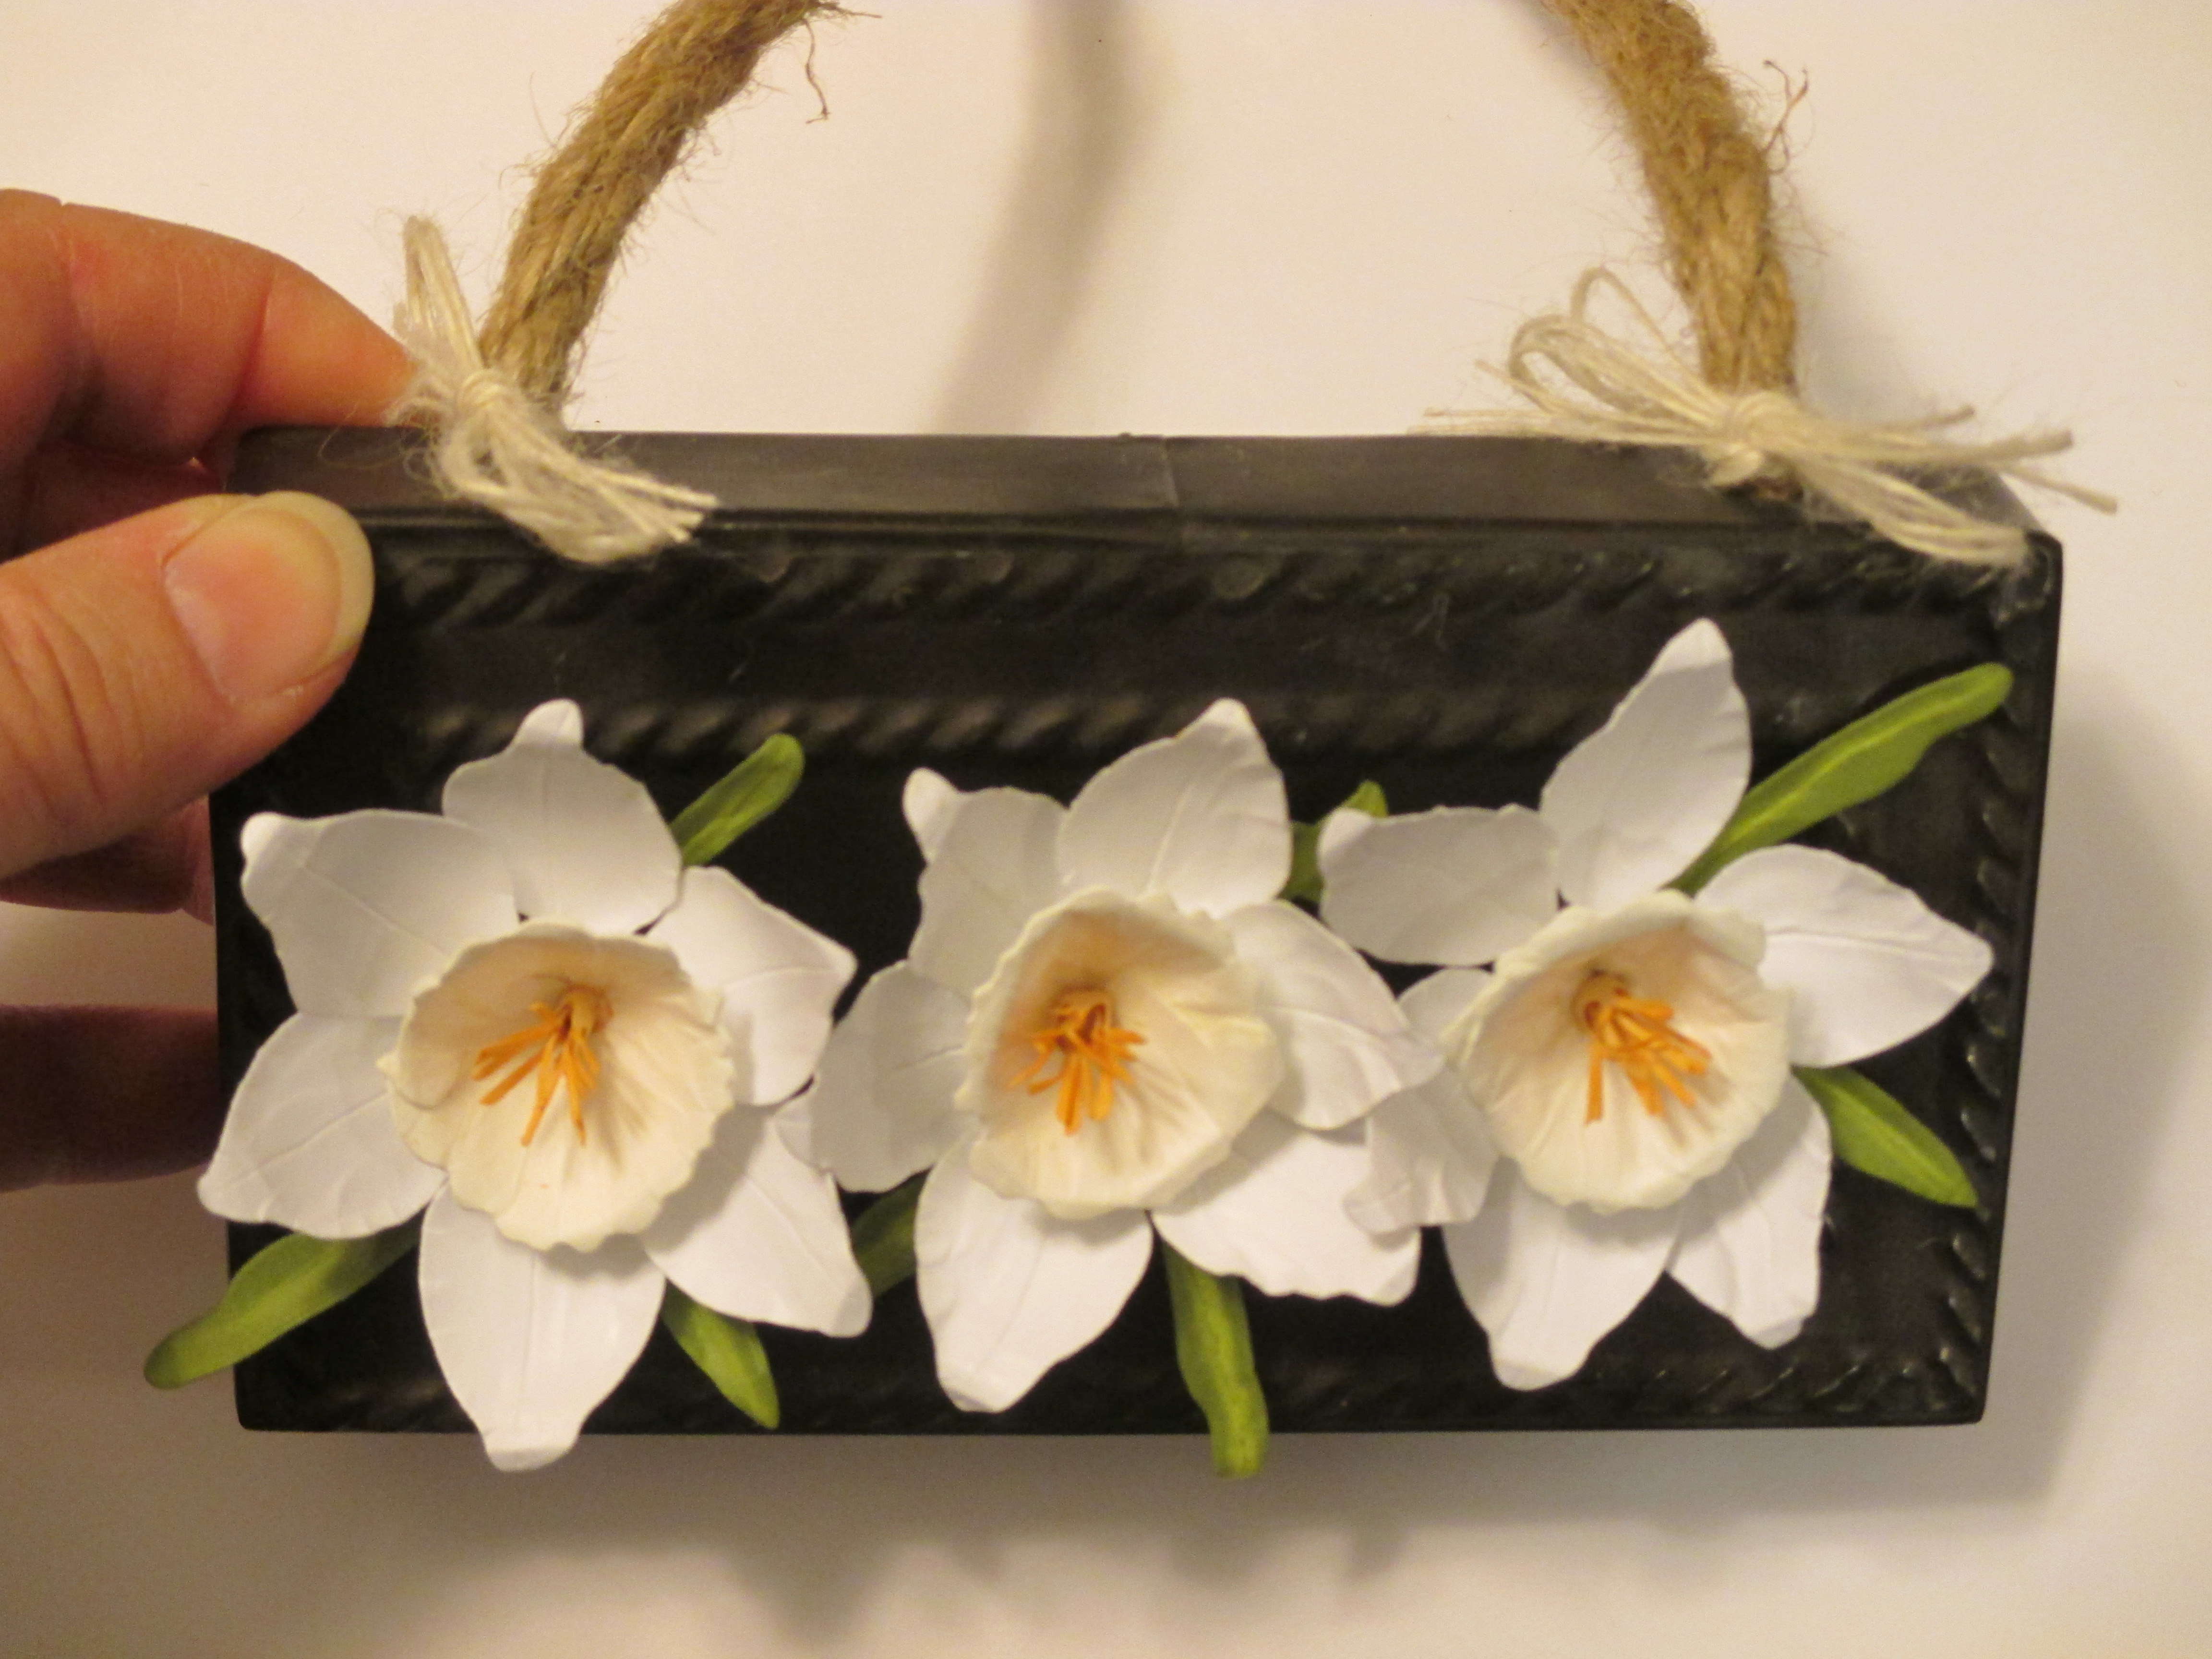
Today I want to show you a gift that I made using Sizzix Susan’s GardenNarcissus/Paperwhites dies. Paperwhites are beautiful flowers that can bloom indoors in the worst of winters. They add such beauty and fragrance, as well as a reminder that spring is just around the corner. This year I received a Thanksgiving gift of some paper white bulbs. It was such fun to watch them grow – very quickly they were more than three feet tall. The blooms were lovely and fragrant. I’ve included pictures below of the real flowers, as well as my interpretation.
Paperwhites are very easy to assemble using the Sizzix die set. First, I cut the pieces from the appropriate colors of cardstock. I used a nice smooth heavy-weight (80lb.) cardstock to get the best results. Lighter weight cardstocks or cardstocks that have a linen finish (or other rough finish) do not work as well. The die set contains twelve dies – only one piece cut from each is needed to complete the flower. I used my Sizzix Big Kick to cut the pieces. These are the Thinlits dies, so there should be no difficulty using them in any die cutting machine.
Once the pieces were cut, it was simple to follow the directions from the Sizzix website to assemble the flowers. Click on this link to access the instructions. It is important to have the proper tools and mats in order to mold the paper appropriately. I used the Sizzix Susan’s Garden tool set which includes the needed tools and mats to make any of the Susan’s Garden flowers. The McGill flower-making tools will also work so long as you have both sets (including mats). Note that where the instructions tell you to add adhesive to the stamens and dip in Woodland Scenic pollen, I did not use the adhesive or the pollen. I just added a little orange Pan Pastel to the ends of the stamens for a more subtle color. Please see the short video for a discussion of the tools and other supplies needed to successfully complete the flowers.
The most important thing in making the flowers is to take your time and work through assembly of the first flower. Any flowers you do after that will be so much simpler and quicker. Sizzix and the designer, Susan Tierney Cockburn, do such a nice job of breaking down the steps for making beautiful paper interpretations of the flowers that we love so much. They are quite simple and so much fun to make!
Once the flowers were complete, it was very easy to attach them to the chalkboard frame using a little bit of Scor-Tape by Scor-Pal. I tied a few strands of ivory burlap string to the burlap rope hanger on the chalkboard frame for added decoration. This ended up being a very quick and easy project.
Supply List:
Sizzix Susan’s Garden paperwhite/narcissus dies set
Die cutting machine – I used my Sizzix Big Kick
Cardstock – white, cream, yellow and green
Flower tool set and mats – I used the Sizzix Susan’s Garden tool set
Small chalkboard frame
Adhesive – I used Scotch Quick Dry Adhesive and Scor-Tape by Scor-Pal
Pastels – I used orange (stamens) and bright yellow green (leaves) Pan Pastels
May Arts ivory burlap string
Scissors
The featured supplies are available at Cut at Home or at your local paper crafting shop. My fave is Bayers Pampered Stampers in Toledo, Ohio. Links for both are in the Blogroll above.
Tuesday was Mardi Gras, or “Fat Tuesday” so for fun I created this Mardi Gras card using Spellbinders Venetian Accents die. In certain parts of the country, that means a day of parades and masks and beads and lots of fun. In my part of the country, it is paczki day – a day to overindulge in a traditional Polish jelly donut like creation (paczki are actually richer and heavier than a jelly donut). Regardless of how you celebrate, I wanted to make a card to mark the occasion.
This is a very simple card, and of course you could dress it up more if you prefer. I started by making the components. The masks are cut from the really fun Spellbinders die set, “Venetian Accents”. This is a very detailed die, so you may need to run it through your die cutting machine a couple of times to get a complete cut. Using wax paper between the die and the paper will help a lot when it comes to removing the finished piece from the die. Be sure to do the embossing step. This will give the mask its wonderful detail. I cut masks from both green and purple cardstock. Once the masks were cut, I used “goldrush” Smooch Glitz to add the glitter on the center crown area. For the scrollwork at the sides, I used “lime twist” Smooch Glitz to add glitter. You may need to do several coats of both in order to get good coverage. Be sure to let each dry thoroughly before adding rhinestones to finish the mask. At this point you can also begin to think about shaping the mask – bending it gently with your fingers in order to achieve dimension for the card.
My next task was to string the beads. I used purple, gold and green “E” beads. These should be readily available in the jewelry section of your favorite craft store. “E” beads are larger than seed beads, so are quicker and easier to string. I made two strands of 36-beads for each color.
In New Orleans, the greeting for today is “laissez les bons temps rouler” – “let the good times roll”. That is the inspiration for the sentiment I used. I didn’t have an appropriate stamp, so I typed it into my computer, changed the font several times until I found one I liked, and changed the color of the letters to purple. When I was happy with the result, I simply printed the sentiment onto white cardstock.
I cut and assembled the following layers for the card front – 1) a green layer, 5” x 7”; 2) a yellow-gold layer, 4.5” x 6.5”; and 3) a purple layer 4” x 6” (note that this is a lighter shade of purple than I used for the mask – I wanted to be sure that the purple mask showed against the background). I used Scor-Tape to attach the layers. I used a combination of Scor-Tape and low dimensional adhesive to attach the masks to the card front. I placed the adhesive on the back of the mask, and when placing the mask on the cardstock, used my fingers to push it into place (adding dimension, not flattening it). I used small drops of Scotch Quick-Dry Adhesive to attach the beads to the card front. The sentiment was attached with Scor-Tape.
Regardless of how you celebrate, I hope you have a great Mardi Gras!
Supply List:
Spellbinders Venetian Accents die set
Die cutting machine – I used my Spellbinders Grand Calibur
Purple, green and yellow-gold cardstock – two shades of purple, a dark one for the mask, and a lighter shade for the card front
The featured supplies are available at Cut at Home or from your local paper crafting shop. My fave is Bayers Pampered Stampers in Toledo, Ohio. Links for both are in my blogroll above.
My project today is a pretty violet gift box featuring a Sizzix die by designer Eileen Hull and Sweet Sentiments papers by Graphic 45. Two weeks ago my blog post featured this die too – at that time I made some very quick, “plain jane” cupcake boxes. The violet gift box is the “dressed up” version – still easy peasy, but what a nice result! (I’ve included a link below to the cupcake box post).
This Sizzix die, like many of the Bigz dies, is specially designed to cut through heavier materials like chipboard, etc. This time I wanted a sturdy box that would stand the test of time, so I selected 50pt. chipboard as the base material. This cuts so easily on my Sizzix Big Kick! It is really no different than cutting through a layer of cardstock. I love being able to use a wider variety of materials without worrying about whether the machine can “handle it”. The Big Kick (or Big Shot – pretty much the same machine, just a slightly different design) certainly can! The square box die also scores as it cuts (no special mats, etc. needed for this), so that is also a time-saving step. I just needed to cut 2 of the 3-panel pieces, and I was ready to start assembling.
Assembly for the more dressed up box includes a couple of additional steps. The first is to paint certain areas of the chipboard in a coordinating color so that at the seams and folds where it might show, the chipboard looks less like chipboard and more like an extension of the paper covering it. I like to use the dabber-top paints for this purpose. The paint that I used on my box was a Jenni Bowlin paint by Ranger, but the Tim Holtz Distress Paints would also work very well for this purpose. I selected the paint to coordinate with my paper for the outside (the violets). The liner paper is also okay with the ivory, so there is no need to change the paints between the sides (if you do find this necessary, paint only the inside seams with the liner color). Chipboard soaks in a lot of paint, so I did find it necessary to do a second coat on everything. I painted the seams or folds on both the inside and outside of the box panel (including the seam at the flap), and all the way around the outside of the box piece. The dabber paints dry very quickly, so you can quickly move on with the project.
I chose to line this box so it would be pretty inside and out. The first step in lining is to line the flaps. The focus here is only on the inside flaps (the outside flaps are the ones that are covered with Scor-Tape and hold the box together). In addition to the inner flaps, you’ll have to cover the top flap of the box (the only one that is not used to make the box structure). To cover the flaps, I start with a piece of paper 3.25” x 1”. I place this against the flap, and fold it accordingly (you’ll fold the paper differently for the outside of the top flap than you will for the inner flaps). Once you have the fold line in place, remove the paper, crease it well, and use Scor-Tape to adhere it to the chipboard. You’ll notice that the flap coverings have square corners, where the box itself has slightly rounded corners. It is very easy to use your good paper cutting scissors to trim that edge along the appropriate curve, using the chipboard as a guide. As an alternative, you could cut these flap liners with the die, but I’m a little concerned that the scoring might be too much for them.
Once the appropriate flaps are covered (the 4 inside flaps, and the top outside flap), it is time to line the inside of the box. I selected a paper from the Graphic 45 Sweet Sentiments collection that coordinated with the violets to do this. Often it is helpful to pick a small overall pattern, such as a polka dot, since the joins, etc. won’t show or become offensive in the confined space inside the box. You’ll need six panels that measure just under 3-1/4” x 3-1/4” (cut them about 1/16” shorter to allow some additional room when the chipboard folds). If you cut exactly at 3-1/4″ x 3-1/4″, the lining paper may buckle or fold at the seams and cause problems later on in the process. I used ¼” Scor-Tape to attach the paper to the chipboard.
When the lining is in place, it is time to assemble the box. To assemble, fold the panels and the tabs along the score lines. Add ½” Scor-Tape to the two tabs at the end of one of the panels, and just one of the tabs on the other panel (the one that is already covered with paper on the outside should not be covered with Scor-Tape). Remove the Scor-Tape liner from the panel that has only the one piece of Scor-Tape, and then placed that tab in the center of the other box panel. It is important to take your time for this step, making sure to get the tab and the panel lined up properly (the Scor-Tape sticks pretty hard and won’t easily adjust if your alignment isn’t correct). Then, one at a time, remove the liner from the two remaining tabs. Fold the panel up along side it, carefully trying to line up the box side and the tab. Repeat for the other side. That’s it . . . the box is assembled.
Now it’s time to cover the box with the patterned paper. I cut six panels, 3-1/4” square. Carefully adhere these to each side of the box with 1-4” Scor-Tape. By adding the paper this way, you can control the overall appearance of the box, making sure that directional patterns, etc. are all going in the right way. The violet paper that I chose is from the Graphic 45 Sweet Sentiments collection, is pretty much an overall pattern, and doesn’t really need much matching. If you have a paper that does need to be matched, then you’ll need to cut the squares carefully so that they line up when added to the box. The alternative to covering the box this way is to cover the chipboard before you cut the box. If you do it that way, you’ll need to think through how the patterned paper needs to be placed in order to achieve a good finished appearance. The overall appearance of the box is pretty much the same regardless of your method for attaching the patterned paper. Please see the short video for additional information about the box assembly.
To finish the box, I first added the “feet”. I used crystal AB glass beads that measure 8mm x 12mm. They are not perfectly round – rather they look a little flatter on the top and bottom. The slightly flatter surface will allow the box to stand more normally. I sat the box on the side of a table with the flap hanging over in order to properly place the beads. I used a significant amount of Scotch Quick-Dry Adhesive so they would be securely attached. I had plenty of time and so I left the box to dry completely for 4-5 hours. If you’re in more of a hurry, you may want to use a hot glue gun, etc. to attach the beads.
Next I selected one of the Tim Holtz idea-ology Curio Knobs for the top. I punched a hole in the center of the top of the box to place the knob using my Crop-A-Dile Big Bite. (I found the center of my box top using my Tim Holtz ruler – the centering ruler side of this makes it an essential tool for your craft room.) The curio knobs are attached in the same way that you would attach a drawer pull – a screw comes up from the back and threads into the knob.
The last step is decorating the box. Here you’ll want to take your time and do something that makes the box unique and special. It should make you smile. There are so many options – charms or other metal sayings, etc. that can be strung on ribbon, flowers (pre-made or ones that you make), ribbons, laces, doilies, etc. I chose a 7/8” wide purple silk ribbon and some pre-made flowers by Petaloo. This made the project quick and easy. I used a couple of glue dots to attach the ribbon to the box so that it would not move. I chose to wrap the box with ribbon, and to tie the bow separately so both could look their best. I attached the bow with a little Scor-Tape, and used some Glue Dots to “fluff” the ribbon and force it in the shape that I wanted. The flowers are pre-made, so I only needed to use a few glue dots to adhere them to the lid.
Here are a couple of additional pictures of the box –
interior view
side view
bead placement on the bottom
Supply List:
Sizzix/Eileen Hull die – box, square (658058)
Chipboard (I used 50pt chipboard)
Die cutting machine – I used my Sizzix Big Kick
Scor-Tape by Scor-Pal – I used ½” and ¼”
Other adhesives — Scotch Quick-Dry Adhesive and small Glue Dots
Assorted patterned papers – I used two papers from the Graphic 45 Sweet Sentiments collection – Violet Bouquet and Perfect Petals (the reverse side)
Paint – I used one of the Jenni Bowlin by Ranger dabber top paints called “Malted Milk” (one of the Tim Holtz distress paints would also be a good choice)
Ribbon – I used a 7/8” wide purple silk ribbon
Embellishments – I used purple, ivory and green flowers by Petaloo
Today I’m using a super-fun die by Die-Versions, “I {Heart} You Animals”. This single die can be used to make at least eight different animals – a lion, a dog, a cat, a bear, a pig, an owl, a monkey and a cow. How fun is that! I really think that with a little creativity, you can probably come up with even more animals by mixing and matching the parts, changing colors, etc. Any of the animals would make a really cute children’s card for a birthday or any occasion – even an “I love you.
The Die-Versions dies are thin metal dies, so you can use them with almost any die cutting machine. I chose my SizzixBig Kick because it is well-suited to heavy-duty cutting. With even my heaviest papers, I was able to cut at least two layers at a time (so I could cut both feet at the same time by stacking the two scraps together, etc.). This saves a little time, and gets me to the fun of assembling the animal faster.
There are a couple of ways you can approach using the die. You can select an animal and the colors of cardstock needed to make it. You might then cut a full sheet of “parts” for each of the colors needed (for some of the colors you would have to cut two full sheets to get enough parts), and then only use the parts you need for the selected animal. The left over parts can be held and used on another card. I think the better way to approach it is to just use your scraps to cut only the pieces that you need for the selected animal. For example, a 2-1/4” x 3” scrap is an appropriate size for the heart, a 2” square for the head, 1” squares for the feet, etc. If you use this method, it really takes very little paper to assemble any of the animals. If you lay the scraps on the die carefully, you can cut most of the parts needed for an animal in one pass through the die cutting machine.
If little pieces tend to make you crazy, note that the eyes and the paw pads, etc. are made from small circles. If you have small circle hole punches (1/8”, ¼”, 3/16”, etc.) you may find it easier to just punch out the shapes needed rather than trying to wrangle the little circles on the die. You may also prefer to cut the larger white circle for the eyes and draw in the pupil with a black marker (a black Glaze pen would give a nice result). Markers can also be used if you want to create an animal with stripes (for example, a tiger cat, etc.). This is all optional – everything that you need is included on the die. Please see the short video for more tips on using the I {Heart} You Animals die.
To assemble the card, I first selected a patterned paper to place the animal on, and a coordinating base layer. I cut the base layer 4.25” x 5.5” (A-2 size), and the patterned paper 3-7/8” x 5-1/8”. I used Scor-Tape by Scor-Pal to attach the patterned layer to the base layer. The next thing I did was to lay the animal pieces on the card front to see how everything fits. When I was happy with the placement, I began to glue the pieces in place. I used Scotch Quick Drying Tacky Glue for the larger pieces. For the smaller pieces, a glue pen or a product called “Sticky Dots” will work best. Of course, you could also run the pieces through a Xyron before attaching them. For ears and tails, I also used some low dimensional adhesive to add a little dimension. Note that I added the sentiments to the hearts before I assembled the animals. Instead of the sentiments you could use stickers or other die cuts, etc.
There are many other fun ways that you can use this die. If you don’t want so much emphasis on the heart, you can cut the heart in the main body color, or replace the heart with an appropriate sized circle or oval. You could also assemble the animal separate from the card base and mount it using a wobble spring (imagine the “giggles” that will bring!). It is a very versatile die.
Supply List:
Die-Versions die “I {Heart} You Animals”
Die cutting machine – I used my Big Kick by Sizzix
Assorted cardstock for the animals – scraps will work fine
Assorted cardstock for the card layers
Adhesives – ¼” Scor-Tape by Scor-Pal, Scotch Quick Drying Tacky Glue, glue pen, Therm O Web Sticky Dots, etc. You may also want a low dimensional adhesive such as Darice foam squares.
Sentiments or stickers – I used several of the new small stamp sets and bars by Heidi Swapp.
Ink – I used Versafine Onyx Black ink.
The featured supplies are available from Cut at Home or from your local paper crafting store. My fave is Bayers Pampered Stampers in Toledo, Ohio. Links for both Cut at Home and Bayers are in my blogroll above.
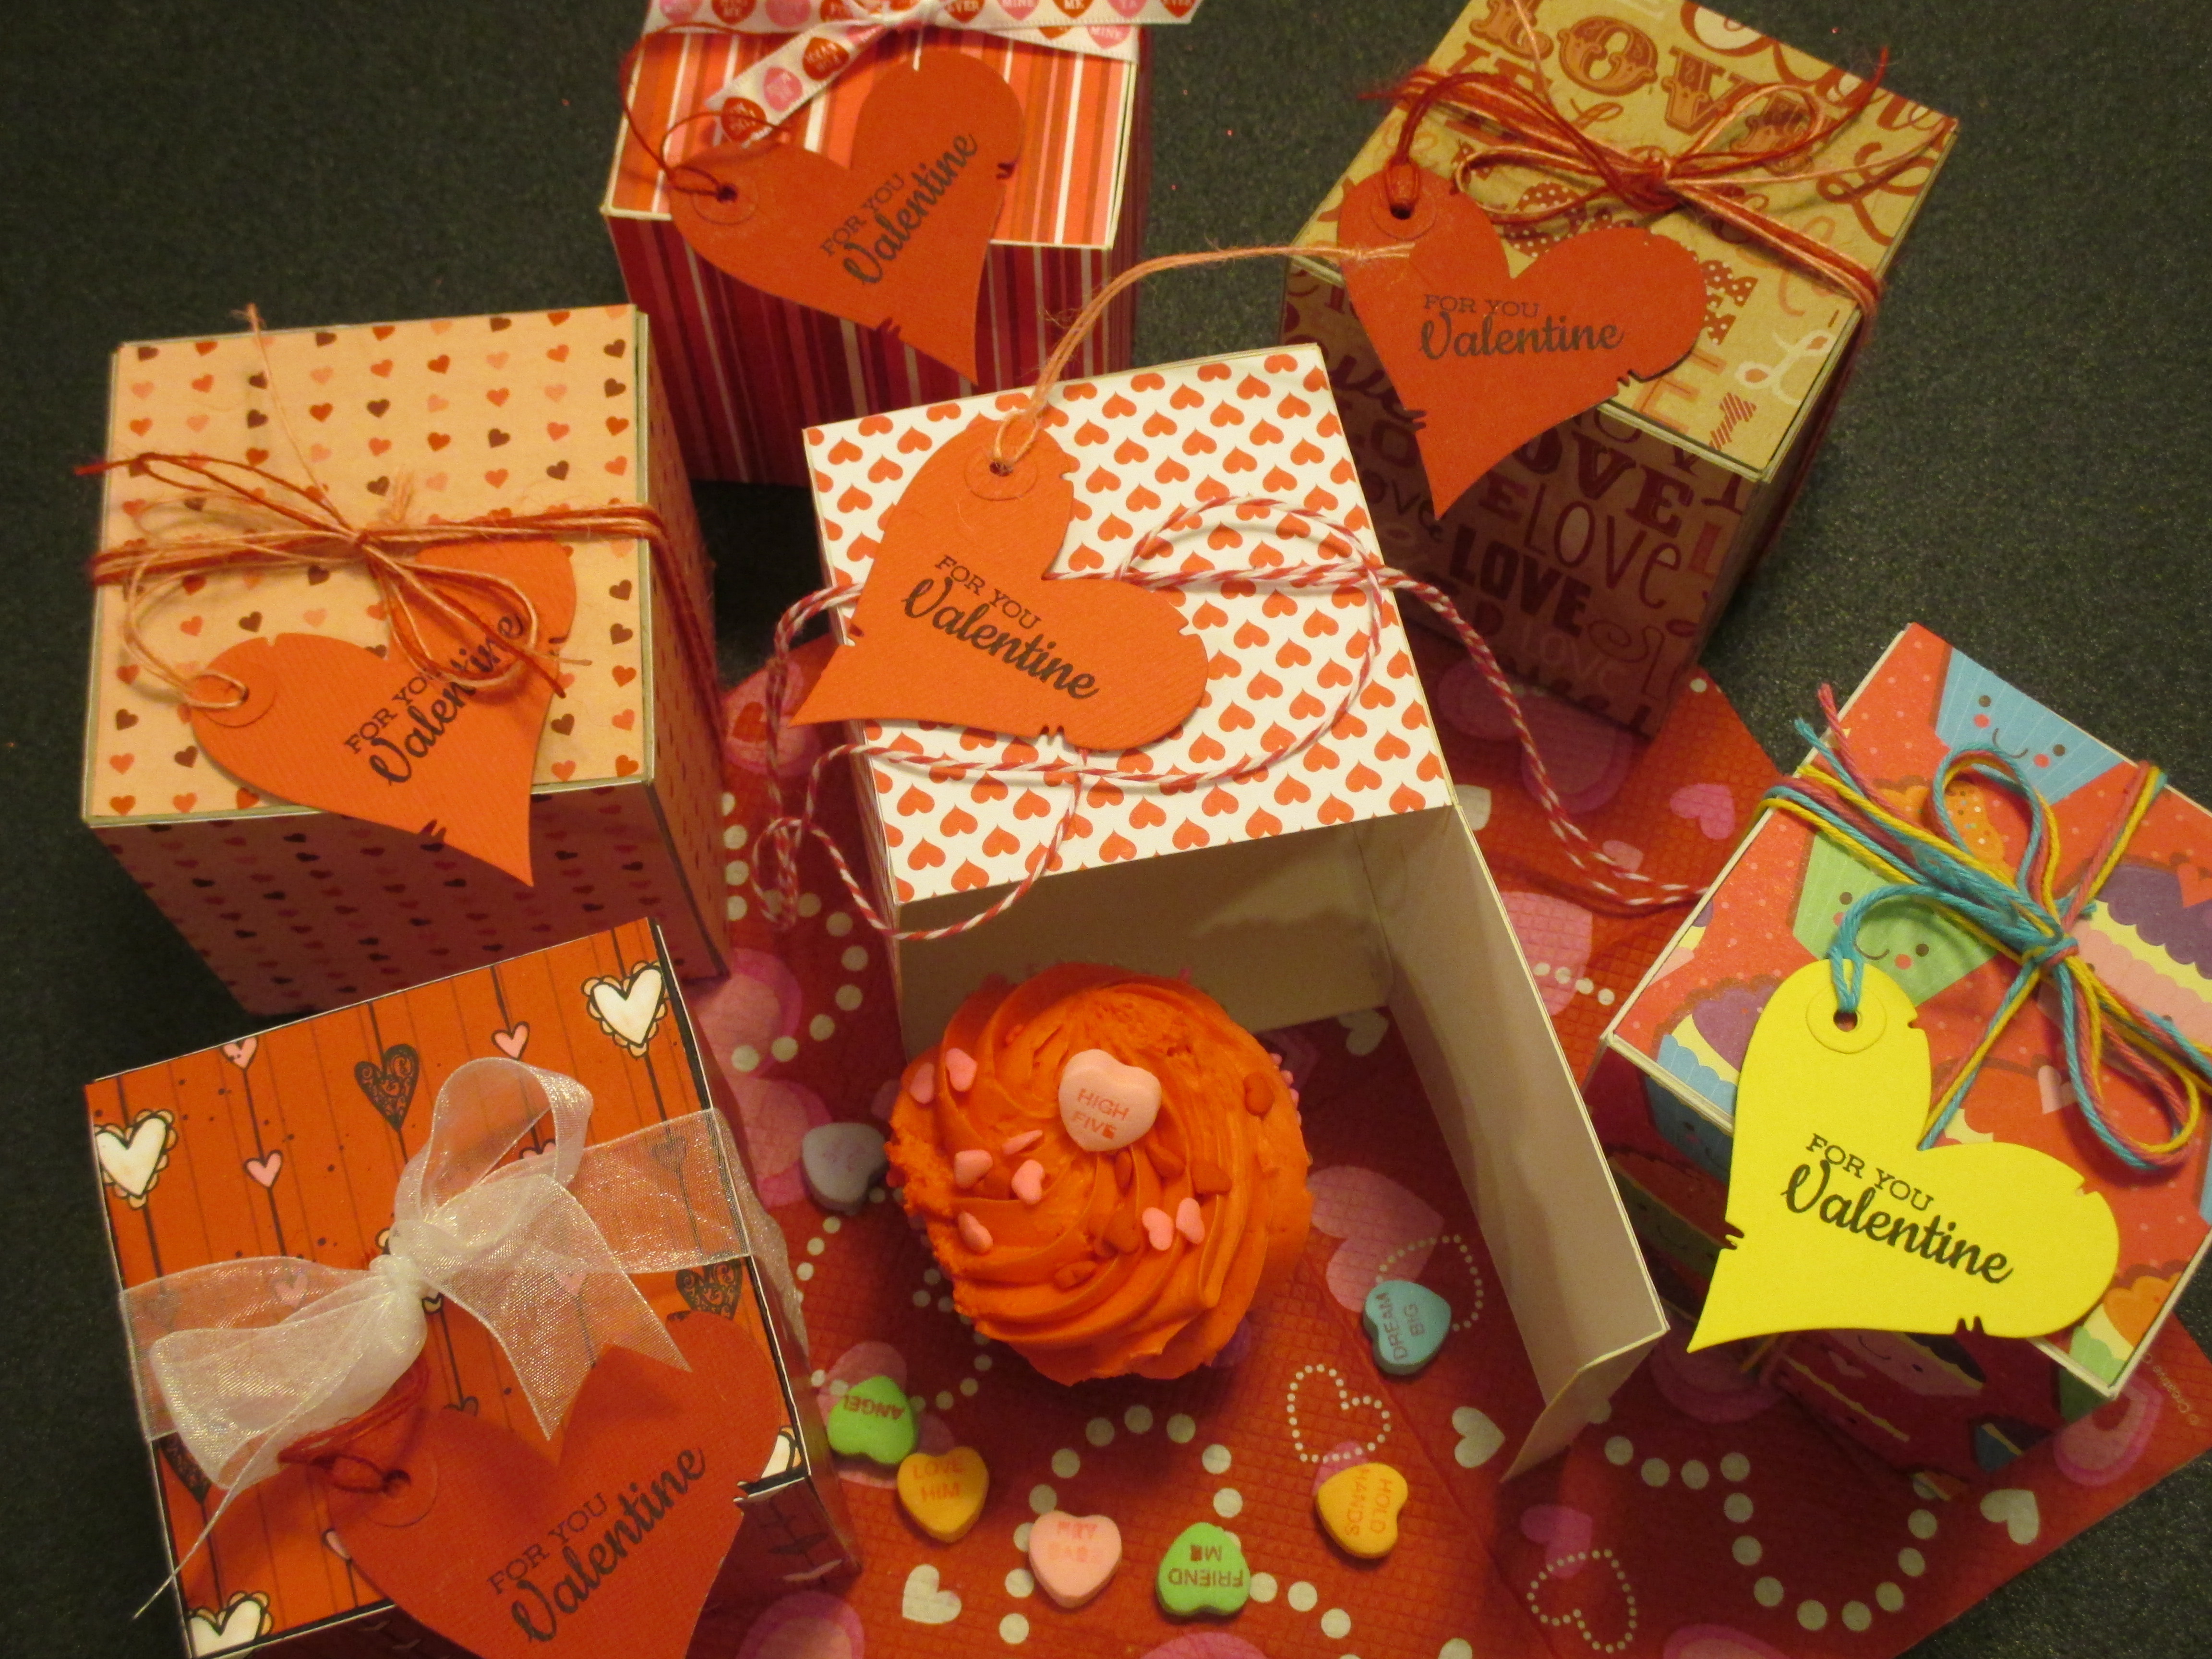
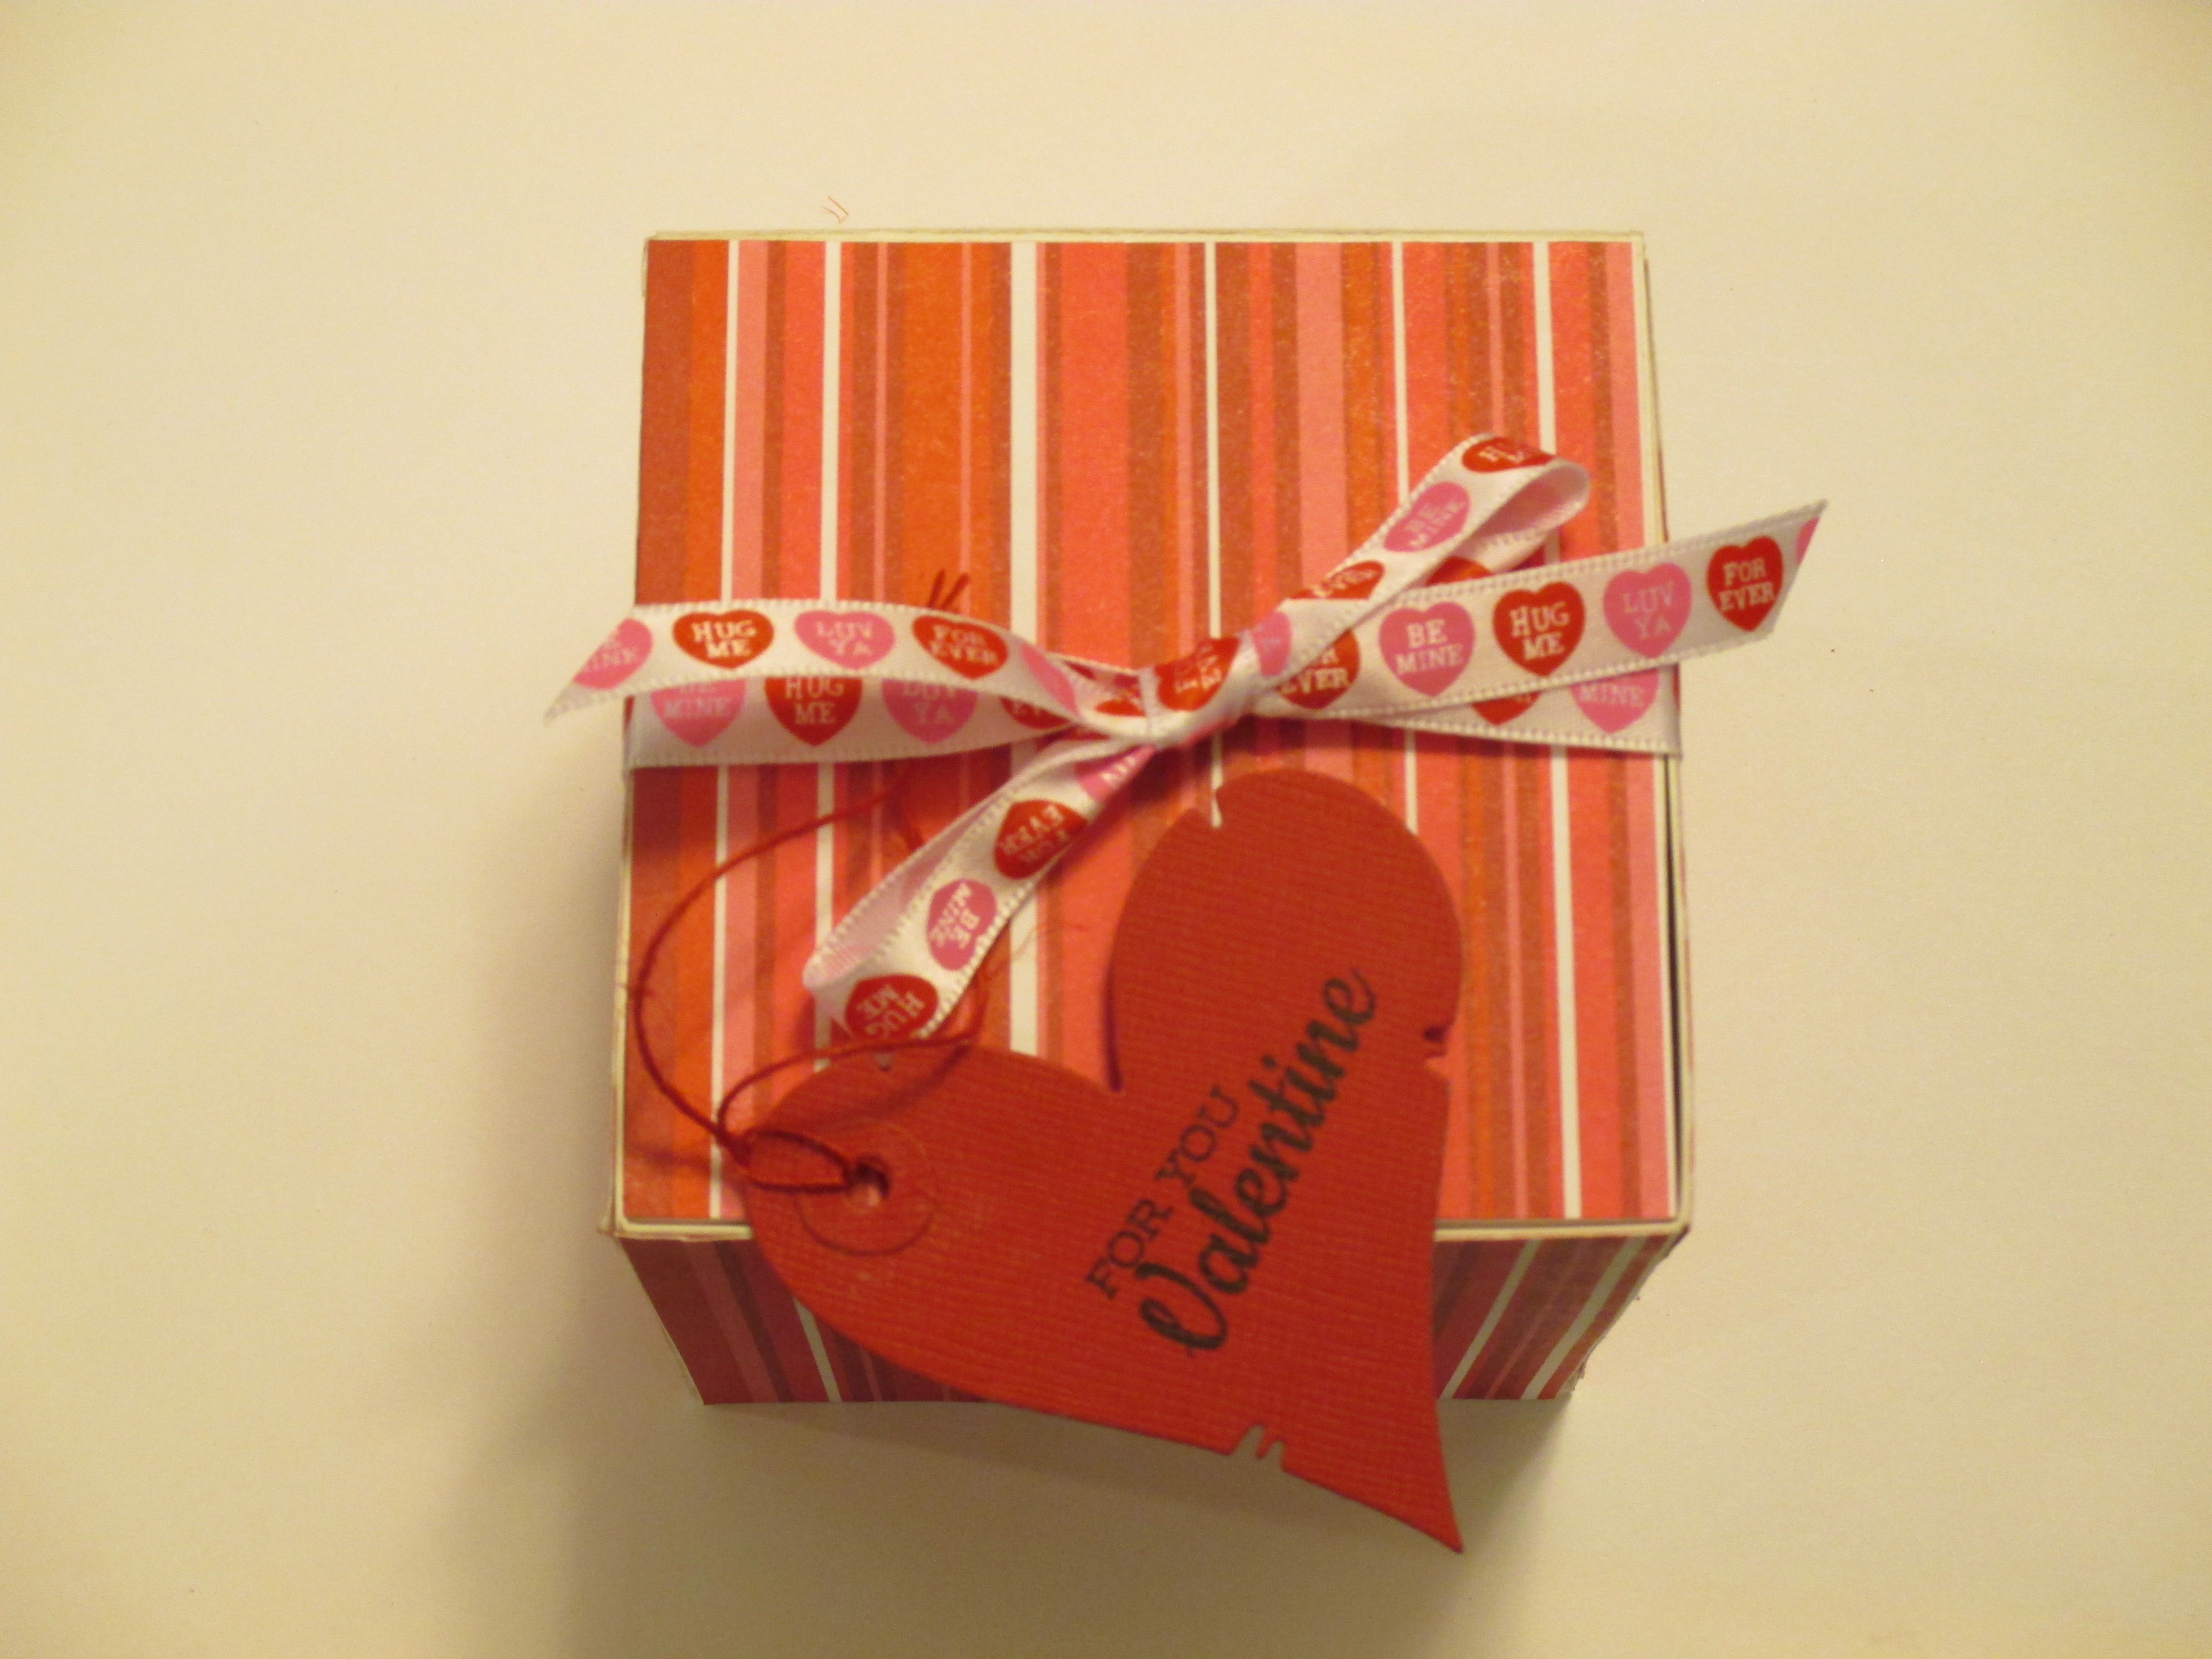
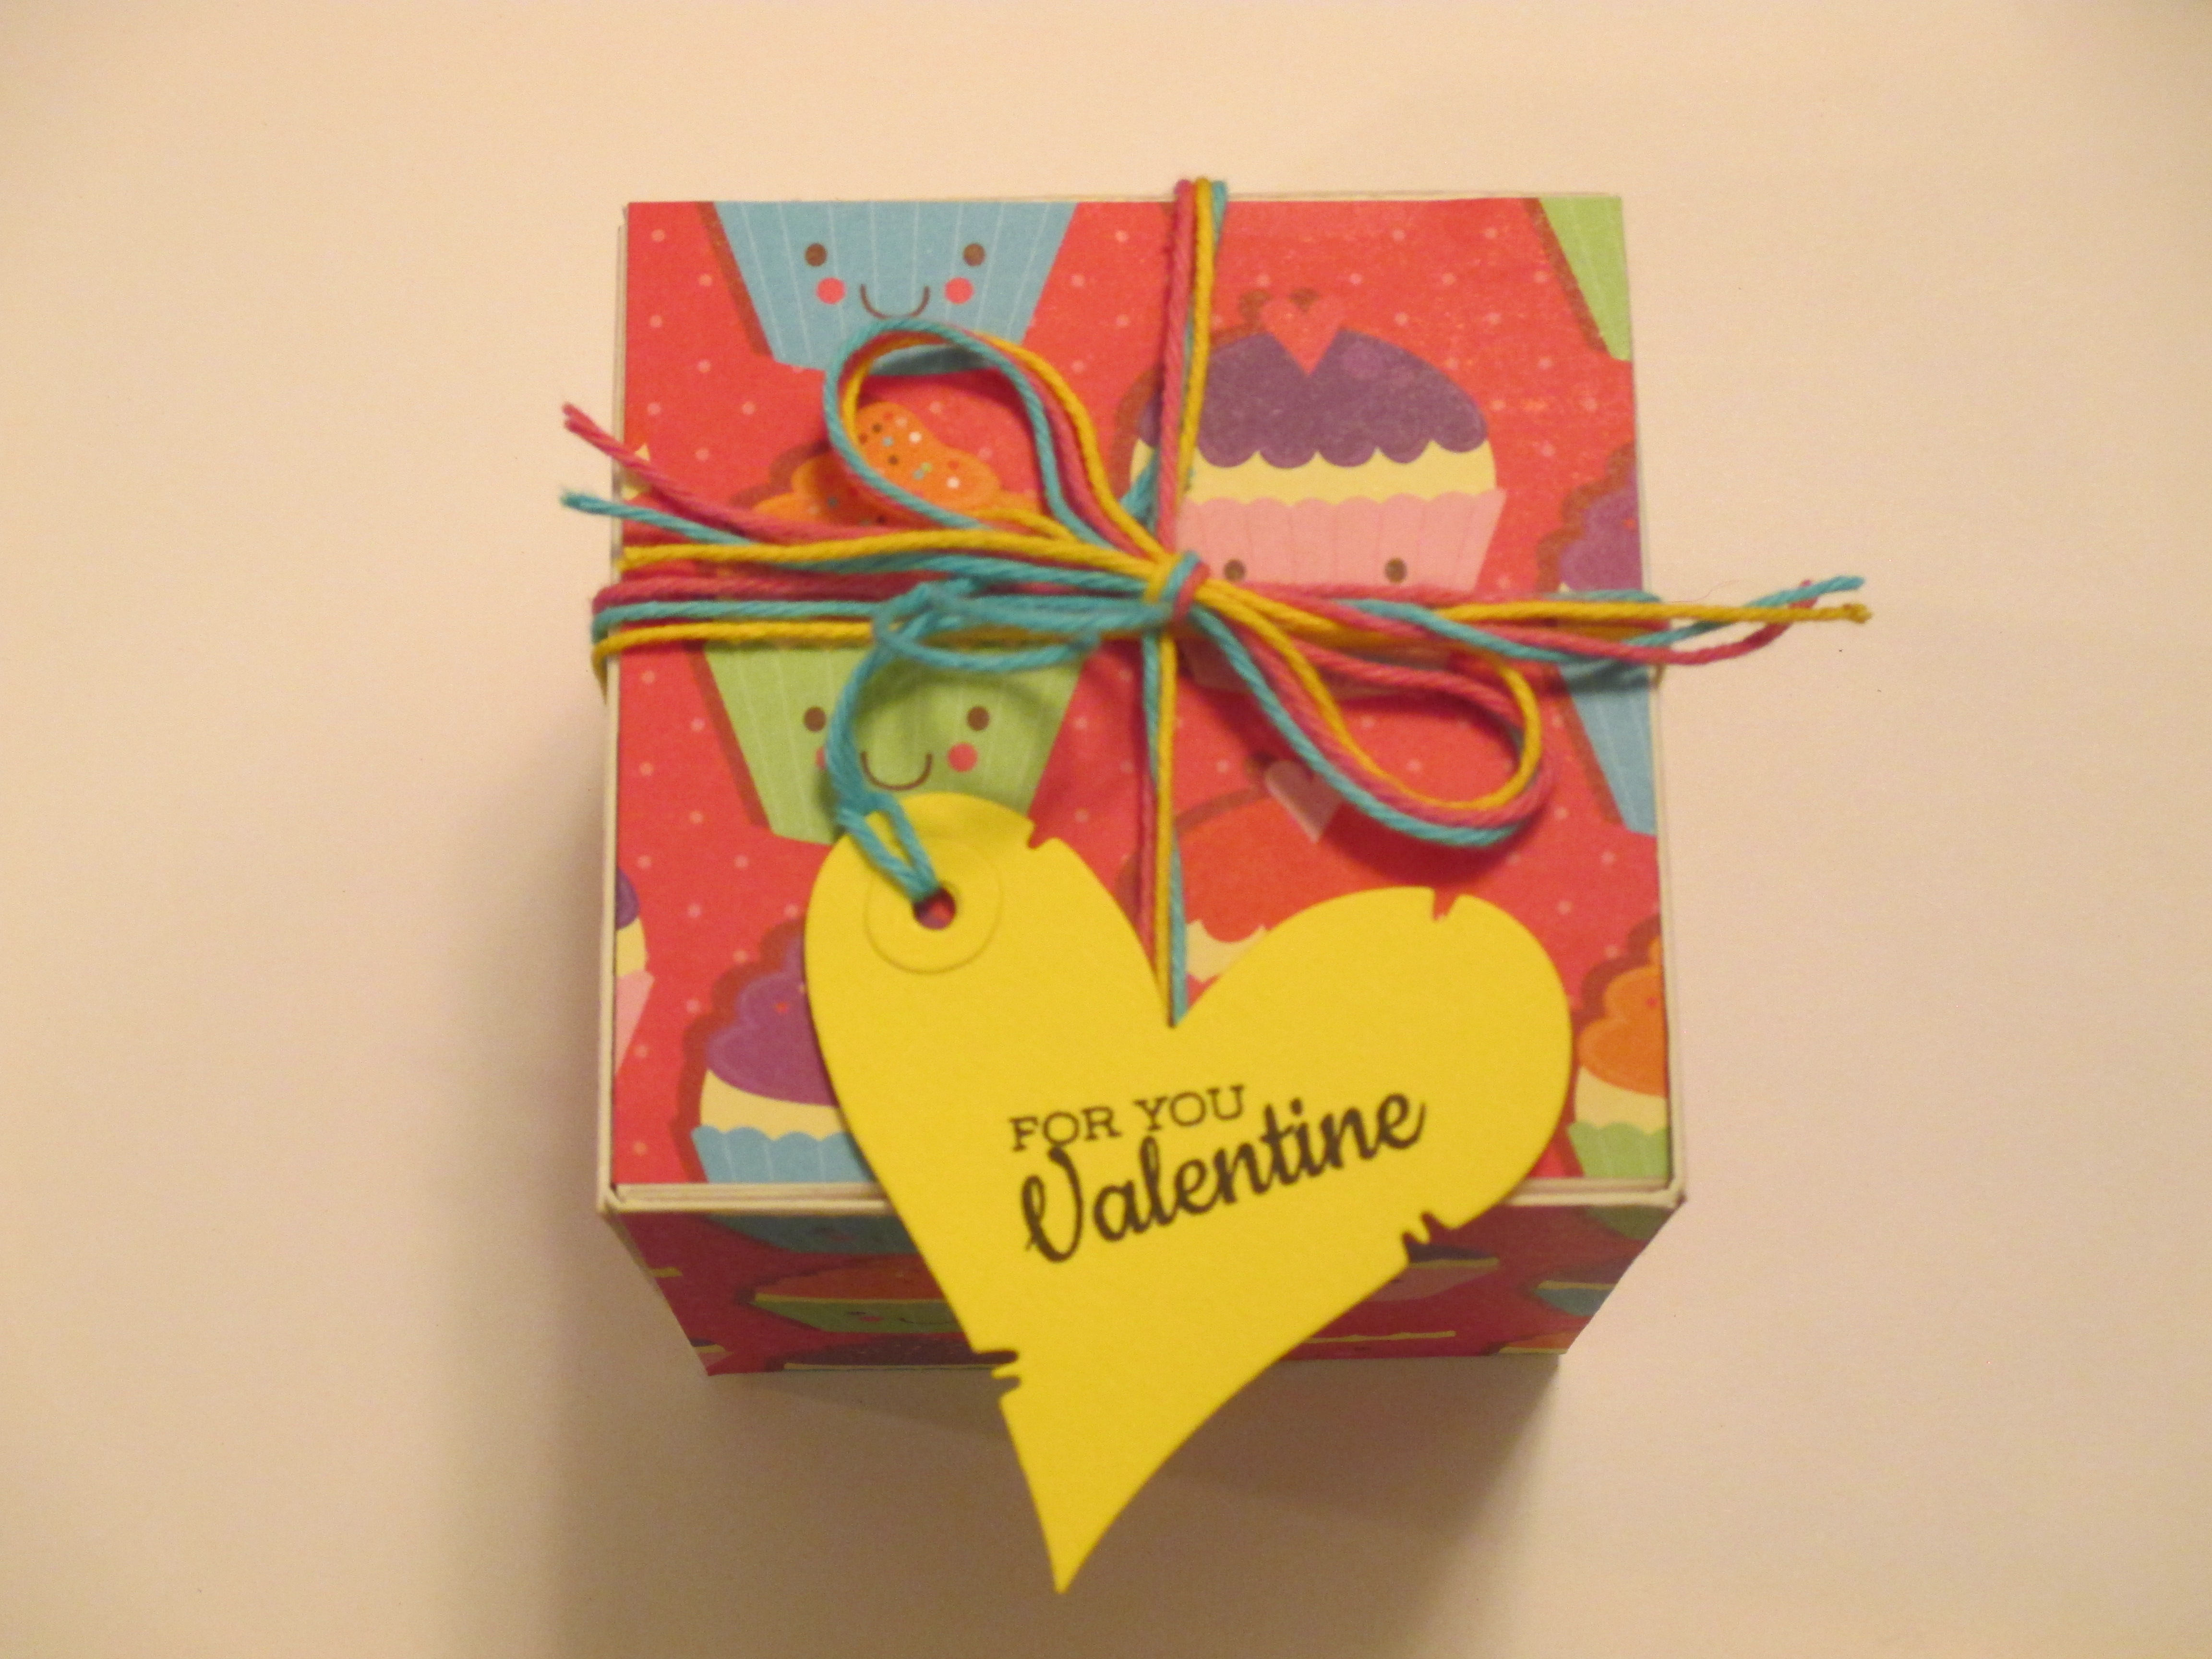
Today I want to show you a super–easy Valentine cupcake box featuring a Sizzix die designed by Eileen Hull. The die makes a 3-1/4” square box – perfect for a single cupcake. The box is also so versatile that you can dress it up and make a beautiful gift box (watch for this on a future post – this die is a new fave!).
The Sizzix die is specially designed to cut through most chipboard and mat boards, etc. I started with a standard weight poster board, and cut two pieces (each has three panels and two tabs, one at either end). I used my Sizzix Big Kick to cut the boxes (this is one of the longer, thick dies — a ScoreBoards XL – so will cut best on the Sizzix machines). The die scores as it cuts, so there is no need for any additional steps there. You are ready to fold and assemble the box straight from the die-cutting machine. I also tried cutting boxes from black board (a little thinner than standard poster board), and from 40 pt. chipboard (about twice as thick as my poster board). All were successful.
To assemble the box, I folded the panels and the tabs along the score lines. I added ½” Scor-Tape by Scor-Pal to the two tabs at the ends of one of the panels, and just one of the tabs on the other panel (the other tab is the top flap of the box providing the opening). I removed the Scor-Tape liner from the panel that had only the one piece of Scor-Tape, and then placed that tab in the center of the other box panel. It is important to take your time for this step, making sure to get the tab and the panel lined up properly (the Scor-Tape sticks pretty hard and won’t easily adjust if your alignment isn’t correct). Then remove the liner from one of the two remaining tabs. Fold the panel up along side it, carefully trying to line up the box side and the tab. Repeat for the other side. That’s it . . . the box is assembled. Please see the short video for additional instructions on this process.
Now it’s time to cover the box with the patterned paper. I cut six panels, 3-1/4” square. Carefully adhere these to each side of the box with 1/4” Scor-Tape. By adding the paper this way, you can control the overall appearance of the box, making sure that directional patterns, etc. are all going in the right way. You can also isolate certain parts of your paper to feature on the box. The alternative to doing it this way is to cover the chipboard before you cut the box. If you do it that way, you’ll need to think through how the patterned paper needs to be placed in order to achieve a good finished appearance. The overall appearance of the box is pretty much the same regardless of your method for attaching the patterned paper.
I didn’t line my boxes or the box flap because I felt that they were okay as they were. You could, of course, choose to line the inside too. It would be easier to line the box before assembly if you choose to do that.
The little heart tag is cut from a Magnolia Doohickeydie. I glued the reinforcement in place, and stamped the sentiment with black onyx Versafine ink. I attached a hanger made from bakers twine or burlap twine.
Following are individual pictures of the boxes and information on the box material, patterned paper and ribbon, etc.
Black board; “Head over Heels” by Bo Bunny; Offray 5/8” white sheer ribbon
40 pt. chipboard; “Heart Healthy Red Bean Soup” by Jillibean Soup; pink and red May Arts burlap string
White poster board; “Love Potion Stripe” by Reminisce; Candy Hearts ribbon by Celebrate It
40 pt. chipboard; paper from “Love Notes” 12×12 paper pad by Martha Stewart; pink and red May Arts burlap string
White poster board; paper from the dollar bin at Target; yellow, blue and pink solid Divine Twine
White poster board; “Tiny Red Hearts” by The Paper Studio; pink sorbet bakers twine by The Twinery
Supply List:
Sizzix/Eileen Hull die – box, square (658058)
Die cutting machine — I used my Sizzix Big Kick
Chipboard, poster board, mat board, etc. (I used 40 pt. chipboard, white poster board and black board)
Scor-Tape by Scor-Pal – I used ½” and ¼”
Assorted patterned papers – the papers I used are described above
Heart tag die – I used Heart Tag by Magnolia Doohickey
Ink – I used onyx black Versafine
Valentine sentiment – I used the “Lots of Love” stamp set by Avery Elle
Assorted ribbon, baker’s twine, burlap twine, etc. – what I used is described above
You can purchase the featured supplies from Cut at Home or from your local paper crafting store. My fave is Bayers Pampered Stampers in Toledo, Ohio. Links to Cut at Home and Bayers are in the Blogroll above.
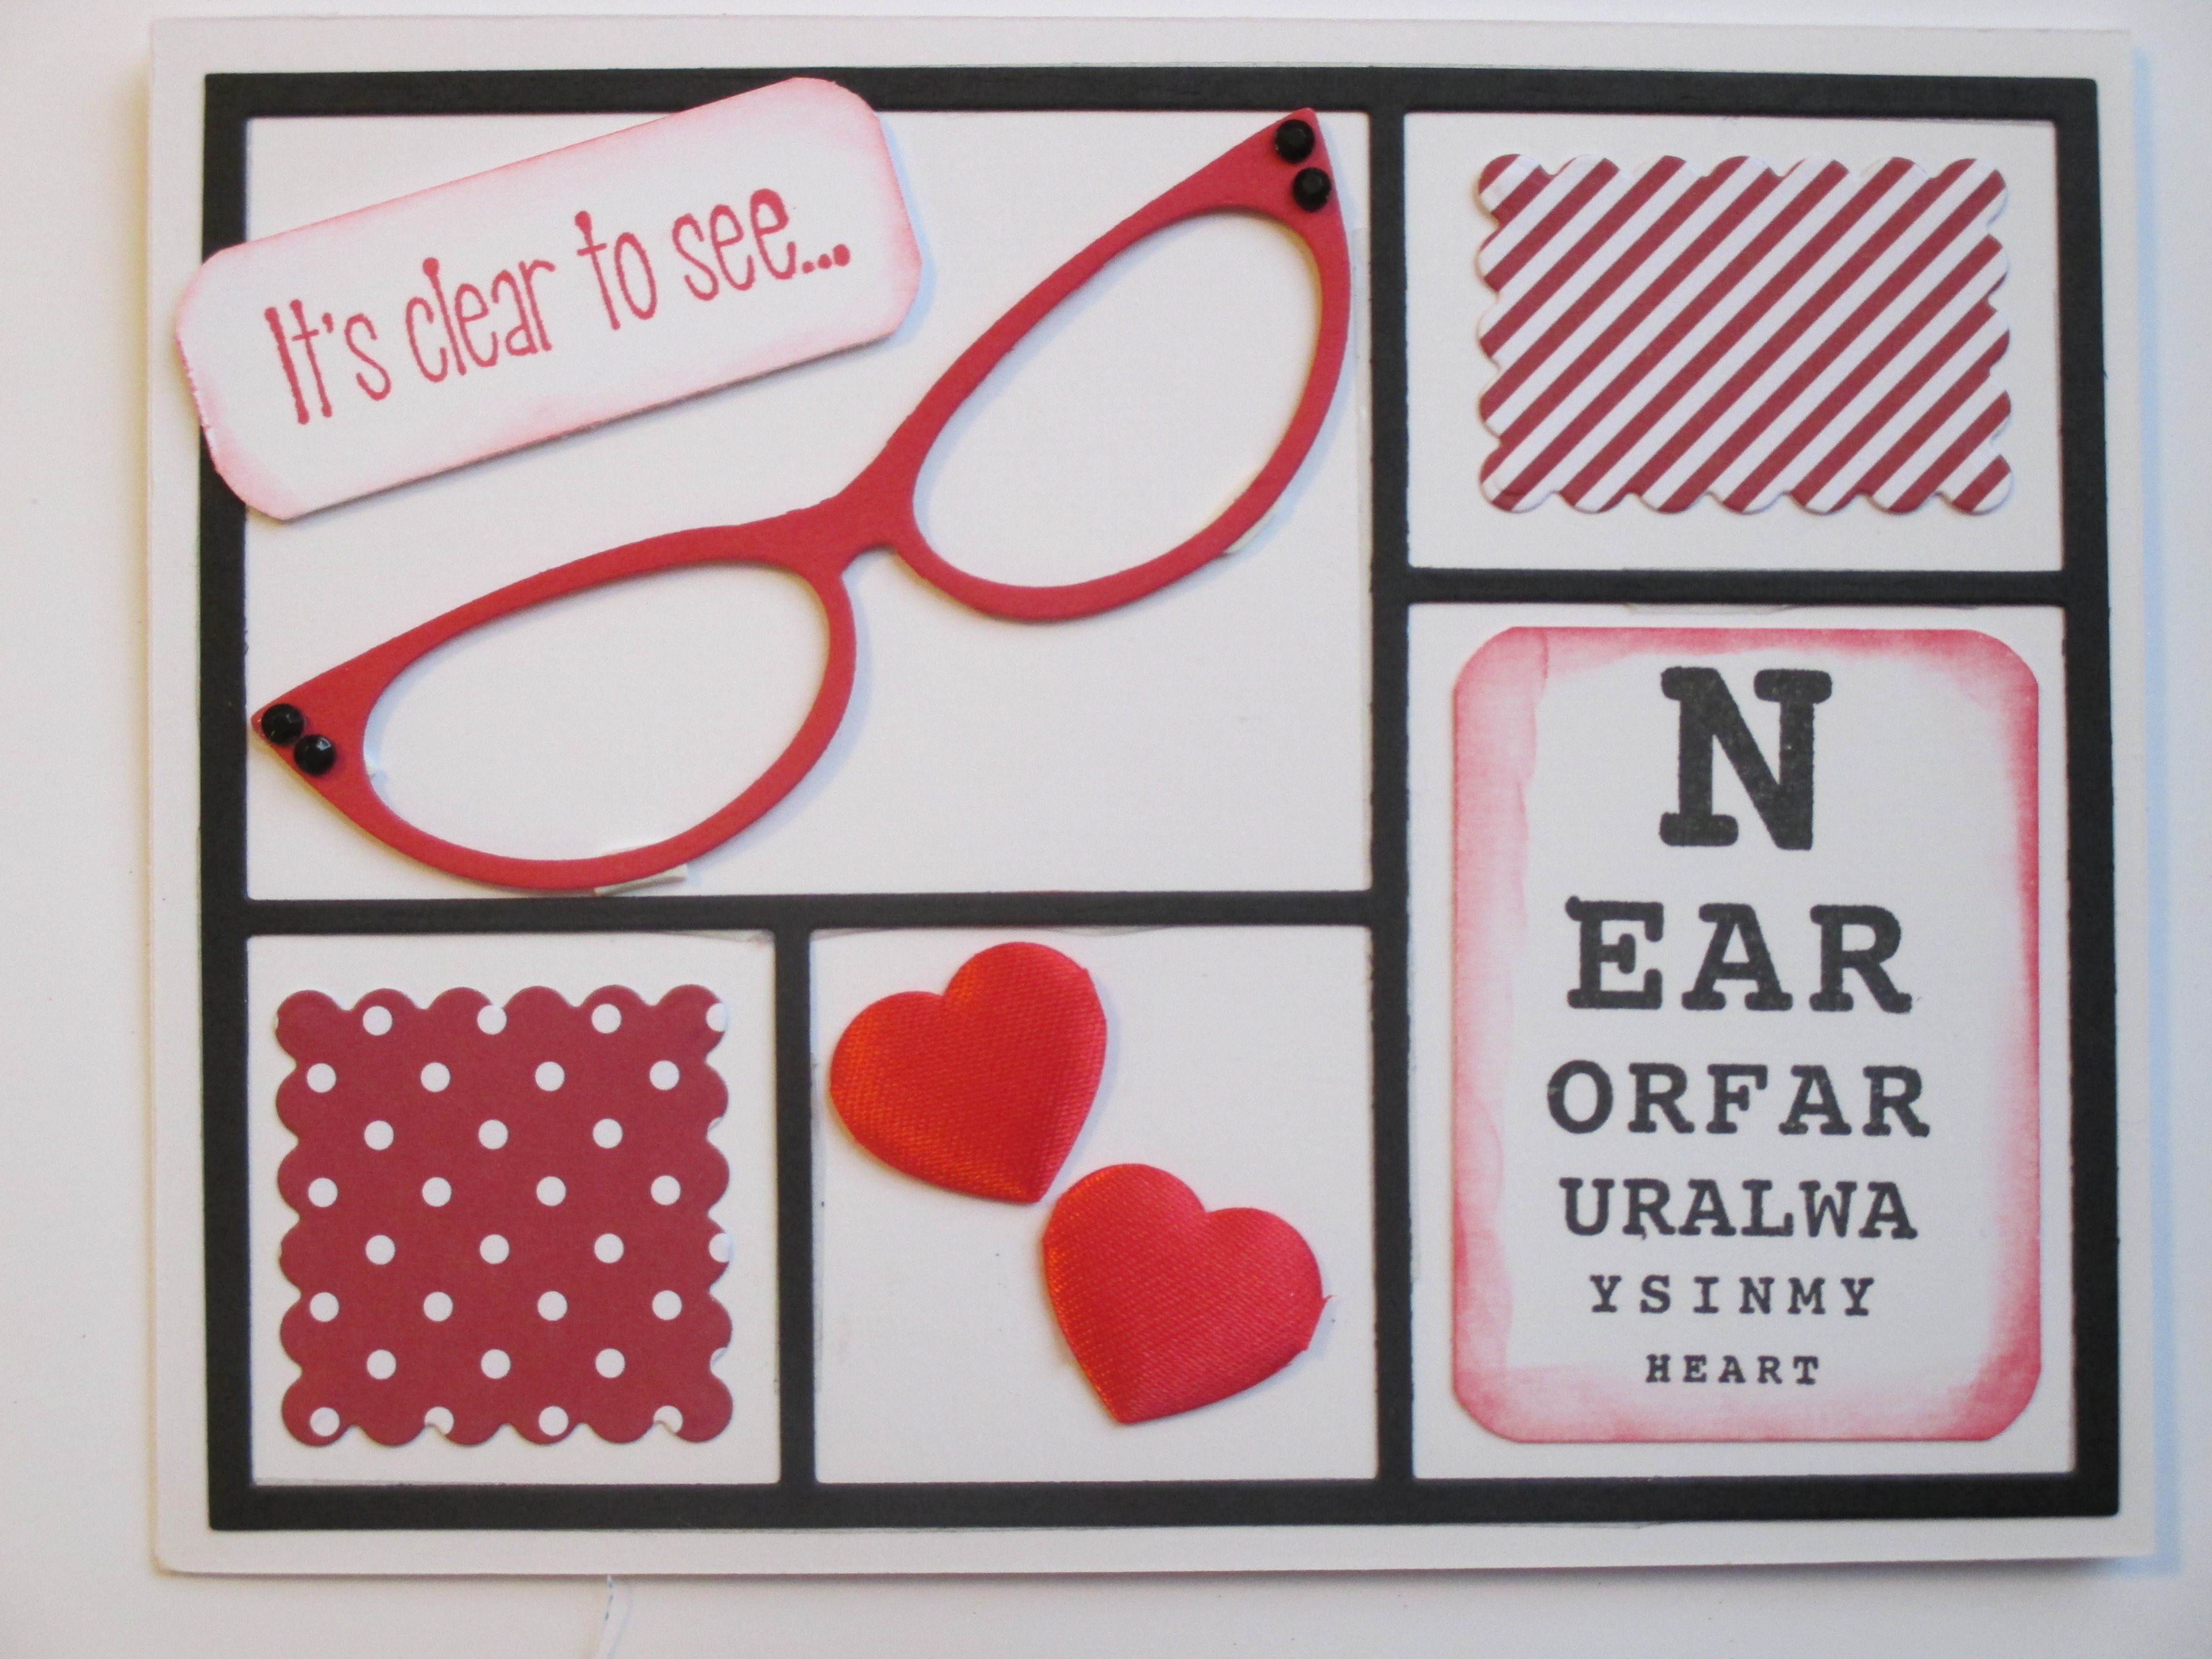
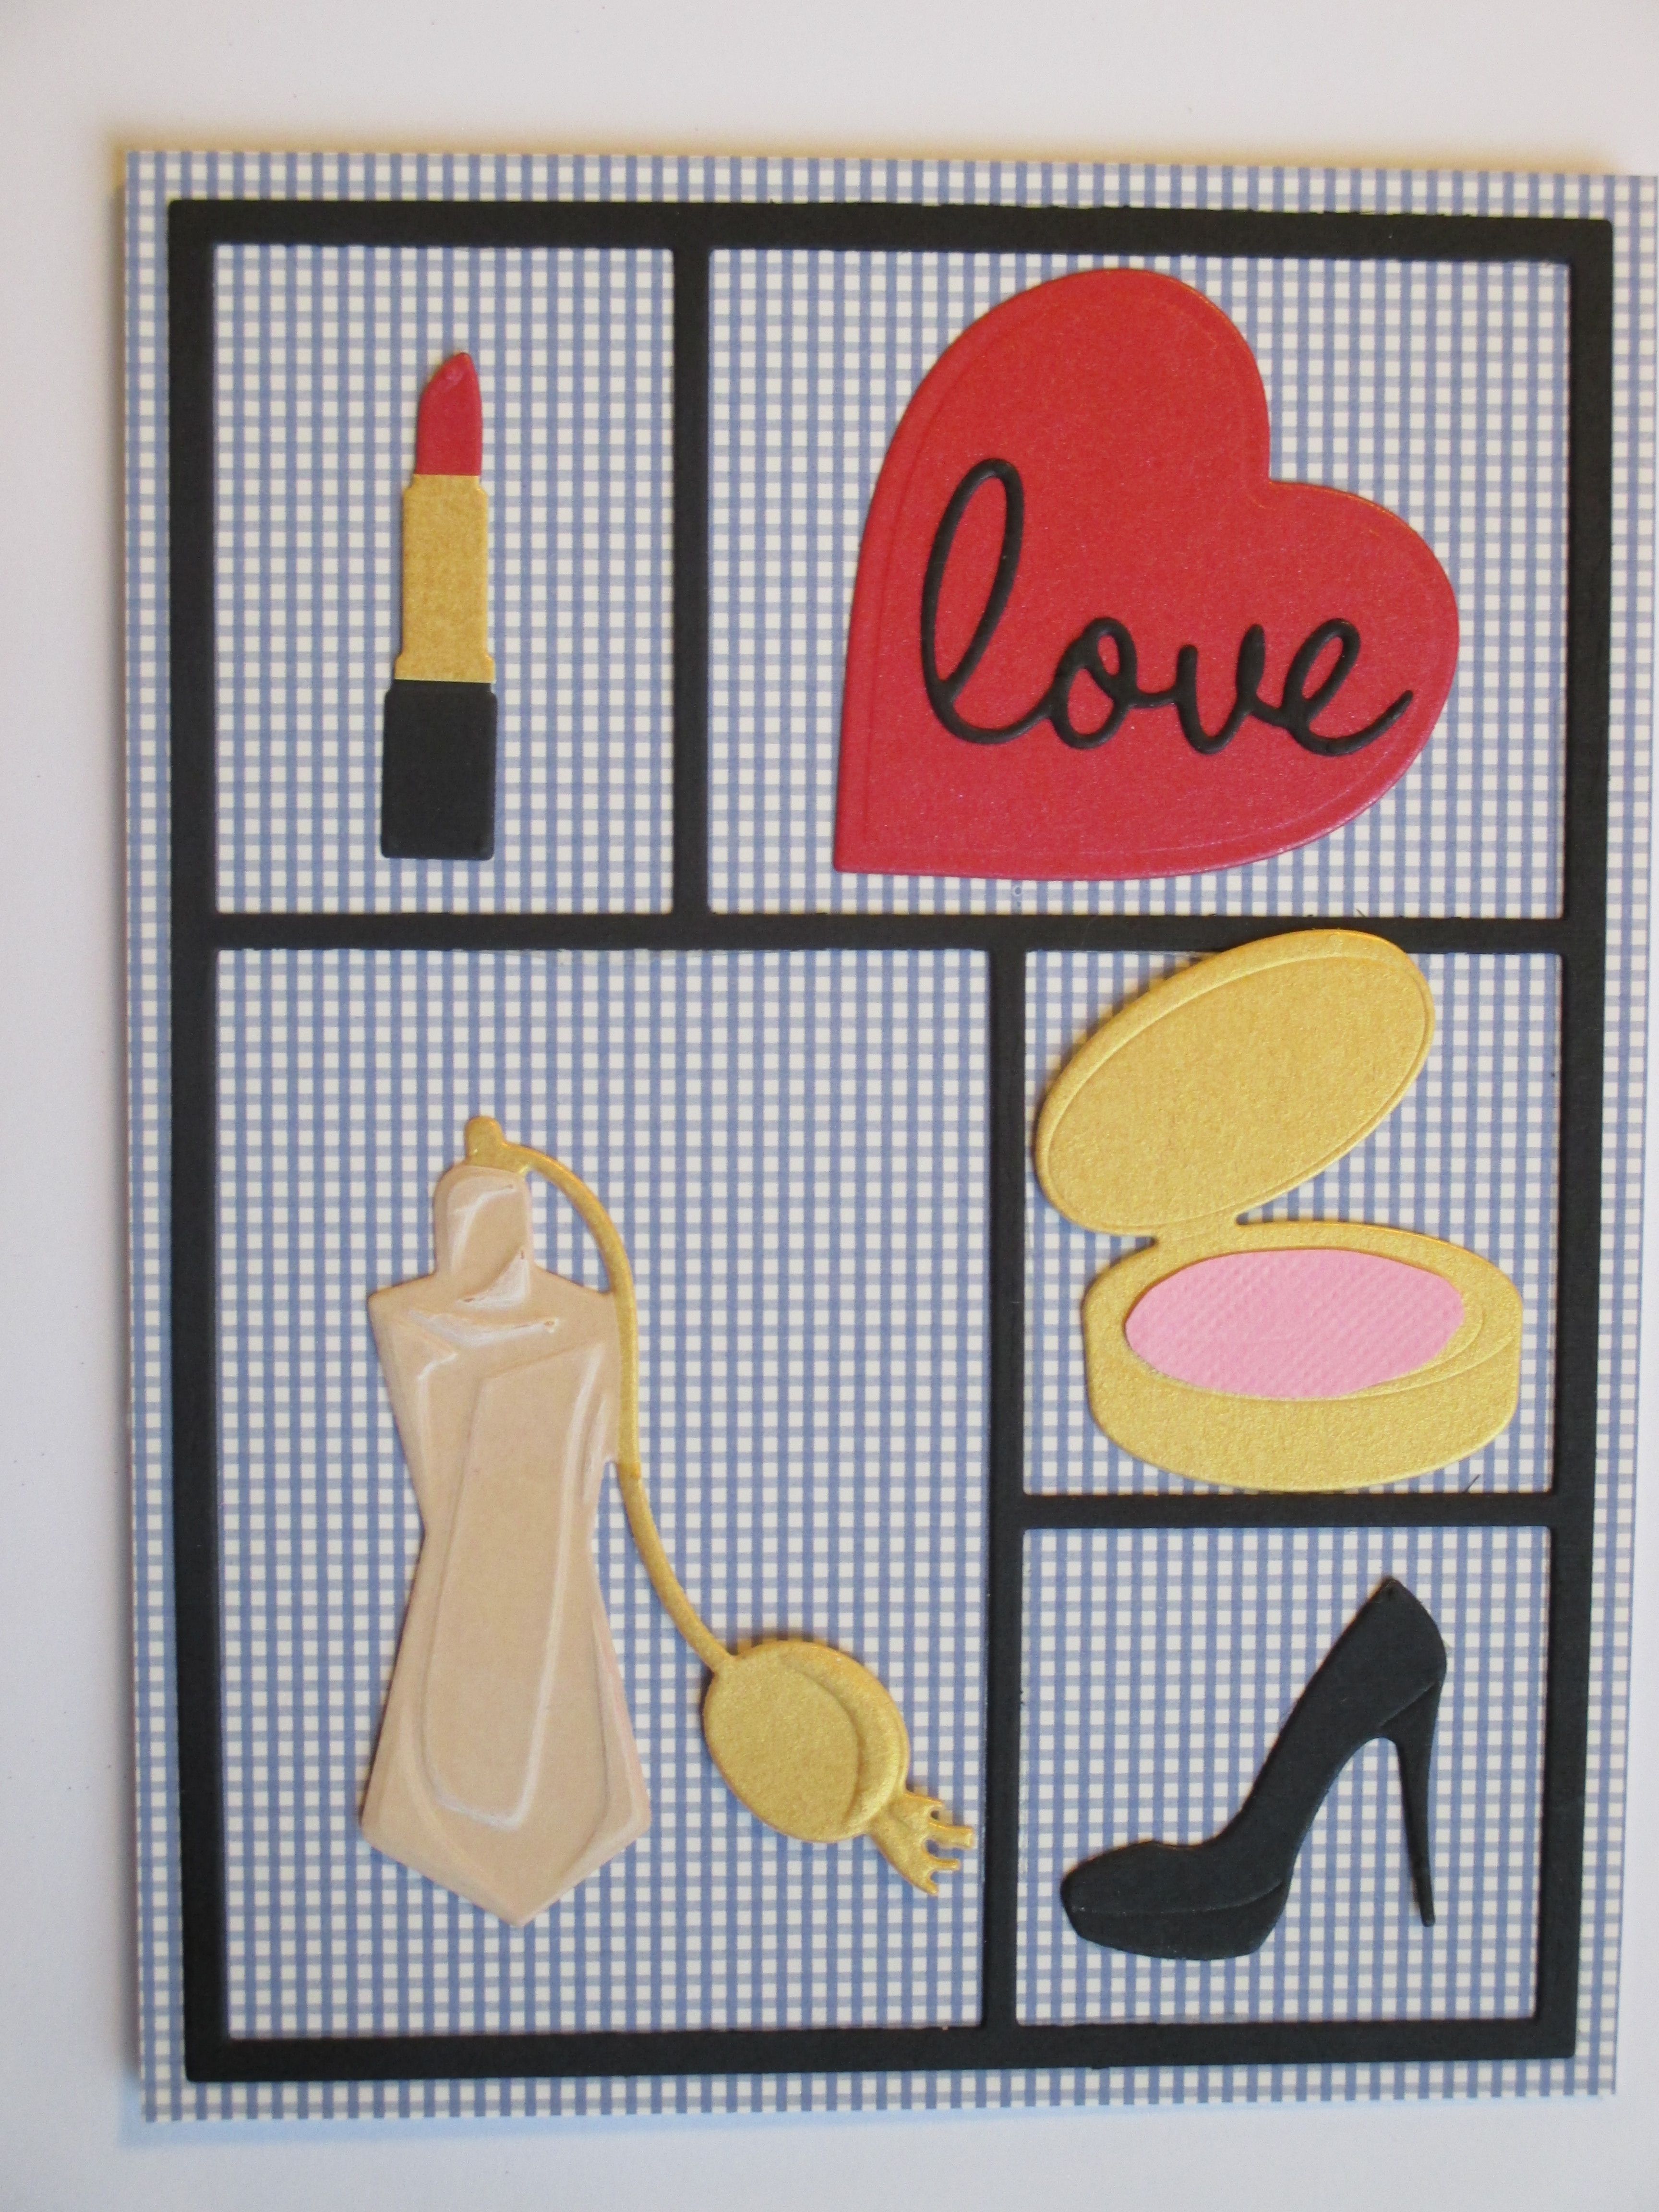
My next class at Bayers Pampered Stampers is on Saturday, February 15. We’re going to make five cards featuring the Color Block Cutting Plate die set by Taylored Expressions. This die set has so many possibilities. It has the basic frame for the blocks, as well as straight and scalloped elements that fit inside. It is just too much fun! Anyway, here are the cards that we’ll make —
There will be an alternative for the “It’s clear to see” card — a more masculine version featuring “guy” glasses, balloons, and a happy birthday sentiment. Your choice of which to make.
The cost for the class is $15.00, and it begins at noon. If you want to attend, be sure to pre-register at Bayers (the link is in the Blogroll above).
Friday is “red dress” day, and I wanted to make a Red Dress Card as a reminder of the importance of women’s heart health. Heart disease is the NUMBER ONE killer of women! It is often a silent killer (our symptoms are quite different from those that men experience). Heart disease kills 1 in 3 women! So, can I ask you to do three simple things? First, talk to your doctor about your heart health and ways to maintain and/or improve it. Second, remind other women of this silent killer and urge them to take steps to reduce their risk factors. Finally, wear something red on Friday to show your support and help spread the message. For more information on women’s heart health issues and the Red Dress (or Go Red) campaign, please visit the American Heart Association’s website at http://www.heart.org.
My card is a simple one. The dress is cut using Spellbinderdies, “Decorative Dress Forms“. The heart behind it is cut using SizzixScallop Hearts #2, embossed with a heart embossing folder by The Paper Studio, and sponged with a little “Love Letter” ink by Memento. The patterned paper is cut 3-7/8″ x 5-1/8″, and the red background layer is 4.25″ x 5.5″. The pink heart embellishment on the dress is a Doodlebug heart pearl (cupcake). The sentiment is from Our Daily Bread, and is stamped and sponged with Memento Love Letter ink. I used 1/4″ Scor-Tape by Scor-Pal and low dimensional adhesive to attach the elements.
Please take care . . .
Supply List:
Spellbinders Shapeabilities dies – “Decorative Dress Forms”
Sizzix Framelits dies – “Scallop Hearts #2”
Die cutting machine – I used my Spellbinders Grand Calibur
cardstock – red, patterned, white
Embossing folder – I used a heart pattern by The Paper Studio
Sentiment – I used Our Daily Bread “Be Joyful”
Ink – I used Love Letter by Memento
ribbon
Pink heart embellishment – I used a Doodlebug pink pearl heart (color is “Cupcake”)
Adhesives – 1/4″ Scor-Tape by Scor-Pal and a low dimensional adhesive (I used Darice squares)
The featured supplies are available from Cut at Home or from your local papercrafting store. My fave is Bayers Pampered Stampers in Toledo, Ohio.
Today I want to share some Valentines featuring doilies and Sweet Sentiments papers by Graphic 45. I’ve mentioned on previous posts that I like to use doilies with my cards, especially Valentines. When I saw the beautiful Sweet Sentiments papers, I knew that the two were made for each other. The paper is so pretty, and the colors are so delicate and distinctive. There are just so many possibilities!
I used the 8×8 Sweet Sentiments paper pad for my cards (it is also available in 12×12). As usual, Graphic 45 provides many unique/beautiful elements that can be used to enhance cards. The cards that you see below feature only parts of two sheets in the paper pad — “Sweet Sentiments” and “Be My Valentine”. Some of the patterned paper that I used on the cards is from the Sweet Sentiments collection, and the rest is from other Valentine paper collections.
All of my cards are A-2 sized (4.25″ x 5.5″). I began by selecting two sheets of the Sweet Sentiments that I thought would make the best Valentines. Those two sheets are “Sweet Sentiments” and “Be My Valentine”. “Be My Valentine” is a page with journaling cards, sayings, etc. so it is very easy to cut apart, and almost everything on the page can be used in some way on a card. The “Sweet Sentiments” sheet is more of an overall design, so it is necessary to fussy-cut the images you want for your Valentines. I cut carefully, trying to preserve borders, etc. as those elements can still be used for a card or something in the future.
Once all of my elements were cut, I picked my six favorites to use on the cards. I looked for coordinating patterned papers to go with each element (several came from Sweet Sentiments, the rest are from other Valentine paper pads). The patterned paper is cut 3-7/8″ x 5-1/8″. I selected a background layer for each from a coordinating solid color. The background layer is cut 4.25″ x 5.5″. I embossed each of the background layers with an all-over embossing folder, a flourish-pattern by Sizzix. I also selected an appropriate doily for each Valentine. Because I wanted the focus to remain on the Sweet Sentiments elements, I tried to select doilies that were more simple and would complement the images.
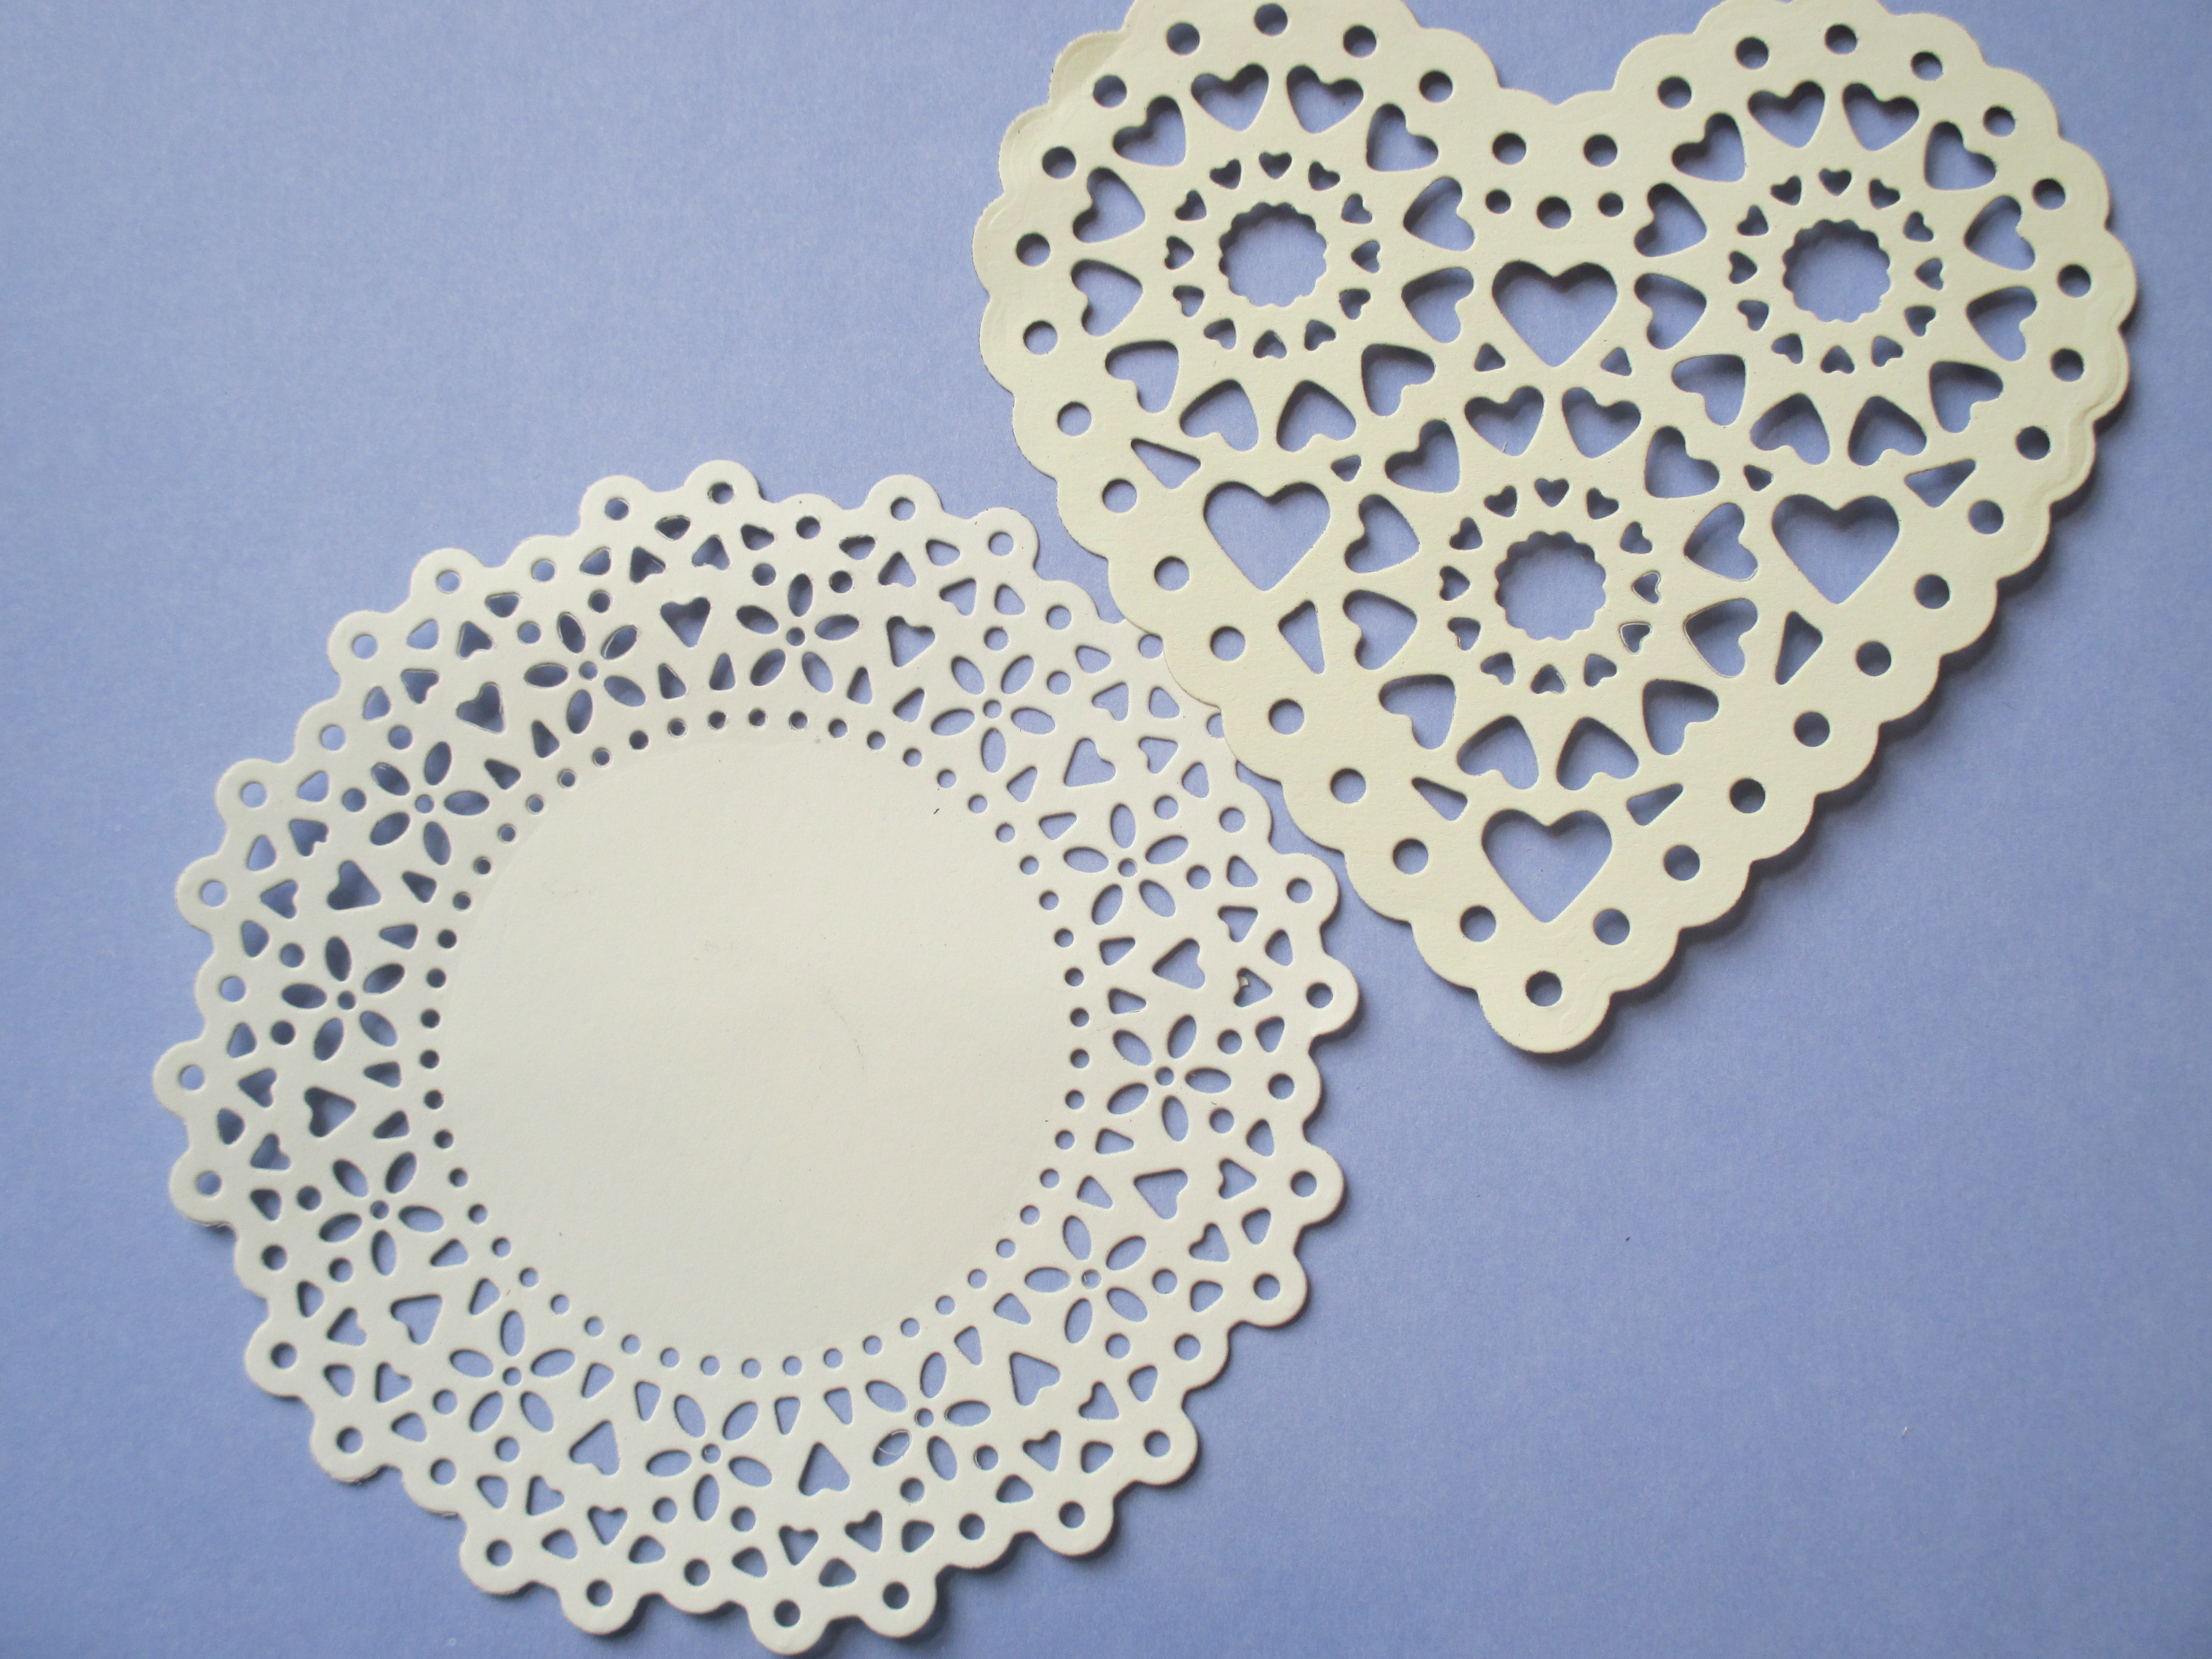
There are so many different kinds of doilies available. There are large and small, frilly and simple, round, oval, square and heart-shaped, etc. – and that only takes into account the pre-made doilies that you can purchase. When you look to the world of papercrafting, there are many more ways to incorporate doilies into a project. Most of the die companies sell dies that they call “doilies” — and almost every one offers round or heart-shaped doilies. The beauty of dies is that you can select any color or patterned paper to use for a doily, so there is much more selection than there would be with pre-made doilies that are generally available only in a few colors (primarily white and ivory). There are also embossing folders that emboss a doily pattern onto paper. Doily stencils and doily rubber stamps can also be used in a number of ways to add the look of a doily to a project. There are just so many fun choices. Please see the short video for some of my favorites (pictures and detailed information are included at the end of this blog post).
Now that the paper and doily selection is complete, it is time to assemble the cards. I worked on each card separately, matching ribbon and embellishments as appropriate to the finished project. I used Scor-Tape by Scor-Pal to assemble the layers and to attach the embellishments. Where appropriate, I added a dimensional adhesive (low or normal) to “pop” the Sweet Sentiments cut-out (or a part of it). It is really such an easy project . . . and the end result is beautiful Valentines.
Note that if your style is more of the multi-layer cut-out cards, etc. the Sweet Sentiments paper will work for you too. The collection contains three sheets of each paper, so there is more than enough to allow for layering, etc.
Another great part of the Graphic 45 Sweet Sentiments collection is that when you finish your Valentines, you don’t have to put the paper away for use next year. The collection also includes beautiful elements for Easter cards. How fun!
Supply list
Graphic 45 “Sweet Sentiments” paper pad – I used the 8×8 pad
Assorted doilies
Cardstock – coordinating solids and a few patterns
Embellishments – assorted rhinestones, glitter and ribbons, etc.
Embossing folder – I used an all-over flourish pattern by Sizzix from the “Floral Flourishes and Vines” set
Die cutting machine – I used my Spellbinders Grand Calibur
Spellbinders “Lace Hearts” die
Adhesives – Scor-Tape by Scor-Pal and dimensional adhesive (low and normal)
For those interested in the doilies on the video, following are photographs and product names, etc.
These heart-shaped doilies are from the “Lace Hearts” dies by Spellbinders. (I used the plain versions on the Graphic 45 cards.) They are approximately 3,5″ high, 3.75″ wide.
These doilies are from the Spellbinders “Delicate Doilies” set. They are approximately 4″, 2″ and 1.75″.
These are the mini doilies from My Favorite Things (Die-namics Mini-Doily Circles). They are approximately 1.75″.
These are the Lifestyle Crafts (Quickutz) doilies. The heart is called simply “Heart Doily” and is approximately 3.5″ high and 4″ wide. The circle is called “Antique Doily” and is approximately 3.75″.
These are the X-Cut or Docrafts doilies. The circle is called “Vintage Notes – Doily” and is approximately 4.5″. The heart is called “Vintage Notes – Filigree Heart” and is approximately 4.5″ (tall and wide).
This is the Magnolia doily. It is called ”Tilda Doily“, and it is approximately 5.5″.
The full embossing folder is Lifestyle Crafts (Quickutz). It is A2 sized, and is from the ”Doily” set. The border or edging is a Sizzix embossing folder, and probably best fits an A6 card. It is called “Scallop Heart Doily (3-pc. set)”.
The two stamp sets in the video are: “Doilies” by Martha Stewart Crafts and CSS-107 by Little Yellow Bicycle.
The products featured in this post are available from Cut at Home or from your local papercrafting store. My fave is Bayers Pampered Stampers in Toledo, Ohio.
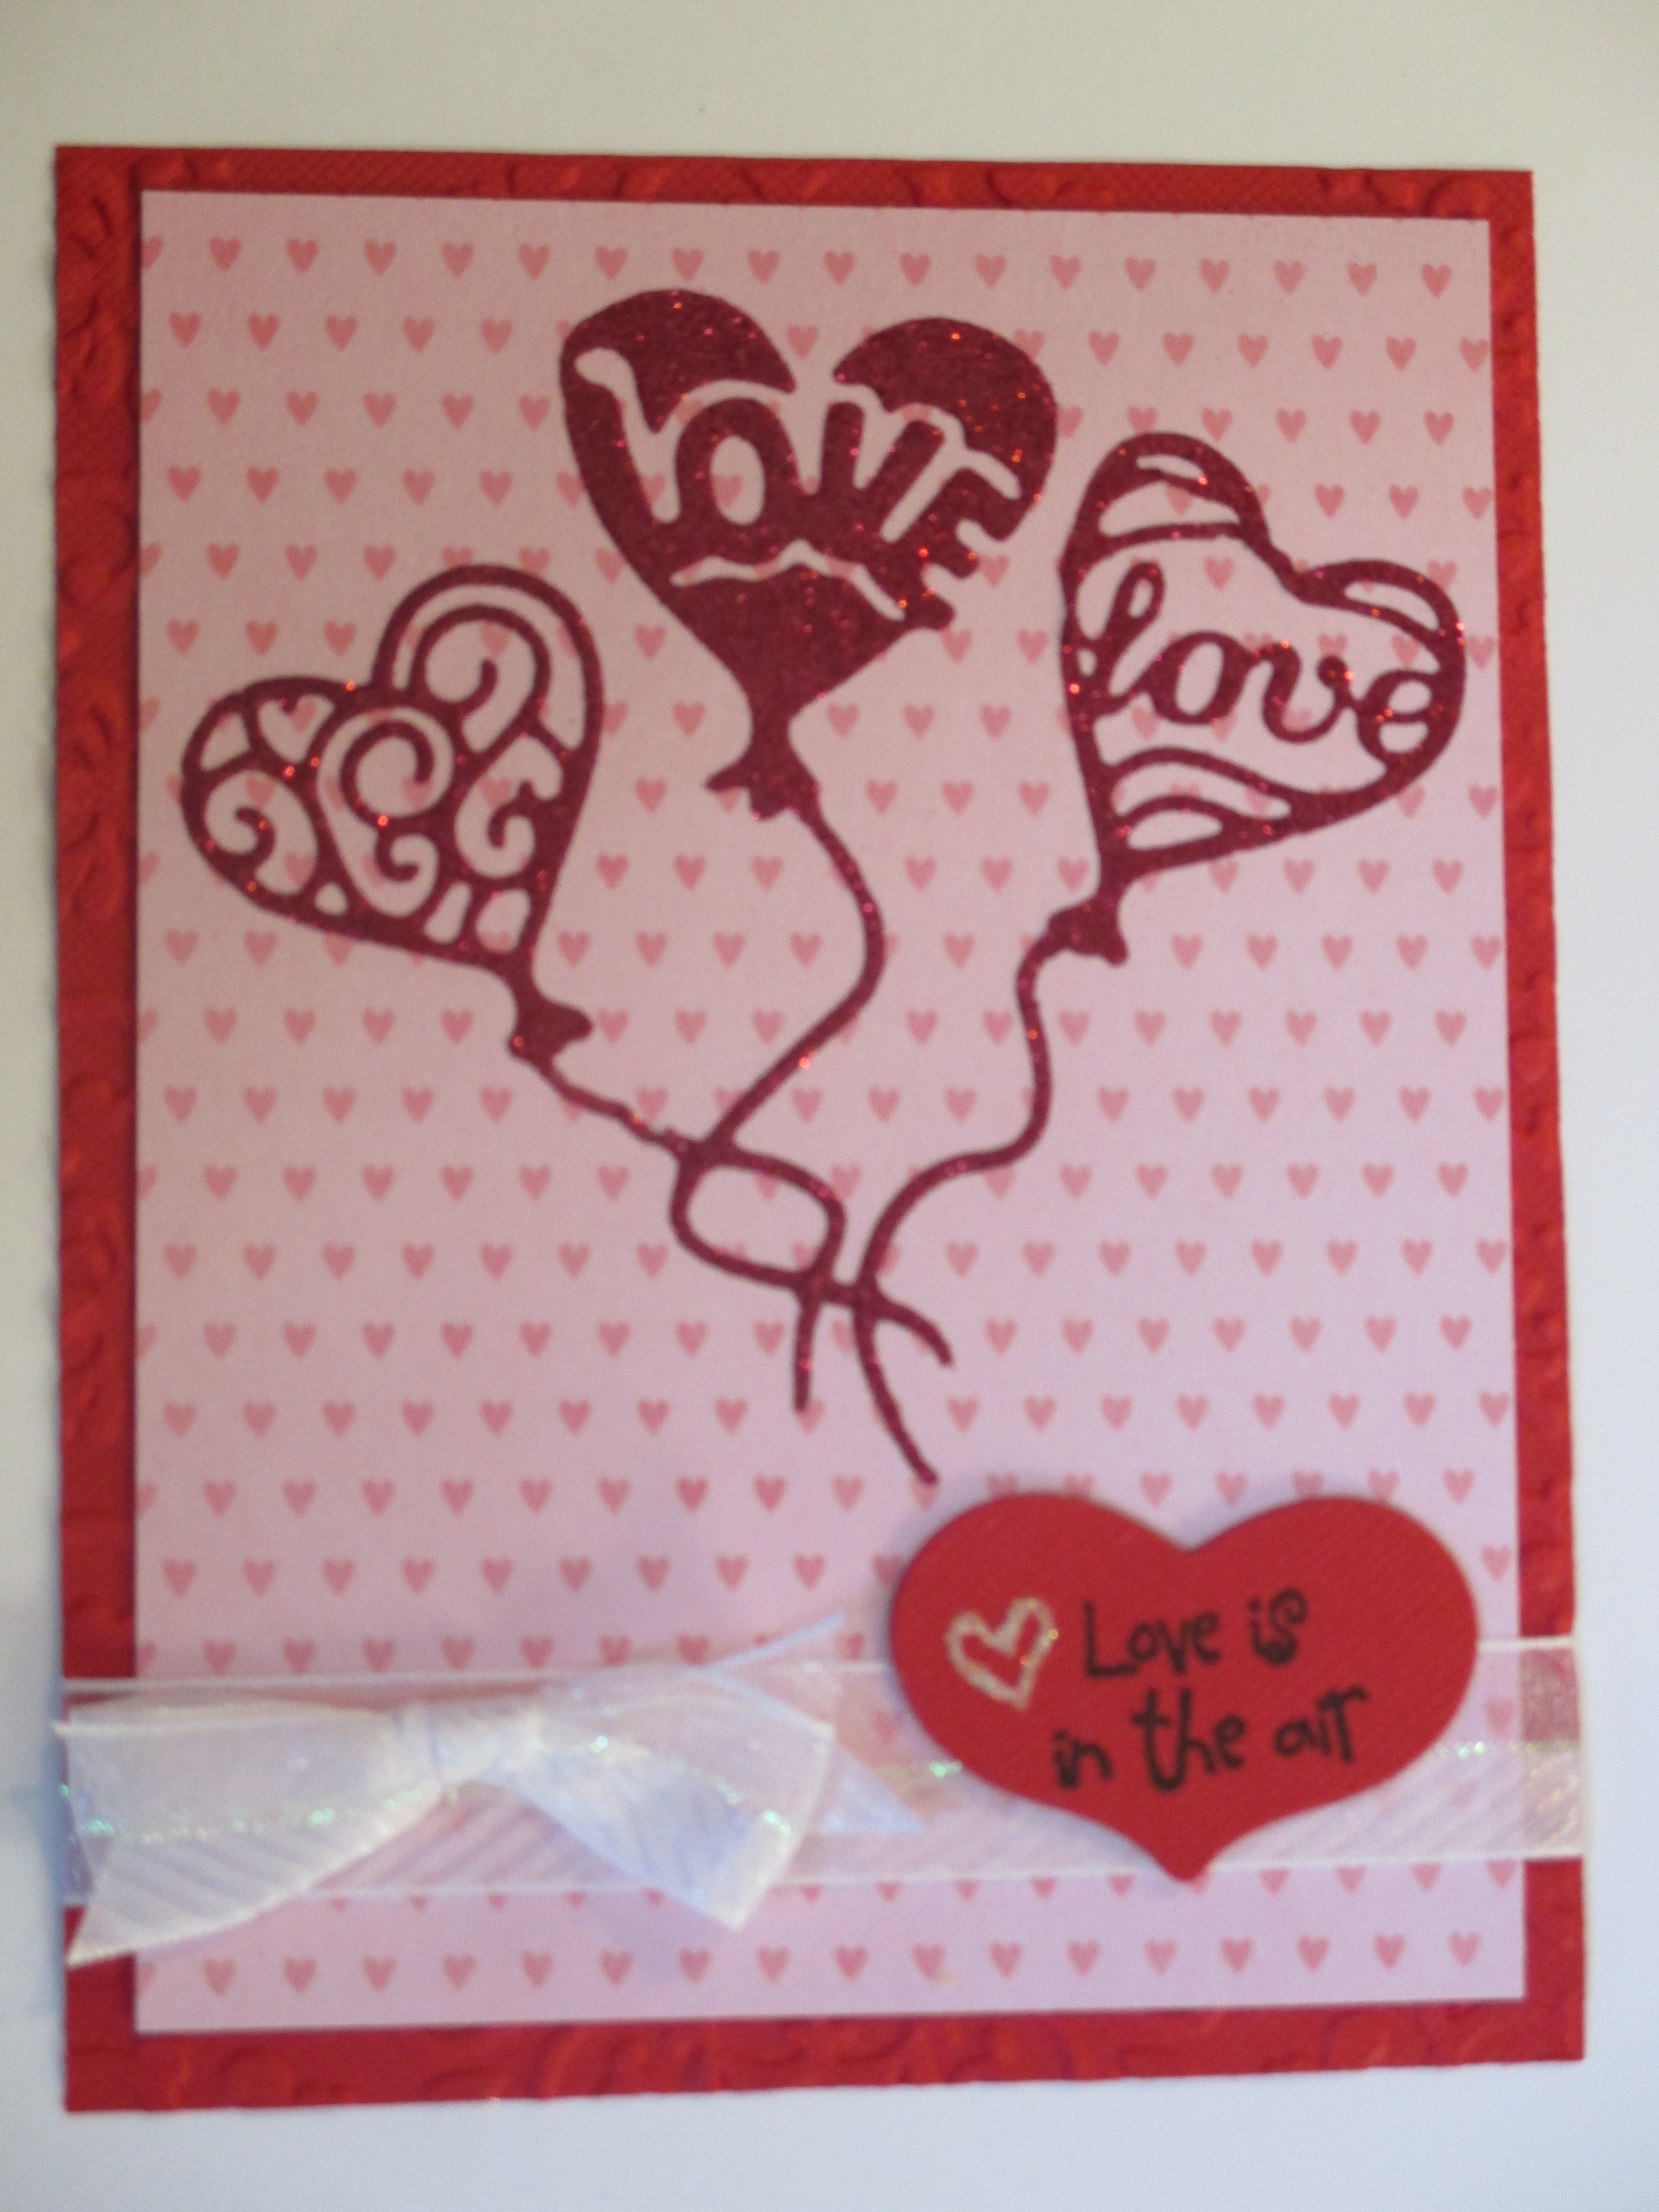
Today my card is a Valentine featuring the “Heart Pops” die by Die-Versions. This is a new die, and when I saw it I knew it was a must have. It is just so much fun, and depending on how you use it makes a great Valentine for all ages. It can also be used for a variety of projects other than those for Valentines Day.
I used a glittering technique for this card that features Scor-Tape by Scor-Pal. It is a simple technique, although it may take a little practice on something as intricate as this die.
I started out with a 6”x6” sheet of Scor-Tape. These sheets have liners on both sides, making it possible to die cut the Scor-Tape. I cut the heart balloons from the Scor-Tape. The Die-Versions dies cut very nicely, and I didn’t have any problems with “no cut” areas, etc. Just do whatever you normally do with your die cutting machine for intricate dies (run it through a second time, add a shim, etc.) and it will be fine. When it comes to removing the shape from the die, just be careful and remember that you have a layer of tape and two layers of liner, so you don’t want to rip, etc. Work gently to free the image from the die.
Next I prepared the layers for my card. I cut a 4.25” x 5.5” piece of red cardstock as the background layer. Then I cut a patterned cardstock to 3-7/8” x 5-1/8” (my pink hearts are from a 6×6 paper pad by Pebbles called “Yours Truly”). I embossed the background layer using “Ornate Swirls” by Sizzix.
This next step is the one that can be a little tricky — placing the Scor-Tape balloons on the patterned paper. This is not difficult, but does take a little patience. First I carefully removed the brown liner from the balloons. I find it easiest to take one balloon at a time – remove the liner to the string and carefully trim off the liner (leaving the liner on the strings and other balloons intact). Then I placed that balloon on the cardstock before moving on to the next one. The tricky part is that sometimes the Scor-Tape comes up with the brown liner, and then it is very easy for it to get out of its intended shape, etc. I used my tools, etc. – tweezers, picks (like you use to get the small pieces out of dies), etc. – adding fingers to the mix just makes things worse. Again, it’s important to just work slowly and calmly through this, one balloon at a time. Once the liner was removed from all three balloons and all were in place on the cardstock, I removed the liner from the strings and set those into place. The strings also consist of some fairly thin pieces of Scor-Tape that may not exactly go where you want them to go – just have patience and use your tools (picks, tweezers, etc.) to guide them into place. Once the liner was fully removed, I pressed all of the pieces into the cardstock so that there was a strong bond (if it hasn’t fully adhered, glitter will get underneath, and the image may try to lift up off of the paper).
The hard part is over now – the rest is pure fun! I placed my card layer on a thin piece of paper (copier-weight paper, for example). I opened the jar of glitter and set it to the side of the paper. Then I removed the top Scor-Tape liner from the image. This should be fairly easy, although you’ll want to be a little careful here to make sure that you don’t pull up the Scor-Tape also. Once the Scor-Tape was exposed, I added glitter to cover the tape image. I used a microfine glitter for my project, and that can get everywhere – so I always try to only shake out a little more than is needed, keeping most of it in the bottle. When the image was covered, I used my finger to lightly press the glitter onto the tape. Then I tapped off the excess glitter onto the lightweight paper, and used a soft bristled brush to continue removing the excess glitter from the card front. (You can easily fold the lightweight paper and guide the unused glitter back into the jar.)
The next step is to burnish the image. I simply rubbed my finger over the glittered area. This loosens any excess glitter that remains, and also revitalizes the glitter that adheres to the Scor-Tape to bring back the “sparkle”. This is a very important step, but clearly the easiest. Once the entire image was burnished, I used my brush again to remove any excess glitter from the project. Please see this short video for a demonstration of the glittering technique.
To finish the card, I used ¼” Scor-Tape by Scor-Pal to attach the glittered layer to the back layer. I also used the Scor-Tape to attach the ribbon and bow. I cut a red heart (same paper as the background) using one of the “Rustic Hearts” Die-namics dies by My Favorite Things. I stamped the sentiment on the heart. I used my Quickie glue pen to draw a small heart next to the sentiment, and covered the glue with Warm Highlight glitter by Glitter Ritz. It takes just a short time for the glue to dry (about 5 minutes), and when it’s dry you can brush off the excess glitter and burnish the little heart. I attached the sentiment using a low dimensional adhesive. That’s it – the card front is finished!
Tip – When you’ve die cut as much as possible from your 6″ x 6″ Scor-Tape sheet, don’t throw it away or recycle it as you would with paper. It’s Scor-Tape, and is still a fabulous adhesive! You just need to cut those remaining pieces as needed, and use them on other projects. The pieces aren’t always very uniform, etc. but that won’t matter. The only difference is that you need to remove the liner from both sides, etc. No waste . . . how cool is that!
Supply List:
Scor-Tape by Scor-Pal – 6”x6” squares
Die-Versions Die – “Heart Pops”
My Favorite Things “Rustic Hearts” Die-Namics die – (for the sentiment)
Microfine glitter – I used Glitter Ritz cranberry and warm highlight
Glue pen – I used a quickie glue pen
Soft paintbrush – to brush away excess glitter
Picks (to remove small pieces from a die) and tweezers
Cardstock – lightly patterned and coordinating backing layer
Embossing folder – I used “Ornate Swirls” by Sizzix
Several sheets of thin paper (copier paper) to catch excess glitter
Die cutting machine – I used my Grand Calibur by Spellbinders
Sentiment stamp – I used “Love is in the Air” by Impression Obsession
Black Versafine ink
Adhesive – I used ¼” Scor-Tape by Scor-Pal and a low dimensional adhesive
Ribbon
For those that are interested in the supplies on the video – I used one of the dies from the Marianne Creatables Die Hearts set. They are just too cute, and the perfect size for many projects! The glitter that I used was Peony Pink microfine glitter by Elizabeth Crafts. I’ve included pictures of the glittered heart from the video, and the Marianne dies below.
The featured supplies are available from Cut at Home, and all supplies are available from your local paper crafting store. My fave is Bayers Pampered Stampers in Toledo.
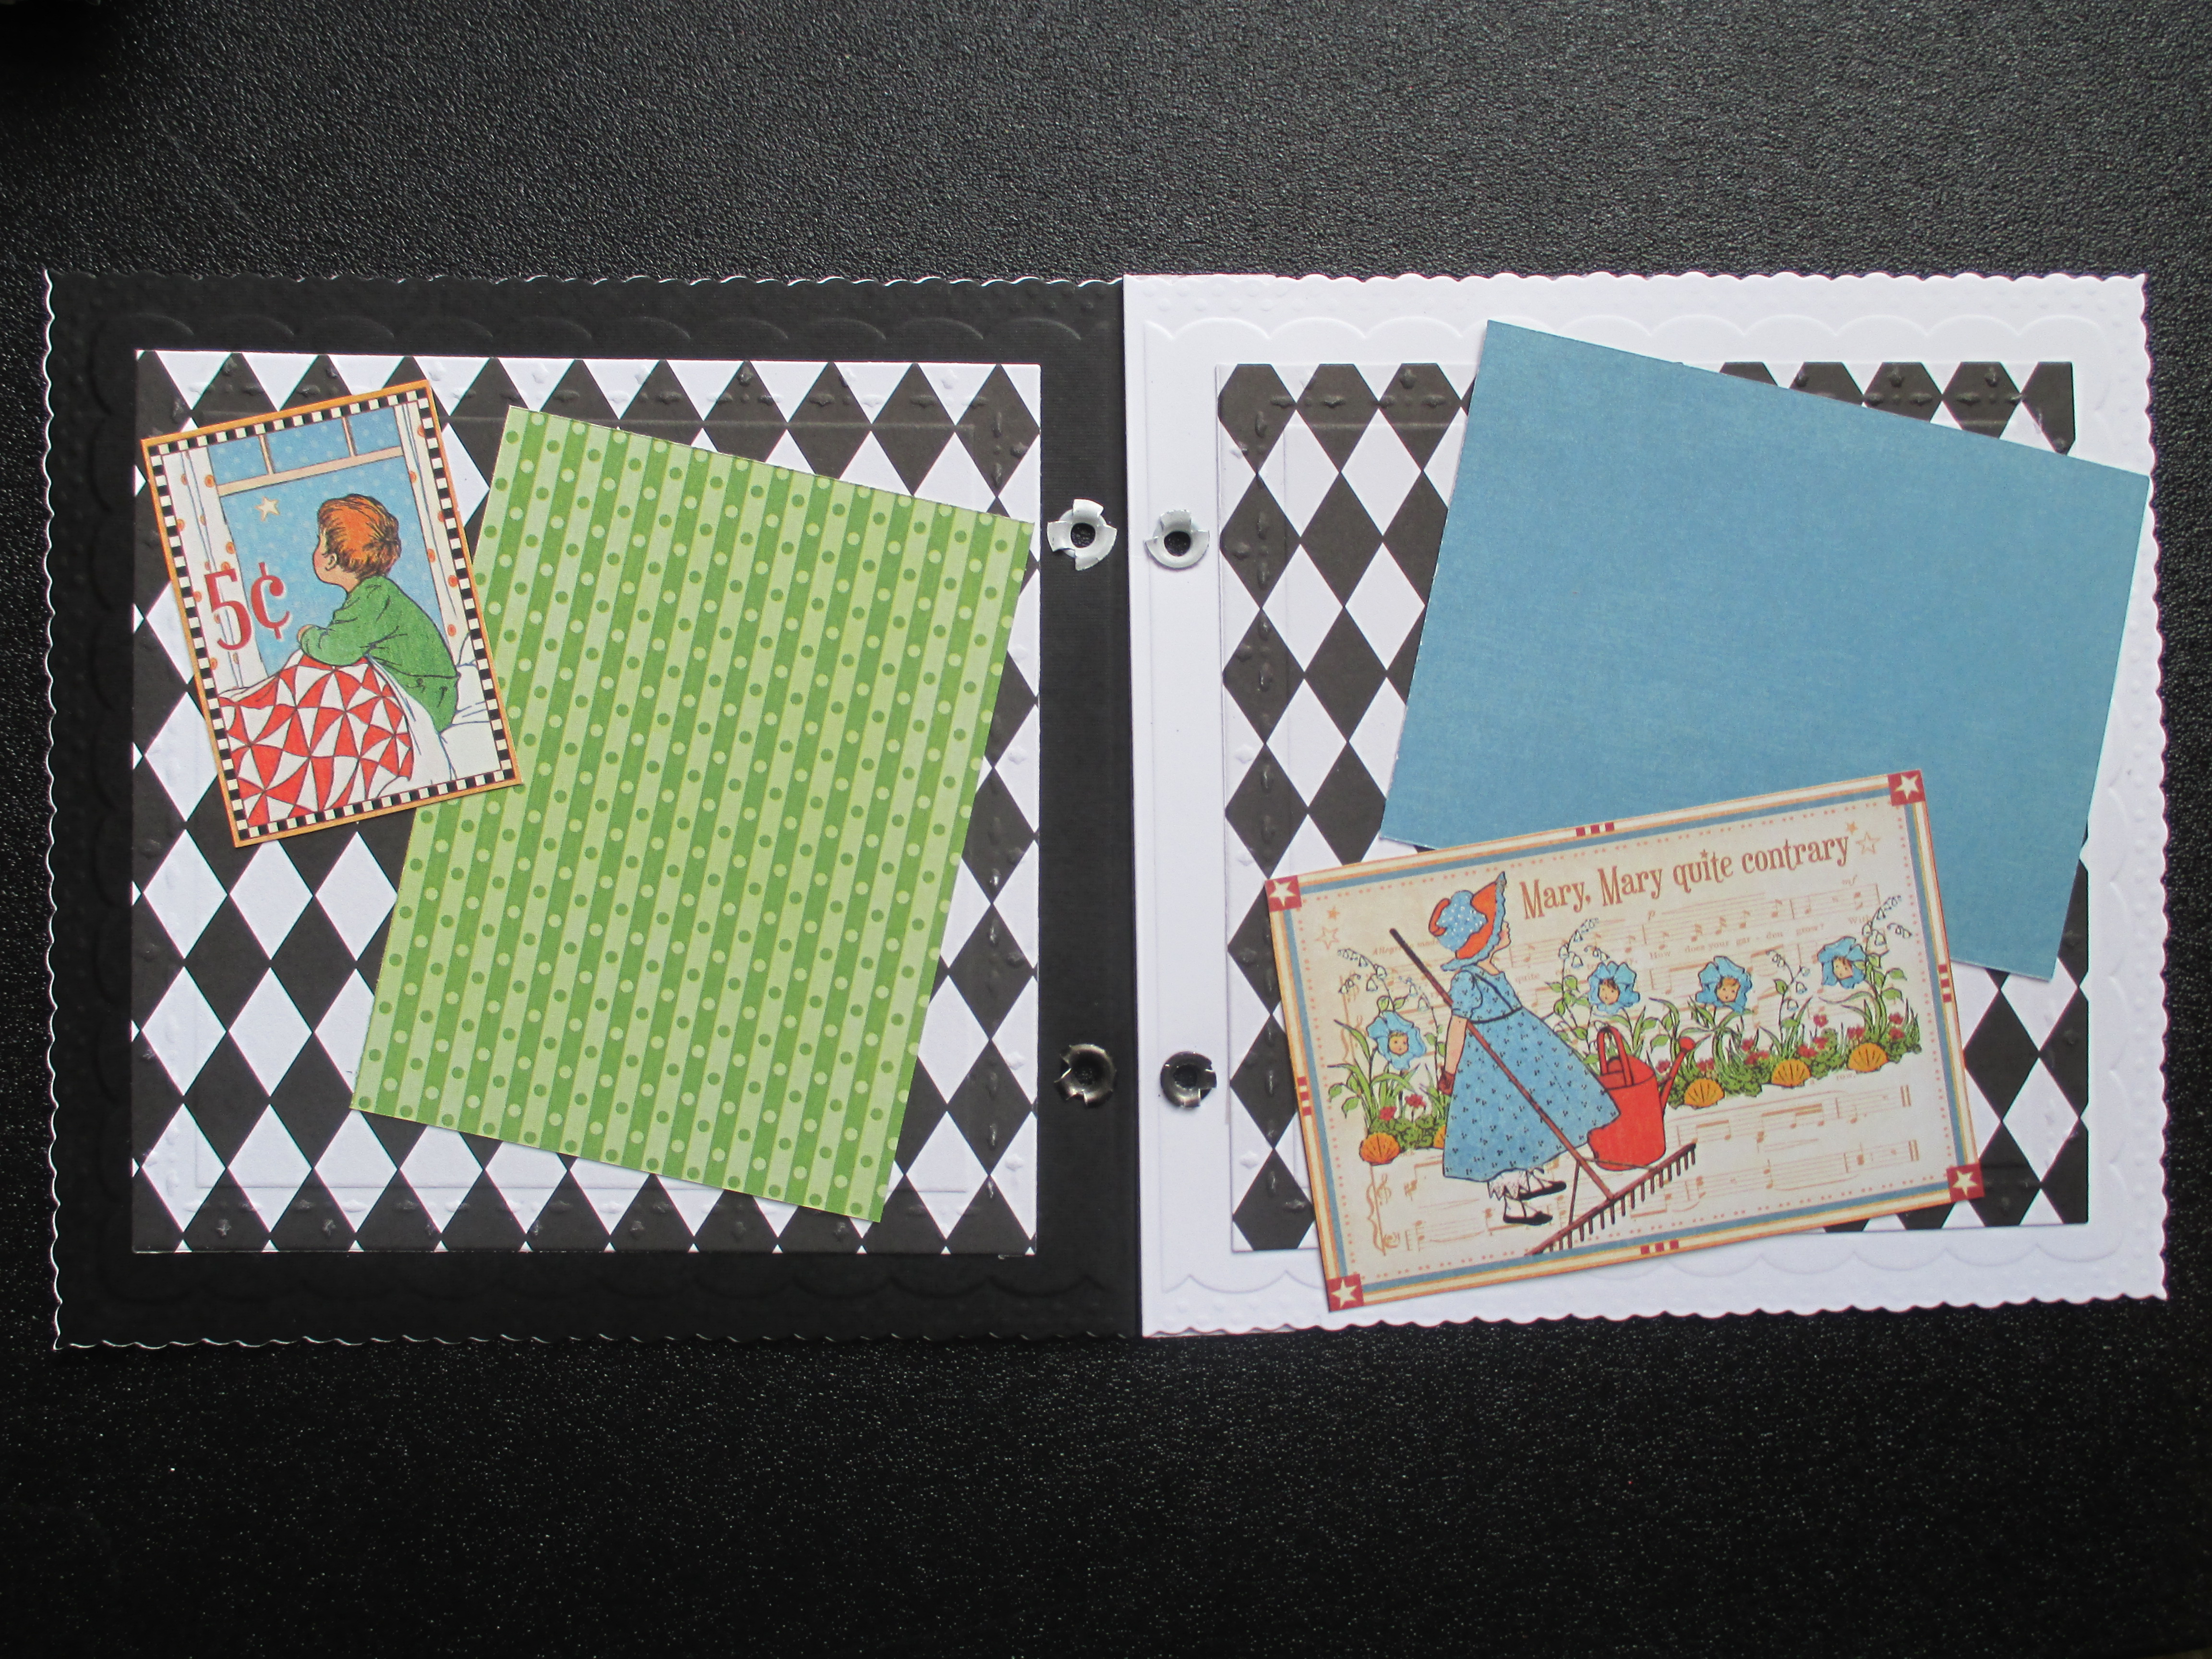
Today my project is a mini-album featuring papers from Mother Goose by Graphic 45. This paper is so fun, and makes a perfect baby mini-album. The colors are very vibrant, and in the 8×8 paper pad there are journaling cards, borders, stamps of various sizes, and other depictions of Mother Goose characters. There are also chipboard stickers and stamps, etc. in the collection if you’re interested.
If you have the right tools and inspiration, mini-albums are actually pretty quick and easy. It is best to start with a good die set to cut your pages. For this project, I chose Creative Book Pages Two by Spellbinders. I like the detail around the cut and embossed edges, and the size is perfect for a small album. The largest sheets are 6”x6”, with a little extra along the side for binding. The next largest die is 5”x5” and would also make a good mini-album. Of course you could also choose to layer the two together.
Next, it is important to have a good theme or inspiration for the mini-album. The Mother Goose paper is just too fun, and I knew that it would be perfect for a mini-album. I looked at the colors in the various papers, and decided that black and white would be the best colors to use for the pages of my mini-album. At this early point I wasn’t sure quite how to put them together, so I cut a few plain black and white pages with both the 6”x6” and the 5”x5” dies. Then I chose a couple of patterned papers and used the 5”x5” dies to cut them. I also cut out some 3”x4” squares from the patterned paper in the Mother Goose pack, as well as some of the journaling cards and other elements. After trying a few lay-outs with these pieces (at this point they can just be scrap papers), I was able to decide to make my pages white on the front and black on the back. Then I tried a few of the patterned papers on top, and decided to use the black and white diamond 5”x5” squares. Please see the short video for a description of how I “plan” a mini-album.
Once you’ve made the key decisions, it is just a matter of cutting out the pieces you’ll need for the album. I use 110lb. cardstock for my pages. This is heavier cardstock, but not quite heavy enough to be used alone for a mini-album page. It is perfect, though, when you tape two of them back to back. I used Scor-Tape by Scor-Pal to do this. Scor-Tape always gives a good strong bond, and you don’t have to worry about the pages coming apart. I punched two holes in each page, and used my Crop-a-Dile to place a white eyelet at the top of each page, and a black eyelet at the bottom. I also attached the patterned paper on the interior pages and the borders on the covers with Scor-Tape.
Once the pages were built, I laid out the scrapbook and began decorating. The hardest part was choosing which of the cute elements to use. There are just so many . . . . and because they represent nursery rhymes they are appropriate for either a boy or a girl. I tried to keep either the colors or the theme consistent with facing pages – but there really are no rules on this. Just do something that you like. I also used Scor-Tape to attach these pieces, although you might want to use removable double-stick tape until you decide which pictures to use (that may affect placement, etc.). Pictures of the front and back covers and some of the interior pages are below.
The final step is to add the book rings and the ribbon. To add the ribbon, I cut 3-4” pieces and tied them to the book rings. If you just use a single knot, it will be easy to untie them if you ever need to pull the book apart or add pages, etc. You don’t want to fully cover the ring, or you won’t be able to turn the pages, etc. Just cover it about half. With the wider ribbon I used (the white is about 1-1/2″ wide, and the black about 1″ wide) it only took 5 pieces of white and 4 pieces of black for each ring. That gave pretty full coverage of the rings from the front view, but still kept enough of the ring open to allow the book pages to be turned.
Supply List:
Graphic 45 Mother Goose 8×8 paper pad
Graphic 45 Mother Goose 6×6 Patterns & Solids paper pad
110 lb. cardstock – black and white
Patterned paper – I used Black and White Diamonds by Canvas Corp.
Paper trimmer
Die cutting machine – I used Spellbinders Grand Calibur
Spellbinders Grand dies Creative Book Pages Two (other sets that work well for mini-albums are Creative Book Pages by Spellbinders and Nesting Rounded Squares by Lifestyle Crafts)
Scor-Tape by Scor-Pal
Black and white eyelets
Crop-a-Dile by We R Memory Keepers
2 book rings
Ribbon
The supplies for this project are available from Cut at Home or from your local paper crafting shop. My fave is Bayers Pampered Stampers in Toledo, Ohio.


You must be logged in to post a comment.