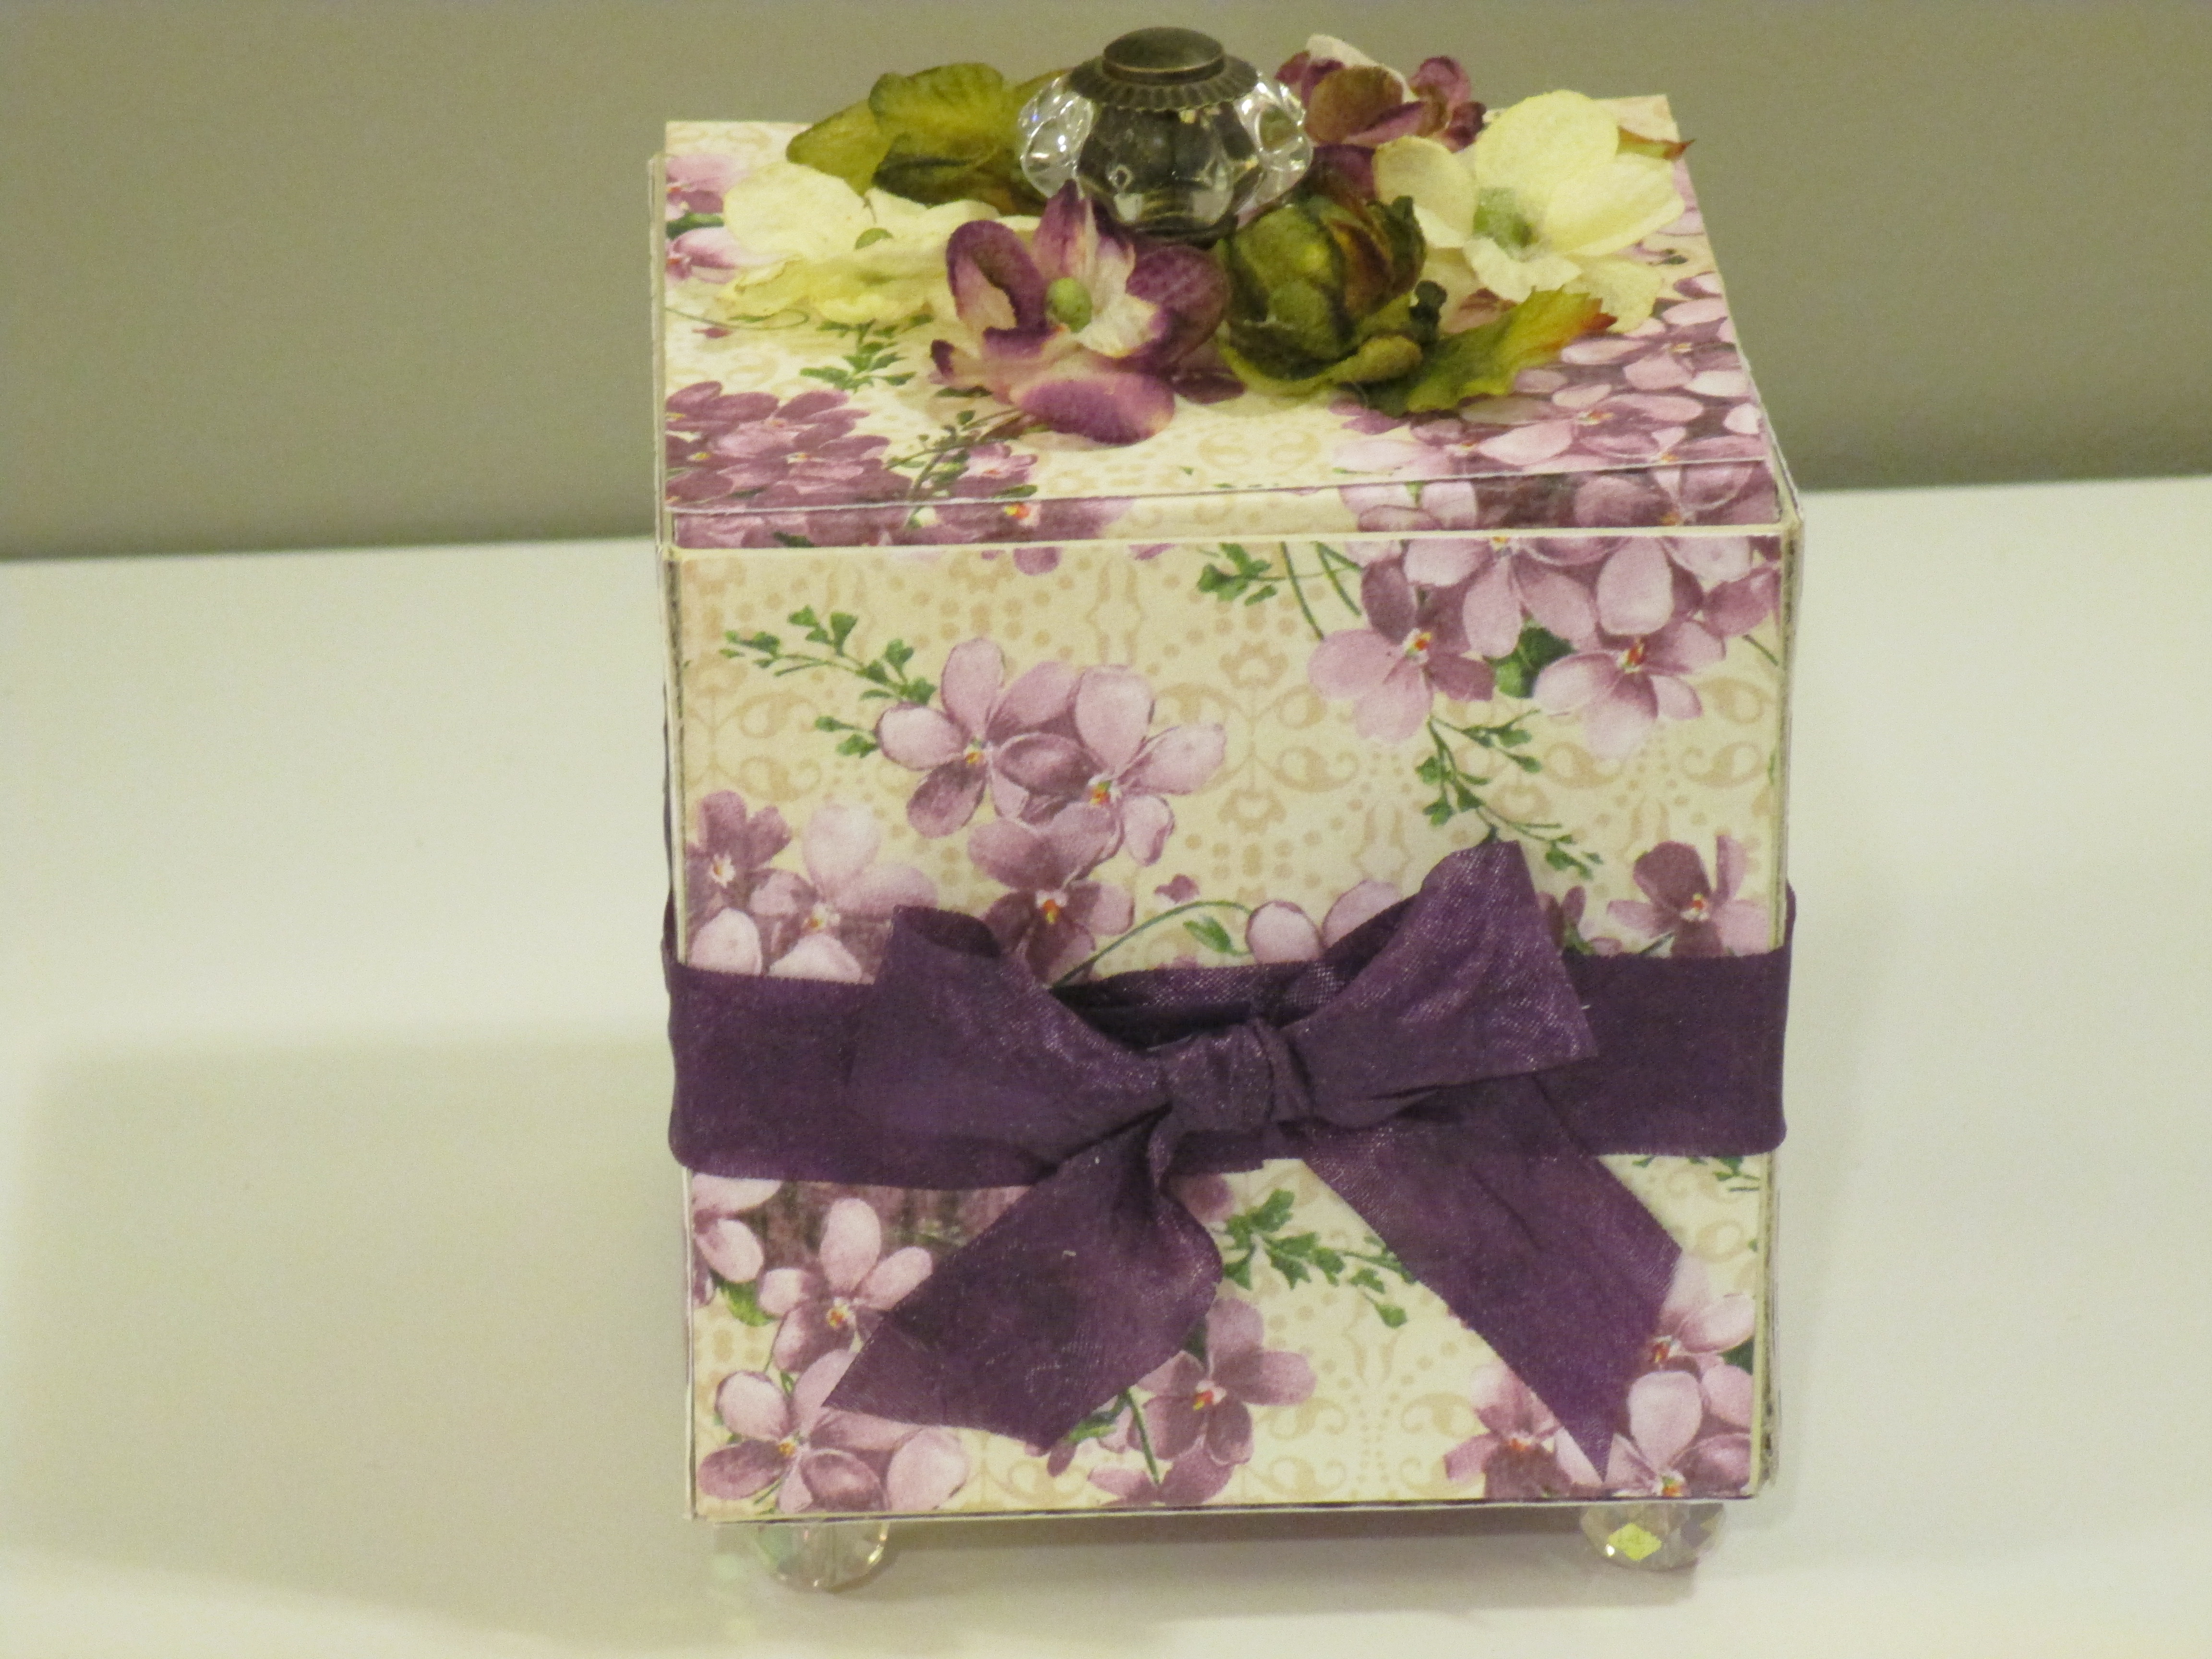
My project today is a pretty violet gift box featuring a Sizzix die by designer Eileen Hull and Sweet Sentiments papers by Graphic 45. Two weeks ago my blog post featured this die too – at that time I made some very quick, “plain jane” cupcake boxes. The violet gift box is the “dressed up” version – still easy peasy, but what a nice result! (I’ve included a link below to the cupcake box post).
This Sizzix die, like many of the Bigz dies, is specially designed to cut through heavier materials like chipboard, etc. This time I wanted a sturdy box that would stand the test of time, so I selected 50pt. chipboard as the base material. This cuts so easily on my Sizzix Big Kick! It is really no different than cutting through a layer of cardstock. I love being able to use a wider variety of materials without worrying about whether the machine can “handle it”. The Big Kick (or Big Shot – pretty much the same machine, just a slightly different design) certainly can! The square box die also scores as it cuts (no special mats, etc. needed for this), so that is also a time-saving step. I just needed to cut 2 of the 3-panel pieces, and I was ready to start assembling.
Assembly for the more dressed up box includes a couple of additional steps. The first is to paint certain areas of the chipboard in a coordinating color so that at the seams and folds where it might show, the chipboard looks less like chipboard and more like an extension of the paper covering it. I like to use the dabber-top paints for this purpose. The paint that I used on my box was a Jenni Bowlin paint by Ranger, but the Tim Holtz Distress Paints would also work very well for this purpose. I selected the paint to coordinate with my paper for the outside (the violets). The liner paper is also okay with the ivory, so there is no need to change the paints between the sides (if you do find this necessary, paint only the inside seams with the liner color). Chipboard soaks in a lot of paint, so I did find it necessary to do a second coat on everything. I painted the seams or folds on both the inside and outside of the box panel (including the seam at the flap), and all the way around the outside of the box piece. The dabber paints dry very quickly, so you can quickly move on with the project.
I chose to line this box so it would be pretty inside and out. The first step in lining is to line the flaps. The focus here is only on the inside flaps (the outside flaps are the ones that are covered with Scor-Tape and hold the box together). In addition to the inner flaps, you’ll have to cover the top flap of the box (the only one that is not used to make the box structure). To cover the flaps, I start with a piece of paper 3.25” x 1”. I place this against the flap, and fold it accordingly (you’ll fold the paper differently for the outside of the top flap than you will for the inner flaps). Once you have the fold line in place, remove the paper, crease it well, and use Scor-Tape to adhere it to the chipboard. You’ll notice that the flap coverings have square corners, where the box itself has slightly rounded corners. It is very easy to use your good paper cutting scissors to trim that edge along the appropriate curve, using the chipboard as a guide. As an alternative, you could cut these flap liners with the die, but I’m a little concerned that the scoring might be too much for them.
Once the appropriate flaps are covered (the 4 inside flaps, and the top outside flap), it is time to line the inside of the box. I selected a paper from the Graphic 45 Sweet Sentiments collection that coordinated with the violets to do this. Often it is helpful to pick a small overall pattern, such as a polka dot, since the joins, etc. won’t show or become offensive in the confined space inside the box. You’ll need six panels that measure just under 3-1/4” x 3-1/4” (cut them about 1/16” shorter to allow some additional room when the chipboard folds). If you cut exactly at 3-1/4″ x 3-1/4″, the lining paper may buckle or fold at the seams and cause problems later on in the process. I used ¼” Scor-Tape to attach the paper to the chipboard.
When the lining is in place, it is time to assemble the box. To assemble, fold the panels and the tabs along the score lines. Add ½” Scor-Tape to the two tabs at the end of one of the panels, and just one of the tabs on the other panel (the one that is already covered with paper on the outside should not be covered with Scor-Tape). Remove the Scor-Tape liner from the panel that has only the one piece of Scor-Tape, and then placed that tab in the center of the other box panel. It is important to take your time for this step, making sure to get the tab and the panel lined up properly (the Scor-Tape sticks pretty hard and won’t easily adjust if your alignment isn’t correct). Then, one at a time, remove the liner from the two remaining tabs. Fold the panel up along side it, carefully trying to line up the box side and the tab. Repeat for the other side. That’s it . . . the box is assembled.
Now it’s time to cover the box with the patterned paper. I cut six panels, 3-1/4” square. Carefully adhere these to each side of the box with 1-4” Scor-Tape. By adding the paper this way, you can control the overall appearance of the box, making sure that directional patterns, etc. are all going in the right way. The violet paper that I chose is from the Graphic 45 Sweet Sentiments collection, is pretty much an overall pattern, and doesn’t really need much matching. If you have a paper that does need to be matched, then you’ll need to cut the squares carefully so that they line up when added to the box. The alternative to covering the box this way is to cover the chipboard before you cut the box. If you do it that way, you’ll need to think through how the patterned paper needs to be placed in order to achieve a good finished appearance. The overall appearance of the box is pretty much the same regardless of your method for attaching the patterned paper. Please see the short video for additional information about the box assembly.
To finish the box, I first added the “feet”. I used crystal AB glass beads that measure 8mm x 12mm. They are not perfectly round – rather they look a little flatter on the top and bottom. The slightly flatter surface will allow the box to stand more normally. I sat the box on the side of a table with the flap hanging over in order to properly place the beads. I used a significant amount of Scotch Quick-Dry Adhesive so they would be securely attached. I had plenty of time and so I left the box to dry completely for 4-5 hours. If you’re in more of a hurry, you may want to use a hot glue gun, etc. to attach the beads.
Next I selected one of the Tim Holtz idea-ology Curio Knobs for the top. I punched a hole in the center of the top of the box to place the knob using my Crop-A-Dile Big Bite. (I found the center of my box top using my Tim Holtz ruler – the centering ruler side of this makes it an essential tool for your craft room.) The curio knobs are attached in the same way that you would attach a drawer pull – a screw comes up from the back and threads into the knob.
The last step is decorating the box. Here you’ll want to take your time and do something that makes the box unique and special. It should make you smile. There are so many options – charms or other metal sayings, etc. that can be strung on ribbon, flowers (pre-made or ones that you make), ribbons, laces, doilies, etc. I chose a 7/8” wide purple silk ribbon and some pre-made flowers by Petaloo. This made the project quick and easy. I used a couple of glue dots to attach the ribbon to the box so that it would not move. I chose to wrap the box with ribbon, and to tie the bow separately so both could look their best. I attached the bow with a little Scor-Tape, and used some Glue Dots to “fluff” the ribbon and force it in the shape that I wanted. The flowers are pre-made, so I only needed to use a few glue dots to adhere them to the lid.
Here are a couple of additional pictures of the box –
interior view
side view
bead placement on the bottom
Supply List:
Sizzix/Eileen Hull die – box, square (658058)
Chipboard (I used 50pt chipboard)
Die cutting machine – I used my Sizzix Big Kick
Scor-Tape by Scor-Pal – I used ½” and ¼”
Other adhesives — Scotch Quick-Dry Adhesive and small Glue Dots
Assorted patterned papers – I used two papers from the Graphic 45 Sweet Sentiments collection – Violet Bouquet and Perfect Petals (the reverse side)
Paint – I used one of the Jenni Bowlin by Ranger dabber top paints called “Malted Milk” (one of the Tim Holtz distress paints would also be a good choice)
Ribbon – I used a 7/8” wide purple silk ribbon
Embellishments – I used purple, ivory and green flowers by Petaloo
Today my project is a mini-album featuring papers from Mother Goose by Graphic 45. This paper is so fun, and makes a perfect baby mini-album. The colors are very vibrant, and in the 8×8 paper pad there are journaling cards, borders, stamps of various sizes, and other depictions of Mother Goose characters. There are also chipboard stickers and stamps, etc. in the collection if you’re interested.
If you have the right tools and inspiration, mini-albums are actually pretty quick and easy. It is best to start with a good die set to cut your pages. For this project, I chose Creative Book Pages Two by Spellbinders. I like the detail around the cut and embossed edges, and the size is perfect for a small album. The largest sheets are 6”x6”, with a little extra along the side for binding. The next largest die is 5”x5” and would also make a good mini-album. Of course you could also choose to layer the two together.
Next, it is important to have a good theme or inspiration for the mini-album. The Mother Goose paper is just too fun, and I knew that it would be perfect for a mini-album. I looked at the colors in the various papers, and decided that black and white would be the best colors to use for the pages of my mini-album. At this early point I wasn’t sure quite how to put them together, so I cut a few plain black and white pages with both the 6”x6” and the 5”x5” dies. Then I chose a couple of patterned papers and used the 5”x5” dies to cut them. I also cut out some 3”x4” squares from the patterned paper in the Mother Goose pack, as well as some of the journaling cards and other elements. After trying a few lay-outs with these pieces (at this point they can just be scrap papers), I was able to decide to make my pages white on the front and black on the back. Then I tried a few of the patterned papers on top, and decided to use the black and white diamond 5”x5” squares. Please see the short video for a description of how I “plan” a mini-album.
Once you’ve made the key decisions, it is just a matter of cutting out the pieces you’ll need for the album. I use 110lb. cardstock for my pages. This is heavier cardstock, but not quite heavy enough to be used alone for a mini-album page. It is perfect, though, when you tape two of them back to back. I used Scor-Tape by Scor-Pal to do this. Scor-Tape always gives a good strong bond, and you don’t have to worry about the pages coming apart. I punched two holes in each page, and used my Crop-a-Dile to place a white eyelet at the top of each page, and a black eyelet at the bottom. I also attached the patterned paper on the interior pages and the borders on the covers with Scor-Tape.
Once the pages were built, I laid out the scrapbook and began decorating. The hardest part was choosing which of the cute elements to use. There are just so many . . . . and because they represent nursery rhymes they are appropriate for either a boy or a girl. I tried to keep either the colors or the theme consistent with facing pages – but there really are no rules on this. Just do something that you like. I also used Scor-Tape to attach these pieces, although you might want to use removable double-stick tape until you decide which pictures to use (that may affect placement, etc.). Pictures of the front and back covers and some of the interior pages are below.
The final step is to add the book rings and the ribbon. To add the ribbon, I cut 3-4” pieces and tied them to the book rings. If you just use a single knot, it will be easy to untie them if you ever need to pull the book apart or add pages, etc. You don’t want to fully cover the ring, or you won’t be able to turn the pages, etc. Just cover it about half. With the wider ribbon I used (the white is about 1-1/2″ wide, and the black about 1″ wide) it only took 5 pieces of white and 4 pieces of black for each ring. That gave pretty full coverage of the rings from the front view, but still kept enough of the ring open to allow the book pages to be turned.
Supply List:
Graphic 45 Mother Goose 8×8 paper pad
Graphic 45 Mother Goose 6×6 Patterns & Solids paper pad
110 lb. cardstock – black and white
Patterned paper – I used Black and White Diamonds by Canvas Corp.
Paper trimmer
Die cutting machine – I used Spellbinders Grand Calibur
Spellbinders Grand dies Creative Book Pages Two (other sets that work well for mini-albums are Creative Book Pages by Spellbinders and Nesting Rounded Squares by Lifestyle Crafts)
Scor-Tape by Scor-Pal
Black and white eyelets
Crop-a-Dile by We R Memory Keepers
2 book rings
Ribbon
The supplies for this project are available from Cut at Home or from your local paper crafting shop. My fave is Bayers Pampered Stampers in Toledo, Ohio.
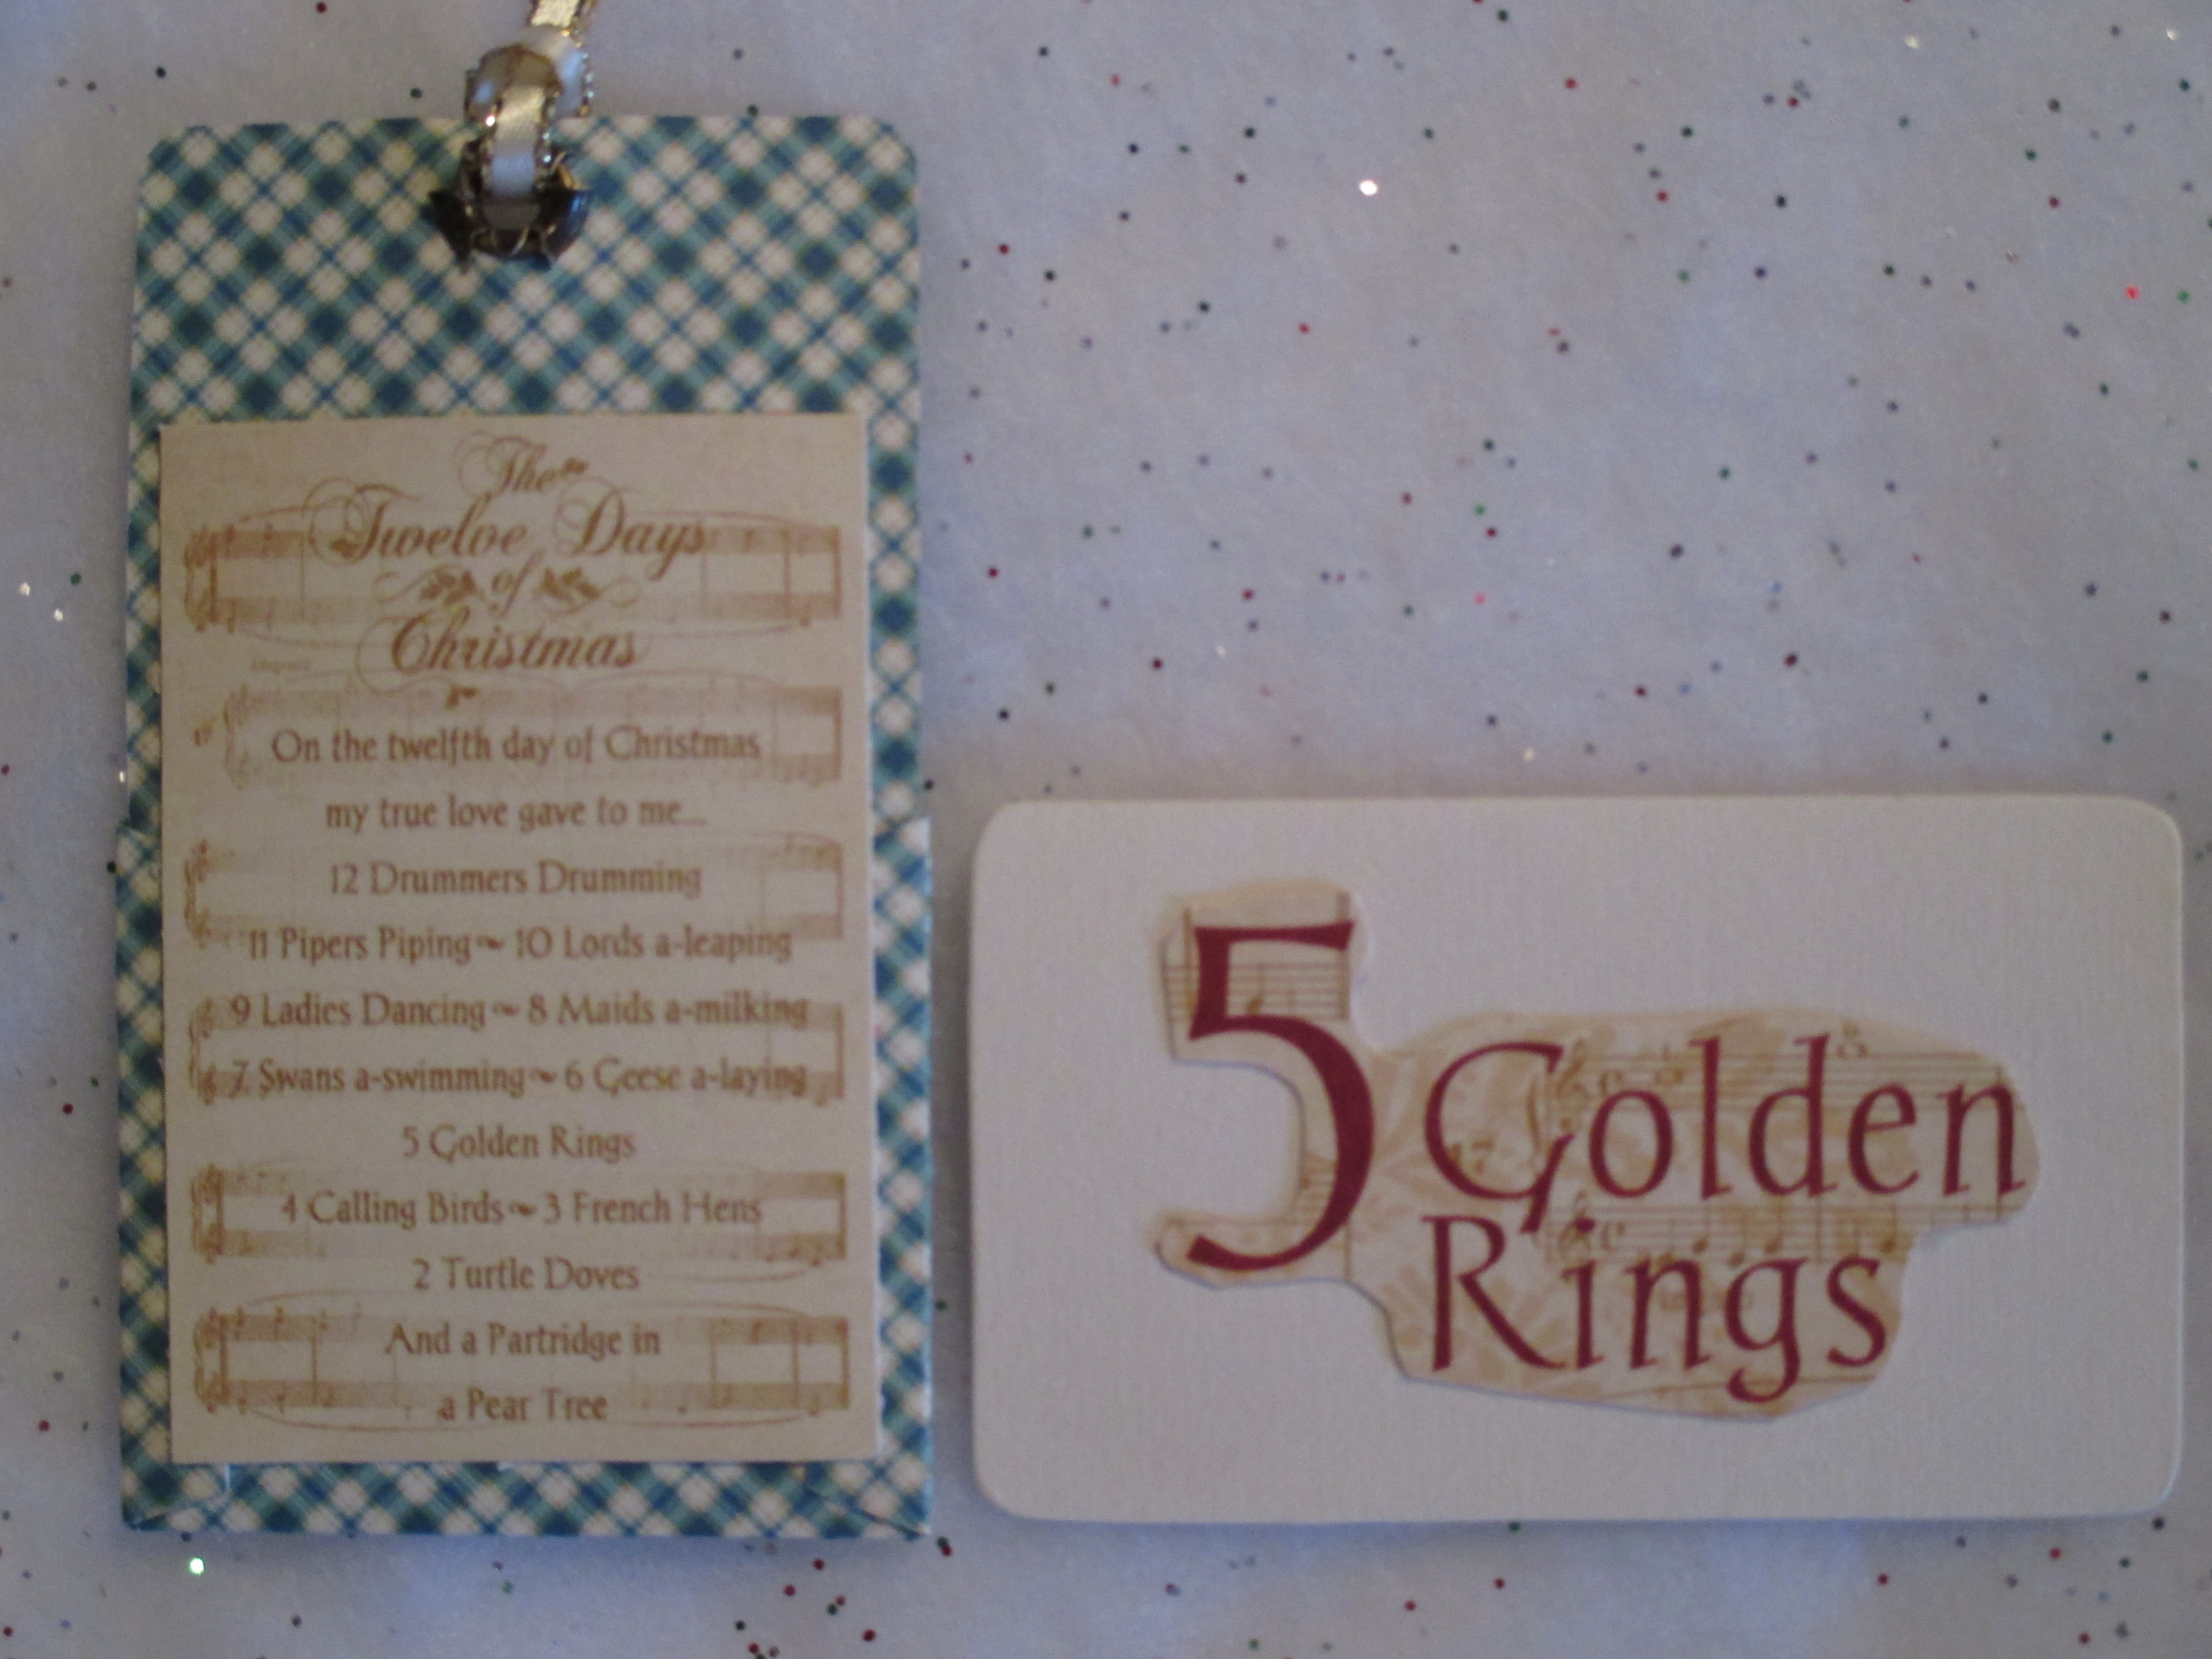
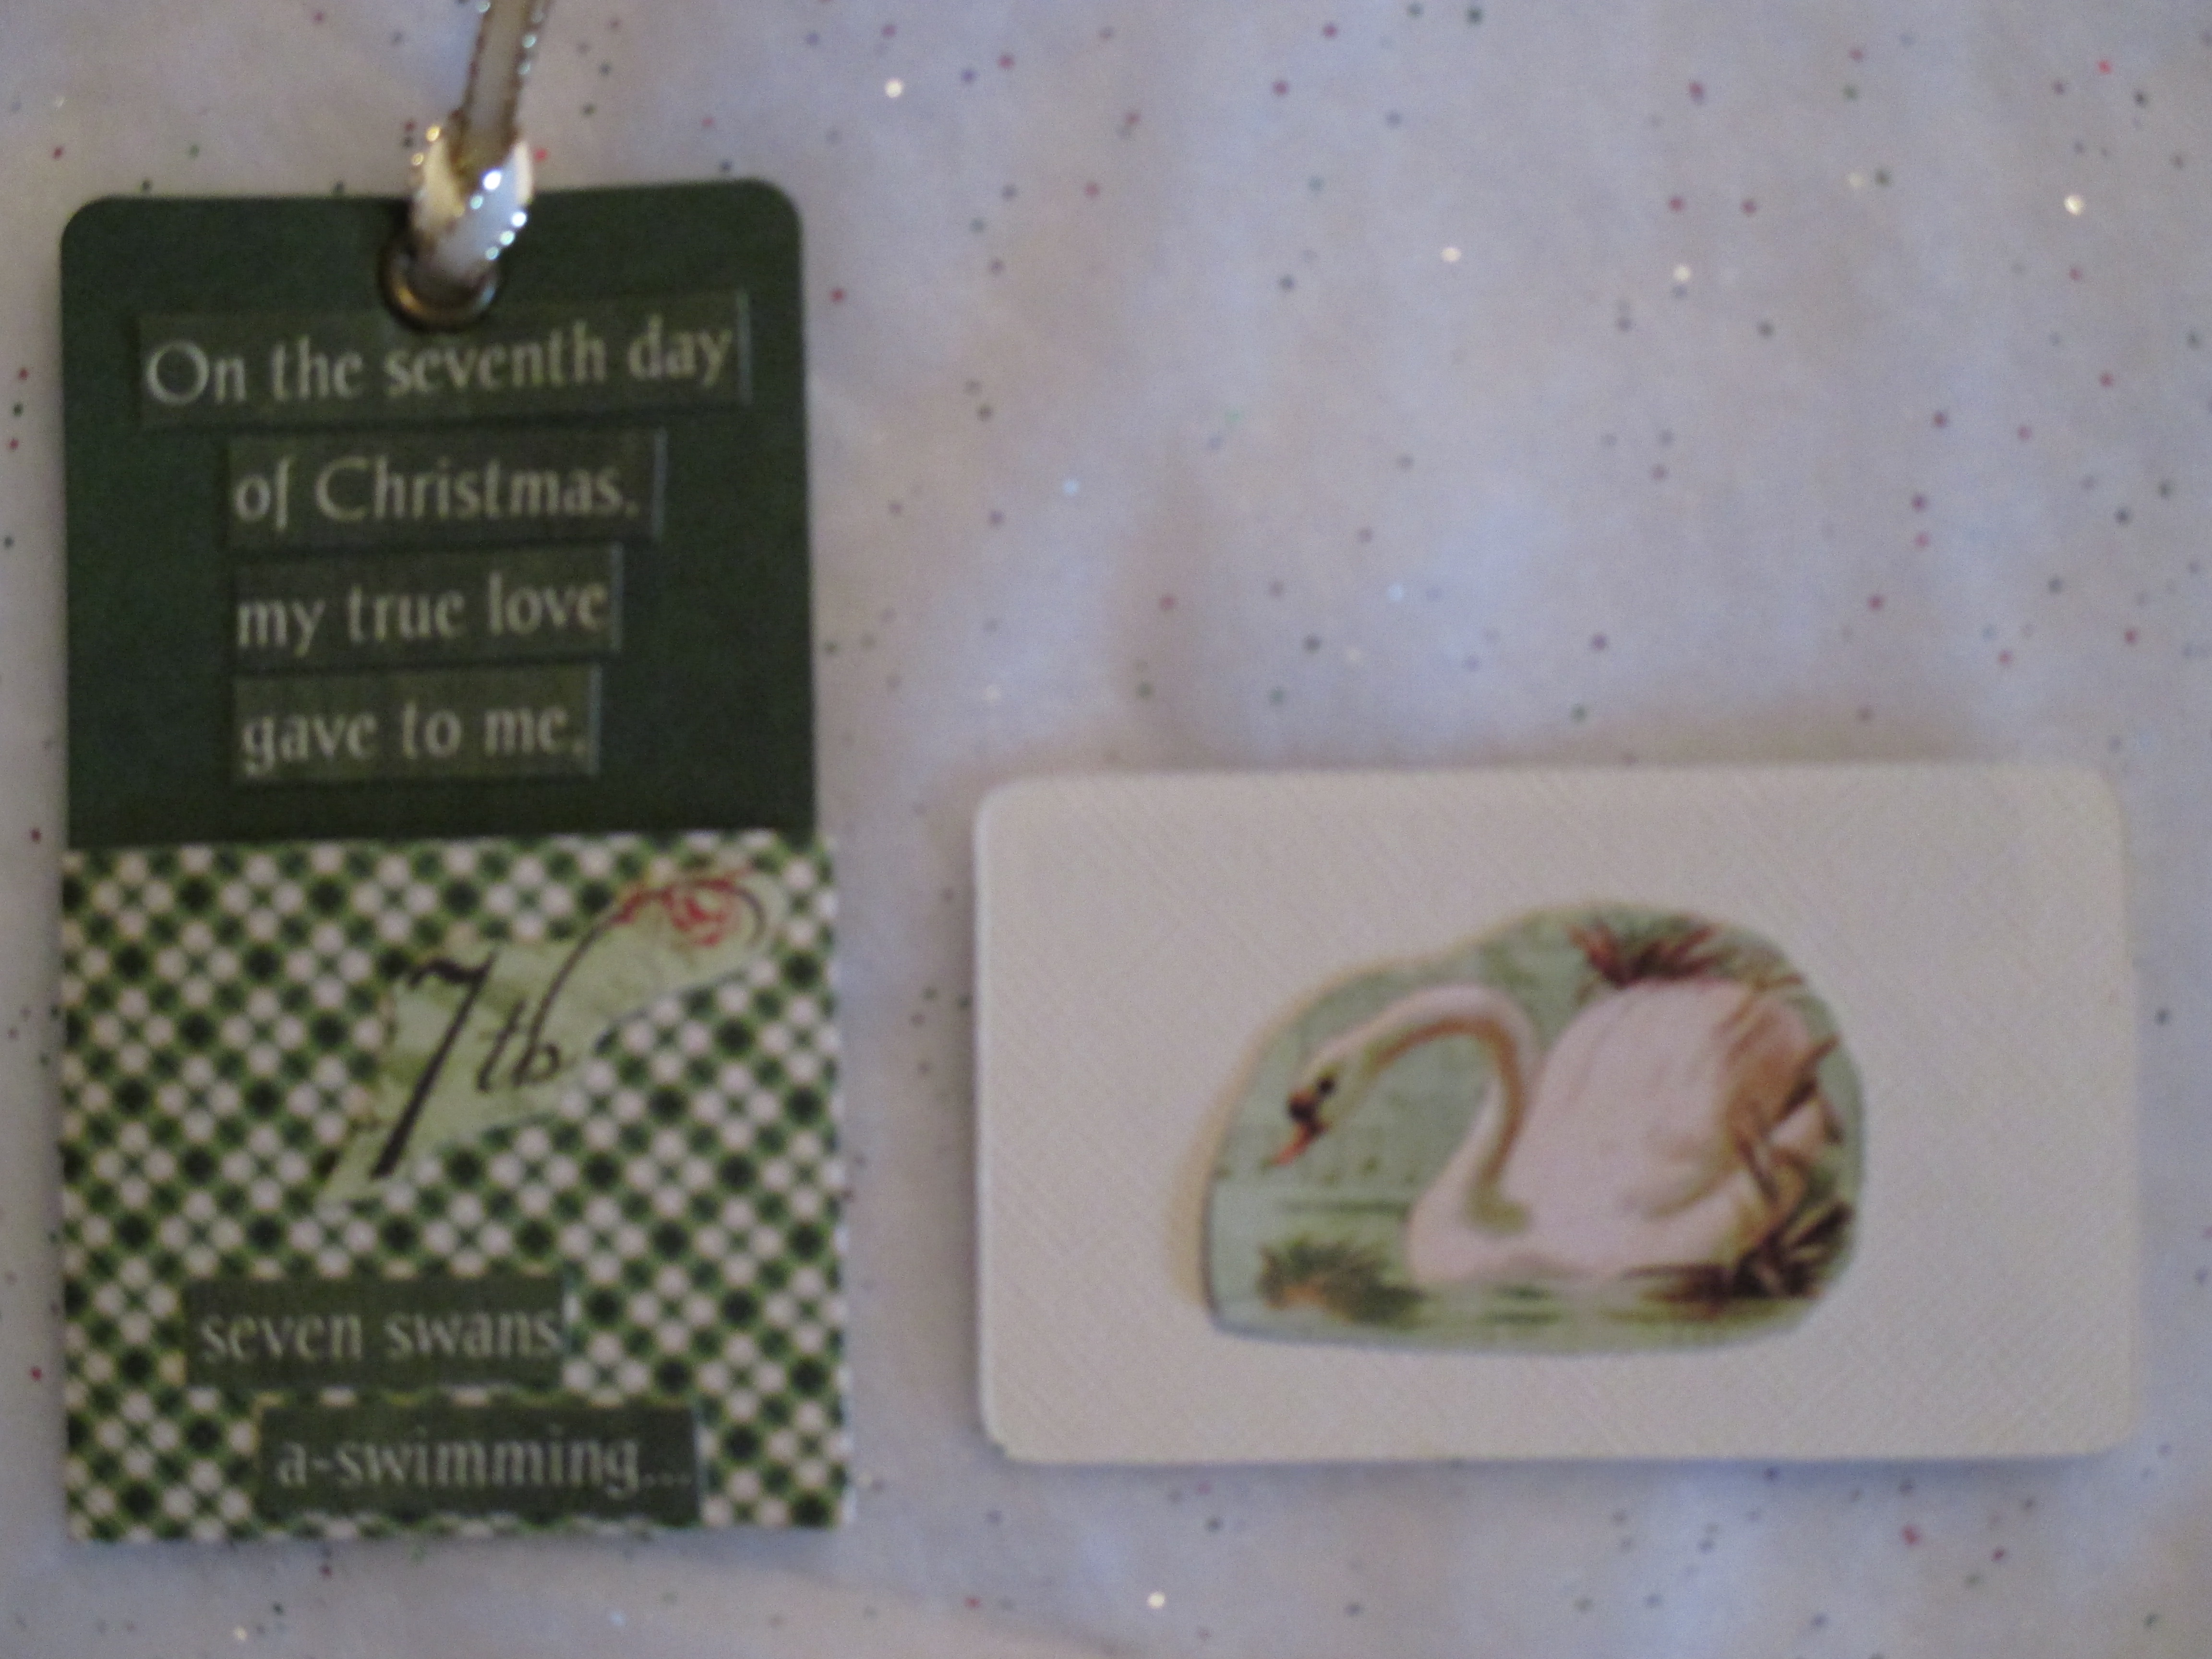
Christmastide, or the Twelve Days of Christmas, begins soon so my project for today is a set of Twelve Days of Christmas Tags. The tags are made using Graphic 45 Twelve Days of Christmas papers and a Sizzix/Brenda Walton die (Inserts and EnvelopesMini Correspondence), and are very quick and easy to make.
I began by selecting papers from the Graphic 45 Twelve Days of Christmas, Patterns and Solids 6×6 paper pack to make the pockets. I also selected a solid paper for the tag – Bazzill “Cream Puff”. I used 1/2 sheet of the 6×6 paper for each pocket, a 2″x3″ piece of the Bazzill paper for each tag. I used my Sizzix Big Kick to cut the twelve tags and pockets from the Mini Correspondence die. The pockets are easily assembled with just a couple of folds (the die adds the score lines as you cut each pocket) and a little Scor-Tape by Scor-Pal.
I used the “Turtle Dove”, “Calling Birds”, “Golden Rings”, “Swans a Swimming”, ”Ladies Dancing”, and “Drummers Drumming” sheets from the Twelve Days of Christmas 8×8 paper pack to cut the elements to decorate the pockets and tags. The 12 days lists that I used on the back of each tag are from the back of the “My True Love” paper (you’ll need both sheets to cut 12). It takes just a few minutes to decorate each tag and pocket. I attached each of the elements with 1/8″ Scor-Tape. I added an eyelet and some ribbon to the top of each pocket to finish it. The finished tags and pockets are approximately 2″x3.5″. Here’s a close up of the front and back of day 5.
Pictures of the remaining tags follow —
I thought this was a very cute, and easy holiday project. Merry Christmas!
Supply List
Graphic 45 Twelve Days of Christmas 8×8 paper pad and 6×6 Patterns and Solids paper pad
Bazzill 12×12 paper – Cream Puff (you’ll only need 1/2 sheet)
Sizzix/Brenda WaltonBigz XL die – Inserts and Envelopes Mini Correspondence


You must be logged in to post a comment.