Happy Birthday Taylored Expressions!

Taylored Expressions is celebrating their ninth birthday!  As part of the celebration, Taylored invited card makers to create a card using their sketch.  This is the card that I designed  —

te photo

My card features the Raccoon “Little Bits” die (don’t you just love the little bits dies?).  The flower is from Mini Bloomers 2, and the stem is a Frantic Stamper die.  I used scissors and a paper trimmer to cut the banners, and the circles were cut using generic stitched circle and stitched scalloped circle stacks.  The “happy birthday” is a sticker.  I embellished the card with a pearl (colored yellow using a Copic marker), and 4mm rose gold sequins.  The patterned paper is from a 6×6 pad by Pebbles called Spring Fling.  I also used solid cardstock in black, white, green and gray.  Super easy!

Happy, happy birthday, Taylored Expressions — and many more!

Cheryl


January Calendar featuring Susan’s Garden – Whitepine Boughs & Pinecone dies

I’m working on a 2017 project — a beautiful calendar featuring the Elizabeth Craft Designs Susan’s Garden dies.  They are designed by Susan Tierney Cockburn, and are just gorgeous.

Today I want to share the January page, featuring the Garden Notes – Whitepine Boughs & Pinecone dies by Elizabeth Craft Designs  —

dscn1113

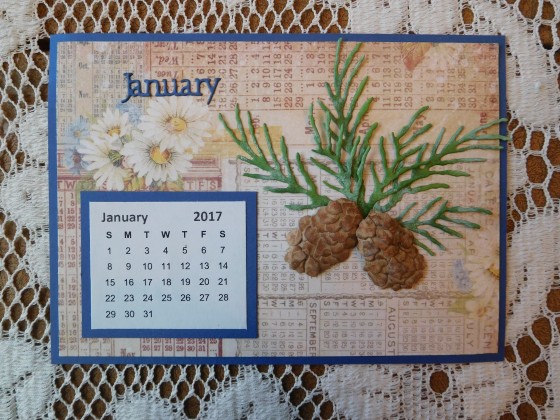
I chose the pine boughs and pinecones because January is normally a snowy month for us, and we don’t see a lot of flowers.  I can’t wait to work through the months and show you some of the beautiful flowers that are a part of the Susan’s Garden collection.  They are all just gorgeous.  It is going to be hard to decide which ones to use.

For the calendar, I began with a fun vintage calendar print background paper (this paper will be used as the background throughout the year).  I cut the sheet 4.5″ x 6″.  I layered it with a beautiful blue (a cold color, I know, but seemed to reflect January in the Midwest).  The background layer is cut 4.75″ x .6.25″.  The calendar page is one that I printed from the Internet — there are lots of different designs and sizes out there so it is fairly easy to find what you want to use for free.  I trimmed the January calendar to 1.75″ x 2″, and added a blue layer behind it 2″ x 2 .25″.  I cut the word “January” using a Tattered Lace die set.

Using the Whitepine die set, I cut several of the pine boughs and the pieces to make several pinecones.  I usually cut extra pieces so when it is time to do the layout I have everything I need.  Extra pieces can always be used later on a quick card, etc.  I used a medium green cardstock to cut three of the larger pine boughs, and three of the smaller ones.  I sponged these pieces with two colors of green ink to add some color and dimension.  Once I was happy with the appearance, I sponged on a little white ink to soften the branches.

For the pinecones, I began with kraft cardstock, and cut three bases and six sets of petals.  I added a little dimension to the pinecone bases and petals  using the Susan’s Garden tool set and a spongy mat.  I began at the bottom of each pinecone, and glued the petals in place.  Tweezers and a fine-tipped glue bottle help a lot in this process.  I love to watch how the pine cones come to life!  Once the pinecones were complete and the glue dry, I sponged on a couple of colors of ink to add color and dimension.

With all of the pieces cut and assembled, it was time to lay out the calendar page.  I began by attaching the background layer to the calendar print, and the January calendar to the blue background paper.  Then I placed the pieces on the calendar sheet, moving them as necessary to get the best layout.  I loved how the flowers,  a part of the background paper, seem to come to life on the calendar.  This was a happy accident!  My last step was to attach the pieces.  I tacked the pine boughs in just a few strategic places using liquid glue.  I wanted them to remain a little loose so that they have some movement.  I attached the pine cones using a low dimensional adhesive.  I wanted them to remain dimensional, but not raise too far off the page.  I used a dotted adhesive runner to attach “January”, and clear photo corners to attach the calendar (I want to be able to update it easily for 2018)..

I think that I will display the calendar using a small metal picture frame stand, however I could also frame it or place it on a clipboard, etc.  My main concern is finding the best way to display it without losing any of the dimension (this will become much more important in the coming months with some of the flowers).  I’ll show you what I decided on in the next post.

Thanks for joining me today.  Please stay tuned for future posts where I’ll show you how the rest of my calendar comes together.  I can’t wait to share more of the beautiful Susan’s Garden dies.

.Cheryl

Supplies used —

Elizabeth Craft Designs – Garden Notes – Whitepine Boughs & Pinecone die set

Tattered Lace – A Date to Remember die set

Assorted cardstock (the calendar cardstock is Blue Fern Studios Autumn Anthology – Balcony)

Assorted inks — I used Altenew inks (Evergreen, Forest Glade, Paper Bag and Dark Chocolate) and VersaMagic Cloud White.

Glue — I used Scotch Quick Dry tacky adhesive (I added a fine tip to better control the flow of glue)

ScorTape

Tombow dot runner (permanent adhesive)

Clear adhesive photo corners

Favorite Cards of 2016

We are almost ready for an exciting new year, 2017.  I want to look back at 2016 for a minute, though, and share a few of my favorite cards made during 2016.  These appear in no particular order.

Tattered Lace Sympathy Card — While it is always hard to make a sympathy card, it is somehow easier when you have beautiful dies to work with.  This card features Tattered Lace dies (Sentiments, Barley Grass and Praying Hands).

DSCN0840

Spellbinders A2 Bracket Borders One cards — The Spellbinders Card Creator dies often can be used to make super easy cards.  The card below features the Card Creator A2 Bracket Borders One die set.  These decorative edgings make gorgeous, yet simple, cards.

dscn0831

Penny Black Christmas Card — This gorgeous Penny Black stag die is such a wonderful focal point for a holiday card.  Here I paired it with a Memory Box tree cover-all die.  So peaceful, and so pretty!

dscn0897

Spooky Halloween Card — This card was so much fun to make.  First, it had been a while since I used the bleaching technique to create a spooky background.  Second, it reminded me that all of my various dies can be mixed and matched to create a fun card.  Dies used below include Sizzix (Tim Holtz Halloween handwritten sentiments), Taylored Expressions (spooky clouds and moon, bats), Impression Obsession (ghosts), Memory Box (spooky tree), and Poppy Stamps (pumpkins and gourds).  Too fun!

dscn1022

Marianne Punch Dies Card — While at CHA in January, a representative of Marianne Design pointed out the punch dies.  I fell in love with them immediately.  There are so many fun things that can be made using these little punched (die-cut) shapes!  I used a similar design for birthdays, anniversaries and Valentines’ Day.

dscn0416

Tattered Lace Wedding Card — Once again the beautifully detailed Tattered Lace dies just make gorgeous cards.  I love the simplicity of the Mr. & Mrs. (from the Wedding sentiments set), and the beautiful couple.  The background oval is also Tattered Lace.

dscn0846

Most of these cards appeared on the Cut at Home blog site during 2016.  Unfortunately that content is no longer available.  If you want to see additional detail on any of these cards, please leave a comment below and I will re-post the content to this blog site.  Videos for these cards are still available on my YouTube channel (search for Cheryl Harwick).

I can’t wait to do more fun cards and projects in 2017.  Watch my blog for more regular content and some give-aways.

Thanks for joining me for this look back at favorite cards of 2016!  I hope that you enjoy the remainder of 2016, and that your 2017 is awesome!

Cheryl


Favorite Projects for 2016

As 2016 draws to a close, I wanted to take the opportunity to share some of my favorite projects for 2016.  The projects are in no particular order.

Flutter by Butterfly — This project features an alphabet and beautiful butterfly stamp and die sets by Marianne Design.  The letter “b” is wood, and was painted.

dscn0751

Sunrise Lily Box — I just love the beautiful flowers in Heartfelt Creation’s Sunset Lily collection.  The box was purchased.

dscn0451

Kids Room Décor — Eline, a designer for Marianne Design, designs the cutest animals.  The letters “e” and “g” feature two of those animals — an elephant and a giraffe.  The letters were purchased decorated.

dscn0799

Lucky Letters —  More wood letters — seems like a theme for favorite 2016 projects.  These chunky letters were unfinished wood.  I painted them and rubbed a little gold on the edges.  The hats are from a Paper Smooches stamp set, “Hats Off to You”.

dscn0560

Easter Cross — The beautiful pansies on this cross are Garden Notes by Elizabeth Crafts Design.  They are a part of the wonderful Susan’s Garden Collection, and were so fun to make.  The cross was unfinished wood.  I painted it and wrapped it with the ivory twine for an interesting texture.

dscn0522

Paper Cone Angel — This paper cone angel was a project I designed for the last demonstration of the year at Bayer’s Pampered Stampers.  It was easy to create using just a little paper, ribbon, chenille stem, head bead and tulle.  The last demo is always a good time!

paper-cone-angel

Most of these projects appeared n the Cut at Home blog.  Unfortunately that content is no longer available.  The YouTube videos for the Cut at Home projects are still available on my personal YouTube channel (search for Cheryl Harwick).  I can duplicate the older blog post if needed.  If you are interested in a project, please leave a note in the comments below, and I will re-post it here.

Thanks!  Enjoy the remainder of 2016.  Watch for another post with my favorite cards  of 2016.

Cheryl

Two Sympathy Cards

Today I want to share two sympathy cards that I made for a friend — one from me personally, and one from former colleagues at work.  I think both turned out beautifully.

DSCN0840

DSCN0859

The praying hands card features Tattered Lace dies.  I just love how elegant and detailed they are, yet they are so simple to use.  I built this card around the patterned paper.  I just love the soft pattern that is there, and I thought it paired well with the plain ivory and the matte gold cardstock.  The praying hands are Tattered Lace’s “Praying Hands” die; the grass behind is Tattered Lace’s “Barley Grass”; and the sentiment is from the 2014 Tattered Lace Sentiments Set.  As you may know, Tattered Lace dies are wafer thin dies, so they work well in almost any die cutting machine.  Because of the stunning detail that is included, you do have to follow a couple of extra steps sometimes but it is easy stuff.  For example, I always start by running my dies through the die cutter going forward and backward (so it gets two cuts).  This is usually enough so that the die cut is flawless, and the pieces that should fall out (what are these called anyway?  I call them “chads”) fall out easily.

The card is an A2 card, so I cut the ivory layer 4.25″ x 5.5″; the gold metallic 4″ x 5.25″, and the patterned paper 3.75″ x 5″.  I attached the 3 layers together using ScorTape.  I attached the “with sympathy” die cuts with a liquid glue.  Before attaching the pieces of barley grass to the patterned paper, I sponged a little Tim Holtz Distress ink (Antique Linen) on them to pop them a little.  I tacked the barley grass in just a few places.  I always like some movement in that layer of the card (ultimately I used 2 large pieces and 3 small pieces).  I used a low dimensional adhesive to add the praying hands to the front.  I finished by adding a tied ribbon across the bottom.  Here’s another look —

DSCN0840

The flower card was also very easy to use  This time my inspiration started with a stamp set by Lil Inkers Designs called “Inky Flowers”.  I love the casual look of these flowers, and the stamps are just so easy to use.  The paper that I used for the top layer and the flowers is from a Momenta paper pad (8×8) that is all watercolor designs.  This beautiful watercolor paper made it so simple to make the card (otherwise I would have needed to create my own color wash)

I began by cutting a coordinating purple layer 4.25″ x 5.5″.  I cut a white layer 4″ x 5.25″, and the watercolor paper 3.75″ x 5″.  I attached the 3 layers together using ScorTape.  I stamped the main flower set on an extra piece of the watercolor cardstock, and also stamped a few of the smaller flowers to fill in.  I fussy cut all of the flowers to make them more useable.  I also die cut the “with sympathy” sentiment (also Lil Inker Designs) from white cardstock, and attached it the bottom of the card.  My next step was to lay out the flower pieces to determine how to best arrange them.  Once I was satisfied with the arrangement, I placed them on the card base using a low dimensional adhesive.  I found the beautiful bird in the jewelry section of Hobby Lobby (Fairy Tale collection), and simply removed the jump ring in the wing to make it lay flat on the card.   I used liquid glue to hold it in place.  My last step was to add the ribbon and embellishment..  There are some cute tulle and pearl picks in the wedding section at Hobby Lobby.  I pulled the pick apart and used just one flower for my card.  I really like the way it turned out.

DSCN0859

Sentiments for the inside of sympathy cards are always a bit difficult, but there is one unity set that I want to recommend to you.  It is called Beautiful Life, Blessed Memories and is the February 2015 sentiment stamp set.  Here’s a link.  There are a lot of different choices.  You’ll definitely want to check out this versatile stamp set.

Hope you enjoyed my cards today.  Hope you have a great week!

Cheryl


Anniversary Card featuring Tim Holtz Dies

t holtz anniversary

This is an anniversary card that I made for my Sister and Brother-in-Law for their anniversary celebration.  I also posted the card with tips and instructions on the Cut at Home blog on July 7th.  Here’s a link to that post http://www.ucutathome.com/blog/2015/07/07/anniversary-card-tim-holtz-dies/.  Detailed information on how I created the card is included there.

The dies that I used are the Handwritten Love die set and the Tiny Tattered Florals die set, both by Tim Holtz (Sizzix).  I think that what made this card extra special was the handmade, textured Japanese paper that I used for the card front (green) and the card base (ivory).  The words were also cut from the ivory handmade paper.  Handmade papers add such subtle beauty to a card — I love how they enhance it.  If you haven’t worked with the Tiny Tattered Florals yet, you will absolutely love them.  There are a number of flower styles and sizes to choose from — you just can’t go wrong.  A small quilling tool is included with the die set to make it easier for you to create the absolute perfect flowers for any project.

It is always hard to pick a card to enter into a challenge, particularly the World Wide Design Team Monthly Open Challenge.  This one is one of my faves, and I hope that you like it.

Thanks!

Cheryl

Summer Coffee Lovers Blog Hop

It’s almost the end of the Summer Coffee Lovers Blog Hop, and my entry is just under the wire (well, about 8 hours to go).  My card is a fun one featuring some of the stamps from the Crafty Secrets Coffee & Tea stamp set (clear sets now retired, but digis should still be available).

IMG_6300

I used some of my favorite paper for the card, Authentique’s Loyal collection.  Memento Olive Grove and Paris Dusk inks were a pretty good match to the blues and greens in the paper.  The solid colors I used are from the Tim Holtz Distress papers collection.  To perk up my card a little, I used my watercolor markers to add a little blush and lipstick to the percolator.  I attached the percolator and sentiment using dimensional adhesive (thin dimensional for the percolator; standard for the sentiment).  My embellishments are a little 1/4″ ivory ribbon and a couple of green rhinestones.  Oh how I miss percolated coffee!  It is just the best!

Graphic 45 Time to Flourish Standing Calendar

My Cut @ Home post on Tuesday was a cute little standing calendar featuring Graphic 45’s Time to Flourish paper.  I love how it turned out —

standing

Please check out my post on Cut @ Home for more pictures and details on how to complete this.  It is a super easy project, and way too much fun!  Here’s a link to that post — http://www.ucutathome.com/blog/2015/01/06/graphic-45-time-flourish-standup-calendar/

Thanks!

Cheryl

Featured Post – Paper Crafter’s Library Blog

I am so excited to be featured on another blog today, the Paper Crafter’s Library Blog.  My project is a Winter Birthday Card, and is made using some of my favorite dies.  Here is a picture —

winter bday

Please go to the Paper Crafter’s Library Blog post to view the project.  Also, if you leave a comment on that post (the PCL Blog), you will be entered to win a nice prize pack courtesy of Cut @ Home.

Here is a link to the PCL Blog post — http://blog.papercrafterslibrary.com/bonus-tutorial-from-cuthome-design-team-member-cheryl-harwick-and-a-give-away/

Thanks!

Cheryl

Top Cards of 2014 OWH Blog Hop

owh top 2014

As a part of the Operation Write Home Top Cards of 2014 blog hop, here are my top 14 favorite cards for 2014.  Not all were OWH cards, but most are OWH-friendly.  I’ve noted below if I think a card is not OWH appropriate, and why —

035

inset letters

april shower

sizz aster

painter

star

pirate ship card  Because of the die size, this is an A-7 card, so it is a little too big for OWH.

card

golf martini

pumpkin head

sunflower

card4

dove

st nick  St. Nick’s beard is flocked.  It would be better to do the card without flocking for OWH.


Thanks for joining me today.  I hope that you have a very happy 2015 — but for now, Hop on . . .  (here’s the link back  http://operationwritehome.org/top-14-of-2014-bloghop/

Cheryl