Today I want to share two sympathy cards that I made for a friend — one from me personally, and one from former colleagues at work. I think both turned out beautifully.
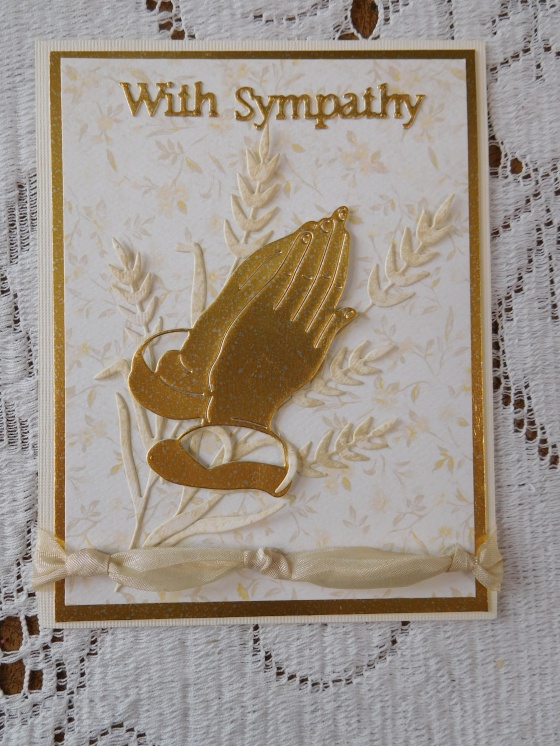
The praying hands card features Tattered Lace dies. I just love how elegant and detailed they are, yet they are so simple to use. I built this card around the patterned paper. I just love the soft pattern that is there, and I thought it paired well with the plain ivory and the matte gold cardstock. The praying hands are Tattered Lace’s “Praying Hands” die; the grass behind is Tattered Lace’s “Barley Grass”; and the sentiment is from the 2014 Tattered Lace Sentiments Set. As you may know, Tattered Lace dies are wafer thin dies, so they work well in almost any die cutting machine. Because of the stunning detail that is included, you do have to follow a couple of extra steps sometimes but it is easy stuff. For example, I always start by running my dies through the die cutter going forward and backward (so it gets two cuts). This is usually enough so that the die cut is flawless, and the pieces that should fall out (what are these called anyway? I call them “chads”) fall out easily.
The card is an A2 card, so I cut the ivory layer 4.25″ x 5.5″; the gold metallic 4″ x 5.25″, and the patterned paper 3.75″ x 5″. I attached the 3 layers together using ScorTape. I attached the “with sympathy” die cuts with a liquid glue. Before attaching the pieces of barley grass to the patterned paper, I sponged a little Tim Holtz Distress ink (Antique Linen) on them to pop them a little. I tacked the barley grass in just a few places. I always like some movement in that layer of the card (ultimately I used 2 large pieces and 3 small pieces). I used a low dimensional adhesive to add the praying hands to the front. I finished by adding a tied ribbon across the bottom. Here’s another look —
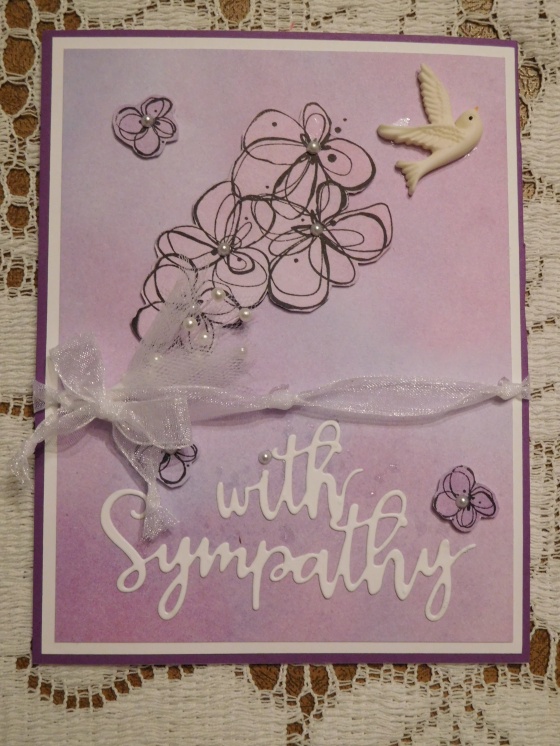
The flower card was also very easy to use This time my inspiration started with a stamp set by Lil Inkers Designs called “Inky Flowers”. I love the casual look of these flowers, and the stamps are just so easy to use. The paper that I used for the top layer and the flowers is from a Momenta paper pad (8×8) that is all watercolor designs. This beautiful watercolor paper made it so simple to make the card (otherwise I would have needed to create my own color wash)
I began by cutting a coordinating purple layer 4.25″ x 5.5″. I cut a white layer 4″ x 5.25″, and the watercolor paper 3.75″ x 5″. I attached the 3 layers together using ScorTape. I stamped the main flower set on an extra piece of the watercolor cardstock, and also stamped a few of the smaller flowers to fill in. I fussy cut all of the flowers to make them more useable. I also die cut the “with sympathy” sentiment (also Lil Inker Designs) from white cardstock, and attached it the bottom of the card. My next step was to lay out the flower pieces to determine how to best arrange them. Once I was satisfied with the arrangement, I placed them on the card base using a low dimensional adhesive. I found the beautiful bird in the jewelry section of Hobby Lobby (Fairy Tale collection), and simply removed the jump ring in the wing to make it lay flat on the card. I used liquid glue to hold it in place. My last step was to add the ribbon and embellishment.. There are some cute tulle and pearl picks in the wedding section at Hobby Lobby. I pulled the pick apart and used just one flower for my card. I really like the way it turned out.
Sentiments for the inside of sympathy cards are always a bit difficult, but there is one unity set that I want to recommend to you. It is called Beautiful Life, Blessed Memories and is the February 2015 sentiment stamp set. Here’s a link. There are a lot of different choices. You’ll definitely want to check out this versatile stamp set.
Hope you enjoyed my cards today. Hope you have a great week!
Tuesday was Mardi Gras, or “Fat Tuesday” so for fun I created this Mardi Gras card using Spellbinders Venetian Accents die. In certain parts of the country, that means a day of parades and masks and beads and lots of fun. In my part of the country, it is paczki day – a day to overindulge in a traditional Polish jelly donut like creation (paczki are actually richer and heavier than a jelly donut). Regardless of how you celebrate, I wanted to make a card to mark the occasion.
This is a very simple card, and of course you could dress it up more if you prefer. I started by making the components. The masks are cut from the really fun Spellbinders die set, “Venetian Accents”. This is a very detailed die, so you may need to run it through your die cutting machine a couple of times to get a complete cut. Using wax paper between the die and the paper will help a lot when it comes to removing the finished piece from the die. Be sure to do the embossing step. This will give the mask its wonderful detail. I cut masks from both green and purple cardstock. Once the masks were cut, I used “goldrush” Smooch Glitz to add the glitter on the center crown area. For the scrollwork at the sides, I used “lime twist” Smooch Glitz to add glitter. You may need to do several coats of both in order to get good coverage. Be sure to let each dry thoroughly before adding rhinestones to finish the mask. At this point you can also begin to think about shaping the mask – bending it gently with your fingers in order to achieve dimension for the card.
My next task was to string the beads. I used purple, gold and green “E” beads. These should be readily available in the jewelry section of your favorite craft store. “E” beads are larger than seed beads, so are quicker and easier to string. I made two strands of 36-beads for each color.
In New Orleans, the greeting for today is “laissez les bons temps rouler” – “let the good times roll”. That is the inspiration for the sentiment I used. I didn’t have an appropriate stamp, so I typed it into my computer, changed the font several times until I found one I liked, and changed the color of the letters to purple. When I was happy with the result, I simply printed the sentiment onto white cardstock.
I cut and assembled the following layers for the card front – 1) a green layer, 5” x 7”; 2) a yellow-gold layer, 4.5” x 6.5”; and 3) a purple layer 4” x 6” (note that this is a lighter shade of purple than I used for the mask – I wanted to be sure that the purple mask showed against the background). I used Scor-Tape to attach the layers. I used a combination of Scor-Tape and low dimensional adhesive to attach the masks to the card front. I placed the adhesive on the back of the mask, and when placing the mask on the cardstock, used my fingers to push it into place (adding dimension, not flattening it). I used small drops of Scotch Quick-Dry Adhesive to attach the beads to the card front. The sentiment was attached with Scor-Tape.
Regardless of how you celebrate, I hope you have a great Mardi Gras!
Supply List:
Spellbinders Venetian Accents die set
Die cutting machine – I used my Spellbinders Grand Calibur
Purple, green and yellow-gold cardstock – two shades of purple, a dark one for the mask, and a lighter shade for the card front
The featured supplies are available at Cut at Home or from your local paper crafting shop. My fave is Bayers Pampered Stampers in Toledo, Ohio. Links for both are in my blogroll above.
Today I’m using a super-fun die by Die-Versions, “I {Heart} You Animals”. This single die can be used to make at least eight different animals – a lion, a dog, a cat, a bear, a pig, an owl, a monkey and a cow. How fun is that! I really think that with a little creativity, you can probably come up with even more animals by mixing and matching the parts, changing colors, etc. Any of the animals would make a really cute children’s card for a birthday or any occasion – even an “I love you.
The Die-Versions dies are thin metal dies, so you can use them with almost any die cutting machine. I chose my SizzixBig Kick because it is well-suited to heavy-duty cutting. With even my heaviest papers, I was able to cut at least two layers at a time (so I could cut both feet at the same time by stacking the two scraps together, etc.). This saves a little time, and gets me to the fun of assembling the animal faster.
There are a couple of ways you can approach using the die. You can select an animal and the colors of cardstock needed to make it. You might then cut a full sheet of “parts” for each of the colors needed (for some of the colors you would have to cut two full sheets to get enough parts), and then only use the parts you need for the selected animal. The left over parts can be held and used on another card. I think the better way to approach it is to just use your scraps to cut only the pieces that you need for the selected animal. For example, a 2-1/4” x 3” scrap is an appropriate size for the heart, a 2” square for the head, 1” squares for the feet, etc. If you use this method, it really takes very little paper to assemble any of the animals. If you lay the scraps on the die carefully, you can cut most of the parts needed for an animal in one pass through the die cutting machine.
If little pieces tend to make you crazy, note that the eyes and the paw pads, etc. are made from small circles. If you have small circle hole punches (1/8”, ¼”, 3/16”, etc.) you may find it easier to just punch out the shapes needed rather than trying to wrangle the little circles on the die. You may also prefer to cut the larger white circle for the eyes and draw in the pupil with a black marker (a black Glaze pen would give a nice result). Markers can also be used if you want to create an animal with stripes (for example, a tiger cat, etc.). This is all optional – everything that you need is included on the die. Please see the short video for more tips on using the I {Heart} You Animals die.
To assemble the card, I first selected a patterned paper to place the animal on, and a coordinating base layer. I cut the base layer 4.25” x 5.5” (A-2 size), and the patterned paper 3-7/8” x 5-1/8”. I used Scor-Tape by Scor-Pal to attach the patterned layer to the base layer. The next thing I did was to lay the animal pieces on the card front to see how everything fits. When I was happy with the placement, I began to glue the pieces in place. I used Scotch Quick Drying Tacky Glue for the larger pieces. For the smaller pieces, a glue pen or a product called “Sticky Dots” will work best. Of course, you could also run the pieces through a Xyron before attaching them. For ears and tails, I also used some low dimensional adhesive to add a little dimension. Note that I added the sentiments to the hearts before I assembled the animals. Instead of the sentiments you could use stickers or other die cuts, etc.
There are many other fun ways that you can use this die. If you don’t want so much emphasis on the heart, you can cut the heart in the main body color, or replace the heart with an appropriate sized circle or oval. You could also assemble the animal separate from the card base and mount it using a wobble spring (imagine the “giggles” that will bring!). It is a very versatile die.
Supply List:
Die-Versions die “I {Heart} You Animals”
Die cutting machine – I used my Big Kick by Sizzix
Assorted cardstock for the animals – scraps will work fine
Assorted cardstock for the card layers
Adhesives – ¼” Scor-Tape by Scor-Pal, Scotch Quick Drying Tacky Glue, glue pen, Therm O Web Sticky Dots, etc. You may also want a low dimensional adhesive such as Darice foam squares.
Sentiments or stickers – I used several of the new small stamp sets and bars by Heidi Swapp.
Ink – I used Versafine Onyx Black ink.
The featured supplies are available from Cut at Home or from your local paper crafting store. My fave is Bayers Pampered Stampers in Toledo, Ohio. Links for both Cut at Home and Bayers are in my blogroll above.
My next class at Bayers Pampered Stampers is on Saturday, February 15. We’re going to make five cards featuring the Color Block Cutting Plate die set by Taylored Expressions. This die set has so many possibilities. It has the basic frame for the blocks, as well as straight and scalloped elements that fit inside. It is just too much fun! Anyway, here are the cards that we’ll make —
There will be an alternative for the “It’s clear to see” card — a more masculine version featuring “guy” glasses, balloons, and a happy birthday sentiment. Your choice of which to make.
The cost for the class is $15.00, and it begins at noon. If you want to attend, be sure to pre-register at Bayers (the link is in the Blogroll above).
Friday is “red dress” day, and I wanted to make a Red Dress Card as a reminder of the importance of women’s heart health. Heart disease is the NUMBER ONE killer of women! It is often a silent killer (our symptoms are quite different from those that men experience). Heart disease kills 1 in 3 women! So, can I ask you to do three simple things? First, talk to your doctor about your heart health and ways to maintain and/or improve it. Second, remind other women of this silent killer and urge them to take steps to reduce their risk factors. Finally, wear something red on Friday to show your support and help spread the message. For more information on women’s heart health issues and the Red Dress (or Go Red) campaign, please visit the American Heart Association’s website at http://www.heart.org.
My card is a simple one. The dress is cut using Spellbinderdies, “Decorative Dress Forms“. The heart behind it is cut using SizzixScallop Hearts #2, embossed with a heart embossing folder by The Paper Studio, and sponged with a little “Love Letter” ink by Memento. The patterned paper is cut 3-7/8″ x 5-1/8″, and the red background layer is 4.25″ x 5.5″. The pink heart embellishment on the dress is a Doodlebug heart pearl (cupcake). The sentiment is from Our Daily Bread, and is stamped and sponged with Memento Love Letter ink. I used 1/4″ Scor-Tape by Scor-Pal and low dimensional adhesive to attach the elements.
Please take care . . .
Supply List:
Spellbinders Shapeabilities dies – “Decorative Dress Forms”
Sizzix Framelits dies – “Scallop Hearts #2”
Die cutting machine – I used my Spellbinders Grand Calibur
cardstock – red, patterned, white
Embossing folder – I used a heart pattern by The Paper Studio
Sentiment – I used Our Daily Bread “Be Joyful”
Ink – I used Love Letter by Memento
ribbon
Pink heart embellishment – I used a Doodlebug pink pearl heart (color is “Cupcake”)
Adhesives – 1/4″ Scor-Tape by Scor-Pal and a low dimensional adhesive (I used Darice squares)
The featured supplies are available from Cut at Home or from your local papercrafting store. My fave is Bayers Pampered Stampers in Toledo, Ohio.
My card today is a Love Card. I absolutely LOVE the die I used for the card. It’s a Hero ArtsFancy Die, “Love and Heart”. This die is perfect for use with glitter. Valentines’ Day is just a month away, and I always think of glitter when I think of Valentines.
The first step for this card was paper selection. I needed to figure out the layers and colors involved in order to pick glitter, etc. I found a patterned paper I liked (the pink with red hearts), and added the coordinating white and dark red Bazzill cardstock. I trimmed my dark red layer to 4.25” x 5.5”, and for the other layers, I used dies from the Spellbinders Nestabilities A2 Distressed Edges die set. Layering is just so easy when I use the Spellbinders Card Creator dies! I used the largest die for the pink/red heart layer, and the next smallest die for the white layer. I embossed both layers to get the full edging detail.
The glittering technique I used for this card is the shipping tape (or packing tape) glittering method. If you haven’t used this technique before, I recommend that you start with something small like the heart from the Hero Arts die set (as illustrated in my video below). It’s an easy technique, but can take a few minutes to get it right. You’ll want just a regular shipping tape for this project. For some reason, the heavy duty tapes don’t work very well for this.
The first step is to create (or cut out) the area to be glittered. I used the Hero Arts Love and Heart die to cut both images from the white card layer. Before I cut, I centered the die carefully, and then I was careful to keep all of the cut pieces. You can see from the attached photo that it would be possible to just glitter the opening created by cutting the die – the word is readable, etc.
Instead I wanted to add back some of the detail from the letters and the center of the heart, etc. to end up with a more delicate glittered result. So I placed the cut word and the heart outline (those parts you would normally cut and use on the card) in my scrap box to be used on another project. I kept in the project area those parts that would normally be recycled and not used.
Now it’s time to add the tape. Cut a piece of shipping tape approximately the size of your cut piece, and carefully apply it to the back of the cardstock. It is important to keep the tape flat – no wrinkles or bubbles, etc. – and to keep your fingers off of any area that is to be glittered (the glitter won’t stick if your fingers touch it). One piece of shipping tape may not cover the entire cut area, so you may need to carefully apply another piece of shipping tape. I needed two pieces of tape to cover this image. It is okay to overlap these pieces of tape – it won’t show in your finished project. The tape is really the hardest part, and the one that can take a few tries to get it right. You just need to find a comfortable position, etc.
Once the tape is in place, carefully trim any excess from the edges – again the hard part will be keeping your fingers off of the area to be glittered. Place the piece to be glittered, sticky side up, on a piece of scrap paper. You’ll need to use something nonstick (a liner from Scor-Tape, a shipping label liner, etc.) to press around the cut edges and make sure they are firmly in place. Any gaps here will allow glitter to get under and raise that part of the cardstock. My favorite thing to use for this is a real low tech option – just cut a longer (5-6”) piece of the shipping tape and fold it in half. Be sure to press around all cut edges and do a good job of making sure the tape is stuck. If you’re going to add back some of the cut-out shapes from the letters, etc. this is the point where you want to do that. You can either do it with your fingers, or with a pair of tweezers. Either way, keep your fingers or tweezers off of the sticky surface. You’ll just kind of drop the inset piece, and it stays where it lands – you can’t really easily reposition it. Once all of the inset pieces are in place, you’ll take your nonstick tape, etc. and press the inset pieces into the tape. Again the goal is to avoid gaps.
Now you’re ready for the glitter. I used a micro fine glitter for my project. It’s very different from the chunkier glitters we used as kids. I prefer to just use my fingers to pinch a little out of the bottle and sprinkle it over the tape. Some people prefer to use a small spoon for this (you can purchase a glittering spoon, or just use one of the cute little appetizer spoons that you’ll find in the grocery store). You don’t need to bring a lot of glitter out of the bottle – just try to give a good even coverage over your image. Then use your finger to pat down the glitter into place, focusing on pushing it toward edges and corners, etc. so you have good coverage. Once the area is covered, shake off any excess glitter on to a piece of scrap paper (use copier weight paper, etc. so you can bend it and easily transfer the excess glitter back into the bottle). I find it helpful to use a soft brush to brush off the excess glitter from the project and the scrap paper, but you can also use a soft cloth or cotton ball, etc. When I shot the video, I forgot my brush. This is a picture of the kind of brush that I use.
The last step is to rub over the image with your finger – called burnishing. This step is very important, and brings back the sparkle of the glitter. After burnishing, you’ll want to do one more pass with the brush to get off any additional excess glitter that was loosened. That’s all there is to it. Keep in mind that sometimes the micro fine glitters can be a little transparent, so it may not look like you have much glitter in place. When you lay the glittered paper on a white surface, etc. you’ll see that the glitter is there and looks perfect. It’s just a more subtle effect than the chunky glitters. Please see the short video for a demonstration of the technique.
Once the glittering was done, I assembled card. Before attaching the layers with Scor-Tape by Scor-Pal, I sponged a little color on the edges of the white cardstock. I used Angel Pink and Love Letter Memento inks to do this. I added a narrow (1/8”) sheer white ribbon and bow. I wanted the embellishment to be subtle, because I wanted the emphasis to remain on the word and the heart.
You can also use the shipping tape method to create an inset of the heart and the word “love” (instead of glittering), as shown in the photos below.
You’ll start the same as you did for the glittering technique, except that when you are cutting, you’ll also need to cut the word “love” and the heart in a contrast color. The pieces that you’ll use are the outline heart and the word “love” from the contrast paper, and the “scraps” from the matching cardstock. After you’ve applied the shipping tape, you’ll carefully lay in the heart outline and the pieces for the word “love”. The last thing you’ll do is to add back the scraps, or cut out shapes giving definition to the letters. Use the nonstick tool (folded over piece of tape or liner, etc.) to push the pieces into place and to make sure that they stick to the tape.
Supply List:
Hero Arts Fancy Die “Love and Heart”
Spellbinders Nestabilities A2 Distressed Edges Card Creator dies
Die cutting machine – I used my Spellbinders Grand Calbur
Cardstock – assorted solids and patterns
Ribbon/trim – I used 1/8” sheer white ribbon for the glittered card, and cranberry burlap string twine by May Arts on the inset card
Shipping tape – use regular weight, heavy duty won’t work well
Micro fine glitter – I used Glitter Ritz Opaque Micro Fine Glitter – cranberry
Paint brush (soft, fine bristle)
Scrap paper
Memento Angel Pink and Love Letter ink pads
You can purchase supplies needed for this project from Cut at Home or from your local paper crafting shop. My fave is Bayers Pampered Stampers in Toledo, Ohio.
We’re very near Christmas, so I wanted to share some Quick Holiday Cards. Several of the cards feature stamps from the beautiful Heartfelt Creations “Season of Joy” collection, and most use a background stamp.
Background stamps and other large stamps used to make me “cringe” because I often had trouble getting the stamp to work consistently and give a nice clear image. I’ve learned two methods that help with background stamps (or other large stamps), and I want to share those with you today. The first method is to use a “Mega Mount” acrylic block by Impression Obsession. This is a large clear stamping block with a handle. It has a very gentle curve on it, and really helps to facilitate stamping. To use it, you adhere your clear or cling stamp to the Mega Mount, and then be sure to cover the stamp fully with ink. This can be another problem in using large stamps — it is very important to keep checking and adding ink until all parts of the stamp appear “wet”. Then you turn over the Mega Mount and begin stamping at one end of your image, following the gentle curve of the block to the other end. You want to apply a firm consistent pressure, and this is usually easiest if you stand. Don’t rock the mega mount back and forth as this might result in a double-stamped image. One pass is sufficient if you keep the firm, even pressure.
The second background stamp technique is a brayer technique. Here you’ll place the cling or clear stamp on a large flat stamp block (if you don’t have a large enough stamp block, you can use one of the cutting plates from your Sizzix or Cuttlebug or Grand Calibur. The acrylic block should be placed on a flat, solid surface like a counter top or table. (Some people even feel comfortable placing the stamp face up on a work table with no block underneath.) The second step is to ink the stamp. Again you’ll want to be careful to add plenty of ink. Next, you’ll lay the paper you want to stamp face down on the inked surface. You can run a brayer over the paper, or run your fingers over the back of the paper — either with a firm, even pressure. The key is to make sure that the paper doesn’t move, so you have to hold it firmly in place with one hand while you use the brayer or your fingers to transfer the image.
I usually am able to get a good impression with large wood-mounted background stamps. (If you have problems, you can use the brayer technique described above.) I do have a problem lifting the stamp without dropping it, and spoiling the stamped image. To prevent this, I add a “handle” to the large wood mount stamp. This is done with packing or shipping tape. You’ll start the tape at one end of the wood stamp and run it to the center. Fold over the tape there to create a handle, and then run the tape to the other end. The tape handle is secure and you can use it to lift your stamp off of the stamped image — much easier than trying to get a good grip on a large stamp. Please see this short video for a demonstration of the two background stamp techniques and the stamp handle.
I began this card by stamping a snowflake background by Our Daily Breadin a very light blue ink (Memento Summer Sky). Next, I stamped a few larger snowflakes over the top of the background to add some dimension. The larger snowflakes are a stamp by Impression Obsession, and are stamped in Memento Danube Blue ink. (This technique shows very well on the card, but is somewhat hard to photograph. I tried to zoom in a little with the corner photo to try to capture an image of the light blue background.) I also stamped the featured quote (stamp by Impression Obsession) in Danube Blue ink. I chose a coordinating blue paper, and cut a 4.25” x 5.5” piece for the background, and a 2.75” x 3.75” piece to frame the sentiment. I trimmed the snowflake background to 3-7/8” x 5-1/8”, and the sentiment to 2.5” x 3.5”. I added a little 3/8” white velvet ribbon along the left side and bottom of the snowflake background paper, and then attached the background paper. I attached the sentiment to the smaller piece of blue background paper using Scor-Tape, and then to the snowflake background using dimensional adhesive. To finish, I added a silver snowflake (cut from a piece of May Arts satin cutouts ribbon), and a blue rhinestone in the center.
I began this card by stamping the “Christmas Story” background by Penny Black using Black Versafine ink on red paper. Then I used two stamps from the Heartfelt Creations “Season of Joy” collection – Striped Candy Cane and Christmas Poinsettia. I used Versafine Smokey Gray ink to stamp these to keep the images soft. I colored the candy cane image using colored pencils, and also colored three of the smaller poinsettias (you can select the right sizes based on the size of the poinsettia in the center of the candy canes). I hand cut the candy canes. The poinsettias can be hand cut or cut using a die (a Spellbinders die made for Heartfelt Creations, called “Sun Kissed Fleur”. To assemble the card, I cut a piece of black background paper 4.25” x 5.5”. I trimmed the stamped background paper to 4” x 5.25”, and attached the candy canes to it. I ran a narrow white satin ribbon across this layer, and added a bow slightly off-center, just beneath the poinsettia. I then attached the top layer to the black base. To finish the card, I added the top poinsettia layers, and curved the edges of the petals slightly to give the flower a little dimension.
This card also features stamps from the Heartfelt Creations “Season of Joy” collection. I used Christmas Poinsettia and Delicate Holly Swirls. I stamped the poinsettia with Versafine Smokey Gray ink, and the holly with Memento Northern Pine ink. I colored the three largest poinsettia images using Faber Castell Pitt pastel pencils, and I also colored the largest leaf set. I cut these out using the Spellbinders Sun Kissed Fleur die. I hand cut two of the holly images, and colored the leaves using colored pencil. My background papers for this project were both hand-made papers (by Jolees). The gold is cut to 4.25” x 5.5”, and the red is cut to 3-7/8” x 5-1/8”. I placed the two holly pieces on the paper first (they kind of “lock” together in the center), and then placed the poinsettia on top. I added red rhinestones to the holly to represent berries – it doesn’t show well in the photo, but I actually used two different colors of rhinestones to add some interest. Finally, I built the poinsettia by alternating the three layers of petals and then adding the leaves. I used yellow rhinestones to enhance the center of the poinsettia. Then I curved the edges of the petals slightly to give the flower some dimension, and I used a small piece of Scor-Tape to attach the poinsettia to the card front.
I began this card by stamping the background using an Our Daily Bread poinsettia background stamp. It is stamped with Crimson Versafine ink on kraft paper. I cut the sentiment from a set of holiday words from Die-Versions called “Holiday 1 Complements”. The poinsettia is cut using the Blooming Poinsettia die from Poppy Stamps. To assemble the card, I cut a background piece of deep red paper 4.25” x 5.5”. I trimmed the background poinsettia kraft paper to 3-7/8” x 5-1/8”, and attached the red mesh ribbon. I used Scor-Tape to adhere the poinsettia layer to the deep red background. I attached the “Seasons Greetings” using “Sticky Dots” by Therm-o-Web. I built the poinsettia, attaching the various layers with a glue dot, and curving the edges of the petal slightly to give some dimension. I finished with a small red rhinestone in the center. I attached it to the card front using a small piece of Scor-Tape.


You must be logged in to post a comment.